My Momma’s Chili

The day has finally come when I get to share with you one of my favorite recipes of all time. Now that it’s getting chillier outside, it’s time to make up a big pot of chili! I look forward to this part of the year practically all year long.

This my friends, is my momma’s chili recipe. She’s been making it for us since I can remember and it’s the best that I’ve ever eaten. It could be that I’m biased because, well, it is my momma’s. But I’m going to say that this isn’t the case because I’ve tried a lot of chili in my time. I even had the opportunity to go to Cincinnati recently and try the “world famous” Skyline Chili.  It was just ok to me. I don’t really understand the hype behind it to be honest.

Maybe I’m just a southern gal, but I like my chili to be extra chunky. It’s got to be hearty and fill me up and keep me warm. After all, what’s the point in eating chili otherwise?

I asked you guys on the Pennywise Cook Facebook Community recently if you enjoy your chili with corn chips or cornbread. I guess I should’ve included crackers because many of you said that’s what you eat yours with.

I have grown up eating chili with corn chips. I just couldn’t imagine eating chili any other way. They are like peanut butter and jelly to me. However, it was pointed out that this is almost more like a Frito Pie rather than chili. So if you prefer, eat your chili with whatever you’d like. Cornbread, crackers, corn chips, or nothing at all!

No matter what you eat your chili with, I highly recommend this recipe if you’re going to make chili. It’s full of flavor and perfect for a weekday or weekend meal. Plus a pot of this stuff will last you all week! That’s one of my favorite things about making up a big pot. We’ll have lunches covered for days. And because it’s so good, you won’t hardly get tired of eating it.

This is a crockpot-friendly meal, but I can assure you that it comes together rather quickly. The key is to brown your ground beef along with the onion, green pepper, and garlic. This saves so much time. Then it’s just a matter of heating everything else through.

You may never make another chili recipe again…

My Momma’s Chili
Recipe Type: Main Dish
Author: Pennywise Cook’s Momma!
This chili recipe is hearty and filling and may be the last chili recipe you ever make!
Ingredients
  • 1 lb Lean Ground Beef
  • 1 Onion, Chopped
  • 1 Green Pepper, Chopped
  • 3 tsp Minced Garlic
  • 28 oz Can Diced Tomatoes (undrained)
  • 6 oz Can Tomato Paste
  • 3 cans water
  • 15 oz Can Light Kidney Beans (drained)
  • 15.5 oz Can Pinto Beans (drained)
  • 3 Tbsp Chili Powder
  • 1 Tsp Salt
  • 1/4 Tsp Pepper
  • 1/2 Tsp Garlic Powder
  • 1 Tsp Cumin
  • Dash salt and pepper
Instructions
  1. In a large pot or dutch oven, brown ground beef along with onion, green pepper and garlic. Add salt and pepper to taste. Drain if needed.
  2. Stir in diced tomatoes, tomato paste, 3 tomato paste cans of water, kidney beans, pinto beans. Heat oven medium high for about 10 minutes.
  3. Stir in chili powder, salt, pepper, garlic powder, and cumin. Stir well and bring to a boil. Lower heat and simmer for about 5-10 minutes or until heated through.

Like this post? SHARE it!

Related Posts Plugin for WordPress, Blogger...

2-Ingredient Oreo Bark

How did your family do with the time change? Everyone enjoy their extra hour of sleep at your place? With 2 girls under 5, there was no extra hour of sleep here. They just don’t cherish that hour like we do. I even had a conversation with my 5 year old the other night about how mommy and daddy like sleep. She just couldn’t grasp why we would enjoy wasting so much time with our eyes closed. That whole conversation was a lost cause. It never really went anywhere and contained no resolution for her.

Sometimes it’s better to just not try and explain things to a 5 year old, huh?

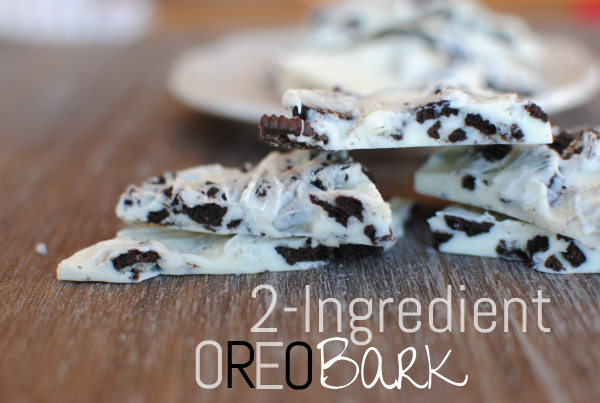
Last week, I had a hankering for something Oreo. I can’t ever bring myself to actually indulge in eating oreos, but I do like to make things containing them. Go figure. I had a package of white chocolate chips in the pantry and some individual packages of Oreos.

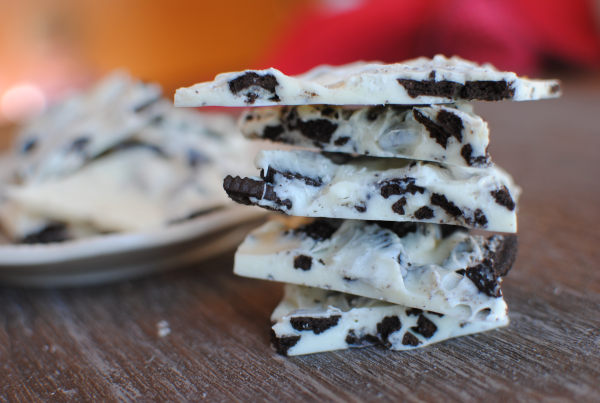
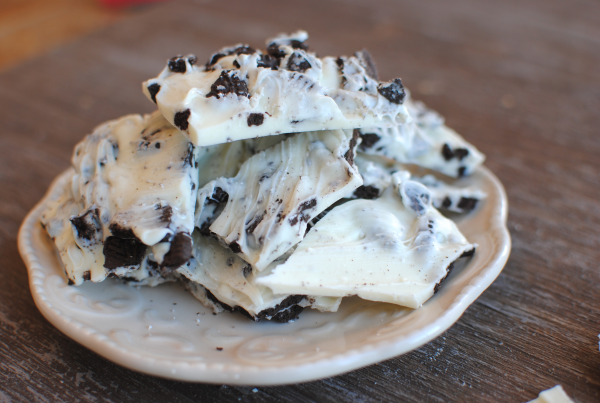
Can you say simple? That’s all that I needed to make this incredibly tasty candy bark. It took literally minutes to make and satisfied my Oreo hankering times 2.

I found myself eating so much of it that I sent it to work with the hubby. That’s my secret weapon, y’all. You notice sometimes I don’t always make “healthy” things. Those are usually the ones that I try to send away to a friend or to work with hubby.

It all starts with a cookie sheet covered in wax paper. Crumble up about 12 or so Oreos and lay them around the cookie sheet. Melt up your white chocolate chips and pour them over the Oreos. Smooth out and place in the freezer for about 10 minutes or so and YOU’RE DONE.

Does it get any easier?

This, my friends, would make a fantastic food gift for Christmas! Simple wrap it up in a fancy tin or treat bag and tie with a Christmas bow and you have one cheap and cheerful gift!

Who wouldn’t enjoy Oreo Bark?

2-Ingredient Oreo Bark
Recipe Type: Dessert, Snack
Author: Pennywise Cook
With only 2 simple ingredients, you can make a Christmas gift or tasty snack within minutes!
Ingredients
  • 12 or so Oreos (Crumbled)
  • 1 (12 oz) Package White Chocolate Chips
Instructions
  1. Line a cookie sheet with wax paper. Spread the crumbled Oreos around the sheet.
  2. Melt entire bag of white chocolate chips according to the package or in a double boiler.
  3. Once melted pour over the Oreo pieces and smooth out. Place cookie sheet in freezer for about 10 minutes and then break into pieces.
Notes

If you don’t have a double boiler to melt your chocolate chips, just use two sauce pans. Place hot water in the bottom one and the chocolate chips in the top. Bring the water to a rolling boil and melt the chips.


Like this post? SHARE it!

Related Posts Plugin for WordPress, Blogger...

A Challenge: 30 Days of Thanks

Today marks the very first day of November. Can you believe it? That means that Christmas is just 55 days away. But before we get into the Christmas spirit, it’s time to get into the thankful spirit.

While I’m thankful all year long, it feels right to make November the month of thanks. Every one of us is truly blessed in so many ways. Why not share your blessings with those around you?

For the next 30 days, I’m going to be posting on my personal facebook and Pennywise Cook twitter account 1 thing that I’m thankful for each day. I encourage you to do the same on your social media sites! We often see people posting about complaints and concerns throughout social media, but how awesome would it be to have a movement of folks sharing things that they are blessed with and spreading positivity?

If you do choose to share on twitter, you can use the hashtag #30DaysofThanks and join in on the fun! I’d also love for you to tag Pennywise Cook on twitter too! I considered sharing my thanks on the Pennywise Cook facebook page, but I was thinking it would be a little much for your facebook stream. What do you think?

At the end of the 30 days, I’ll come back here and post my 30 Days of Thanks for you to see them all.

Now go!

Tweet, facebook, Google+, Myspace, whatever you’d like your thanks for the next 30 days!


Like this post? SHARE it!

Related Posts Plugin for WordPress, Blogger...

Chili Cheese Pizza

If any of you, or those that you know, are being affected by Sandy, we are praying for you. I hope that you are safe. This is some crazy storm.

When it comes to chili, there are those that eat their chili with cornbread and there are those that eat theirs with corn chips. This might just spark a controversy. It’s hard to get someone to cross the line between chips and bread when they have been eating their chili this way for years.

And then of course there are those who theirs with saltines or perhaps the Ohioans who eat theirs oven spaghetti. However you do prefer to eat your chili, I want to suggest that you try this awesome and SIMPLE recipe for Chili Cheese Pizza.

You may just have to convert to be a corn bread eater to enjoy this pizza. But I promise you, you won’t miss those corn chips.

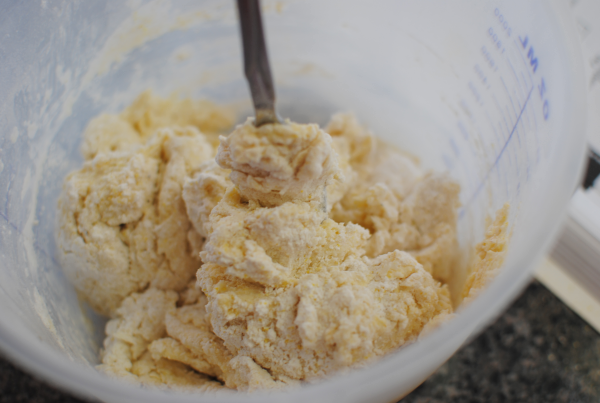
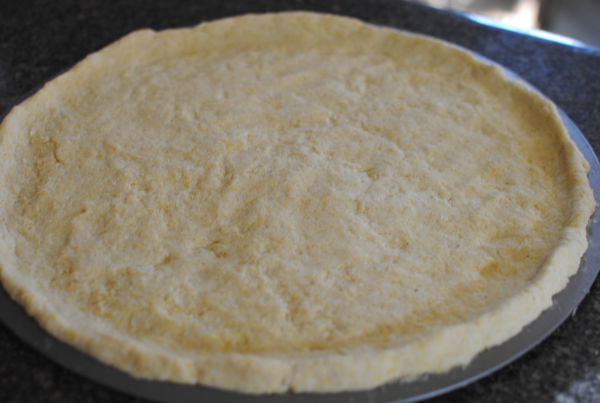
This recipe starts by mixing up a very simple cornbread dough that will be the crust of the pizza.

Roll it out and onto a pizza pan. The key to keeping all of the chili inside the pizza is to make ridges around the edges. Just take your fingers and squish up a ridge that goes all the way around.

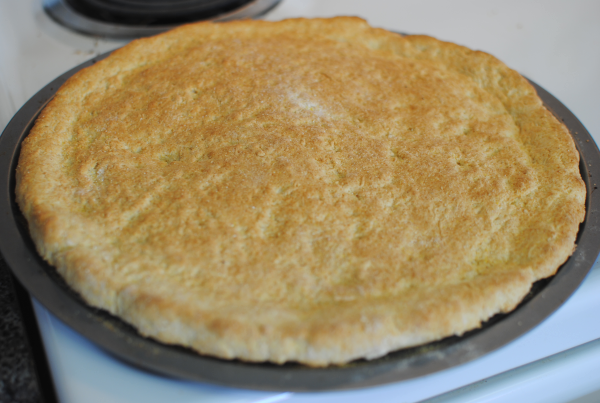
Once the crust bakes up, you’ll have a small ridge around the edges that will hopefully do it’s job and keep the yummy chili inside the pizza. This isn’t like a gigantic loaf of corn bread. It’s much flatter than cornbread and makes the perfect pizza crust.

Whipping up the chili part is really simple as well. When I first read over this recipe, I didn’t get the impression that this was going to be chili. The recipe seemed to go a different direction. But once I made it and tasted, it’s just a very simple chili recipe. It includes taco sauce which I’ve never put in my chili, but turned out pretty good.

Place all of that incredibly tasty chili over your homemade pizza crust.

It’s already looking like heaven on a pizza pan…

Cover that chili with mounds of cheese. No, NOW it’s looking like heaven on a pizza pan…

Oh. Em. Gee. When it comes out of the oven, it is nothing short of an amazing site. You’ve got your corn bread, chili, and cheese all in one place. No spoon needed! Just the two utensils that God blessed us with…your hands!

You may eventually need a fork to capture those pesky beans that try to get away from ya. But this pizza can mostly be eaten just like a regular pizza. And it is oh so tasty!

Oh yes, and P.S.-

Recipe from Butter Busters Cookbook.

Chili Cheese Pizza
Recipe Type: Main Dish
Author: Butter Busters Cookbook (1994)
No need for a spoon, this Chili Cheese Pizza has it all in one piece of pizza!
Ingredients
  • 1 cup + 1 tbsp Cornmeal
  • 1 and 1/2 c. Flour
  • 1 tbsp Baking Powder
  • 1/2 tsp Salt
  • 3/4 c. Milk
  • 1/4 c. Melted Butter (light)
  • 1 (12 oz) jar Taco Sauce
  • 1 can (15.5 oz) Milk Mexican Style Chili Beans (undrained)
  • 1/2 lb Ground Turkey
  • 1 can (4 oz) Green Chilies (drained)
  • 2 c. Reduced-Fat Shredded Cheddar Cheese
Instructions
  1. Preheat oven to 450°. Spray a 14″ pizza pan with non-stick cooking spray. Sprinkle the 1 tbsp of cornmeal all over the pizza pan. Combine 1/2 c. cornmeal, flour, baking powder, and salt in a medium bowl. Add the milk and melted butter. With a fork, stir until the mixture starts to form a ball. Remove the dough from the bowl and press into pizza pan. Shape the edges to form a ridge around the outside. Bake for 15 minutes.
  2. Meanwhile, cook the ground turkey in a microwave for 5 minutes on high. Take out and stir. Cover and cook for 1-3 minutes more. Drain off any excess fat. In a bowl, combine turkey, beans, green chilies, and taco sauce. Pour mixture over the cooked crust. Sprinkle the cheese over the entire pizza.
  3. Bake for 10 minutes or until the cheese is melted.
  4. Slice and serve!
Notes

The recipe calls for the ground turkey to be cooked in the microwave, but feel free to brown it in a skillet if you prefer. You could even do this step ahead of time to save time.


Like this post? SHARE it!

Related Posts Plugin for WordPress, Blogger...

Simple Sausage Mac

Are you ready for Halloween yet? Well you better get that way because it’s on Wednesday! Can you really believe that we have already reached the end of October? I’d really love for someone to explain to me where the rest of this month has slipped away to. Maybe I’m just getting old or maybe time is speeding up. Either way, I’m going to hold on tight.

The weather is finally starting to cool off around here. I absolutely love the fall. Well, let me just say I love being cozy. I hate being cold, but I love being cozy. I’ve got a bunch of warm and comforting recipes coming up that I can’t wait to share with you. The fall is really when I have the most fun cooking. You can make up a big pot of something that sticks to your bones.

One of the first “comfort foods” that comes to mind practically anytime I hear that phrase is macaroni and cheese. It doesn’t get much more comforting than that. I’ve seen mac & cheese turn a frown completely upside down! Especially when it’s homemade. The boxes are good, but homemade is better.

And you know that here in the south, macaroni and cheese is considered a vegetable at most meat and threes….

The only issue that I’ve ever had with macaroni and cheese is that it’s so good that I eat too much. Well that and the fact that it needs a little bulking up so that it can be worthy of being called a meal. After all, we wouldn’t want to make mac & cheese only a side dish. It’s worthy of being the main attraction with a little adjustment.

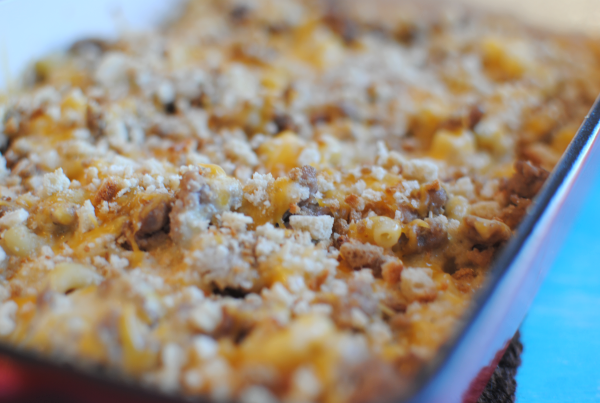
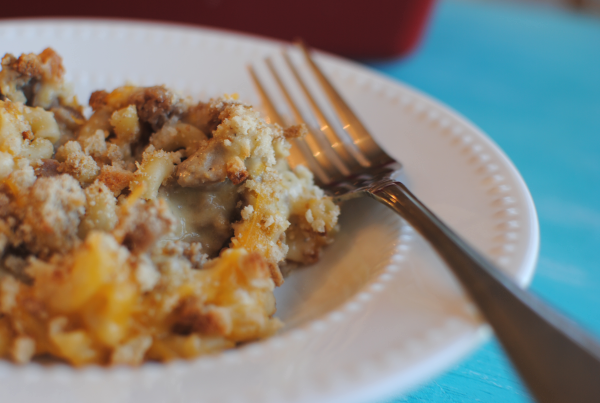
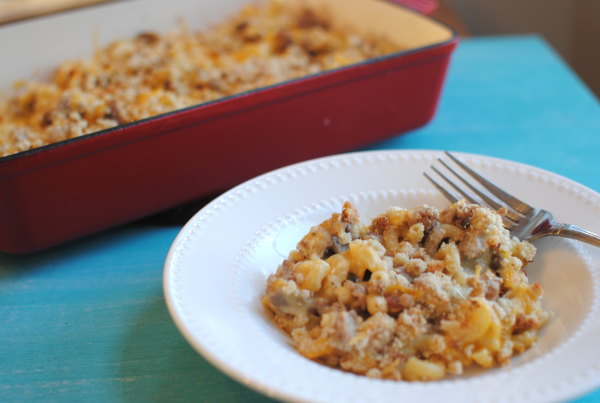
One of my favorite things about this macaroni and cheese is the secret topping. No longer a secret because I’m about to share it with you! We’re heading for Thanksgiving and there will be deals out the wazoo on stuffing mix. THAT my friend is a little something extra that can give macaroni and cheese a little spice. Breadcrumbs are great, but stuffing mix adds a little more crunch and even some nice flavor. I used Stove Top’s version for this. You can use whatever you’d like of course.

I bulked this up with sausage to give it a little flavor and to make it meaty. So yummy and extra comforting. I’d almost make this for a brunch!

Recipe adapted from Butter Busters Cookbook.

Simple Sausage Mac
Recipe Type: Side Dish, Main Dish
Author: Adapted from Butter Busters Cookbook
Bulk up your everyday mac & cheese and make it meaty. Perfect for dinner any night of the week!
Ingredients
  • 1 lb Turkey Sausage, Browned and Drained
  • 3 tbsp Melted Butter (light)
  • 1 and 1/2 tbsp flour
  • 1/2 tsp salt
  • 1/2 tsp pepper
  • 2 cups Skim Milk
  • 1 tbsp Melted Butter (light)
  • 2 cups Elbow Macaroni, Cooked
  • 1 tbsp Onion, Grated
  • 1/2 tsp salt
  • 1/4 tsp pepper
  • 2 cups Reduced fat Shredded Cheddar Cheese
  • 1/2 c. Crushed Cubed Style Stuffing Mix
Instructions
  1. Preheat oven to 350°.
  2. Combine 3 tbsp melted butter, flour, salt, and pepper in a small sauce pan. Slowly add skim milk and whisk well. Bring to boil, then lower temp until thickens. Set aside.
  3. Spray a 2 quart baking dish with non-stick cooking spray. Place half of the macaroni in the dish. Spread half of the cooked sausage over the noodles. Sprinkle half of the grated onion, salt, pepper, sauce, and cheese. Repeat layer. Drizzle 1 tbsp melted butter over top. Sprinkle with remaining cheese. Sprinkle crushed stuffing over the top. Cover and baked for 30 minutes. Then uncover and bake an additional 10 minutes.

Like this post? SHARE it!

Related Posts Plugin for WordPress, Blogger...

Extreme Cheapskates: Cheap or Crazy?


Creative Commons License photo credit: {ErinKphoto} aka redcargurl

Have you seen this new show Extreme Cheapskates? It’s on TLC, the same channel that also brought us Extreme Couponing. The premise of this show is people who live in extreme measures to save money. In all aspects of the word, they are cheap. My friend Tshanina at Thrifty T’s Treasures brought this up on her blog the other day and it got me thinking.

And just to get it out there, I myself am cheap. Sometimes I may be too cheap, according to my husband. 😉 I even have a $1 philosophy that I used to live by when I was hardcore couponing. I still have lingering symptoms of this. It’s basically where I have trouble paying over $1 for anything. I’d prefer that everything be less than $1. And with coupons, it’s actually quite possible most of the time. But now since I’m *cough* not couponing as much these days, it’s not realistic to live by that philosophy anymore.

I am coming to terms with this. 🙂

When I first heard of this show, I thought oh these people are going to be the ones who take Sweet ‘N Low packets at restaurants. Well, yes they do that. However, what I also witnessed that they do was beyond something I’d ever imagine.

Most of these people actually HAVE money. There was one guy on there bragging about how he had over $100 thousand dollars in his bank account and yet, he did not even own a couch in his living room. They sat at a card table (the only piece of furniture in the room).

Another lady was a millionaire and yet peed in a bottle to save money on water. This same millionaire also dumpster dived for her food.

Anywho, I guess what I’m getting at is that I think this show justifies that I am not in fact, crazy cheap. THEY are cheap. And extremely at that.

What do you think? Have you seen the show? What do you think about their methods of saving money?


Like this post? SHARE it!

Related Posts Plugin for WordPress, Blogger...

A”Door”able Hall Tree

Do you have a spot in the house where everyone leaves their stuff? Perhaps the entryway or foyer area. In my house, the living room and kitchen are the drop zone. We come into out house through the garage and on the way to the living room, we tend to expel our belongings as we go. And by we, I mainly mean the children. One of our biggest problems is finding shoes. Yes, I know this may sound silly to some, but for some reason my Addie likes them off the very moment that she arrives at home. This isn’t one of those “Take your shoes off at the door” kinda situations.

We have hard floors.

This leads to shoes that go missing. Under the couch. IN the couch. Around the couch. Under random toys. IN random toys. You name it, we’ve probably found a shoe there. So I wanted an easier solution for keeping the family’s shoes in one place.

I originally wanted one of those storage benches with matching shelf and hook above. I spent countless hours on Pinterest looking for ideas. I even found a few that I liked, but I cannot justify paying the price for those sets. Many are upwards of $300-$500. Then I came across numerous ideas for hall trees made from old doors on there. What a genius idea, huh? Plus this gave me a reason to visit one of my favorite stores on earth, Habitat Restore! That place is brimming with old building materials, paint, light fixtures and all for awesomely affordable prices.

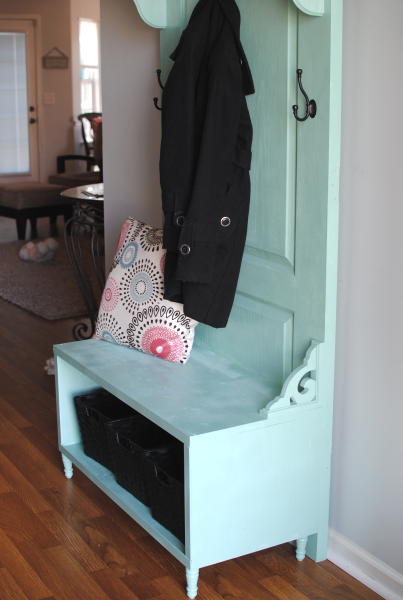
This is my creation! When I started, I really had no idea what it was that I wanted to do with this door. I knew that I wanted to have a bench, a place for bins, and hooks. I didn’t even have plans for HOW this was going to occur. I kinda just winged it to be honest.

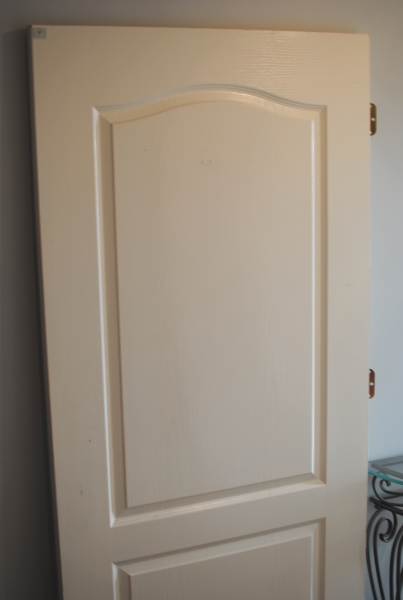
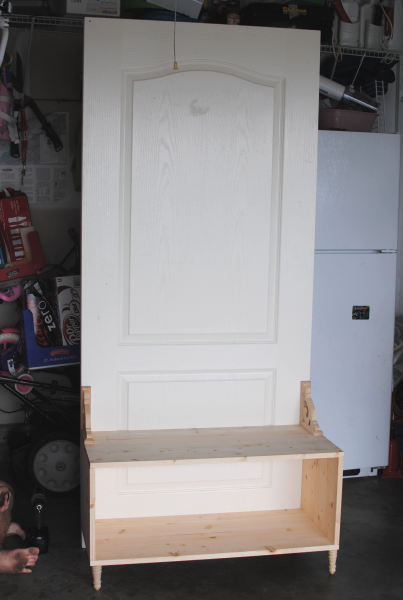
It all started with this door. I liked this one because it was really wide and in great shape. No big scratches or gauges. It only set me back $25 bucks.

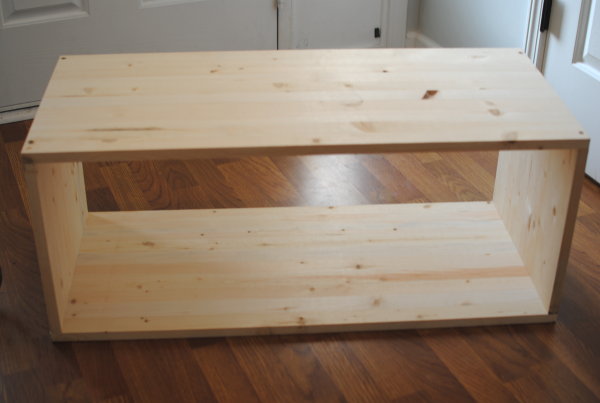
Knowing that the bench wouldn’t need a back (the door is the backing), I knew building the box for it would be fairly simple. I measured the door and the estimated height that I would want the bench and created this box that is 36 inches long and 13.25 inches high. We used a drilled to screw the boards directly into each other.

The wood for this cost about $14 at Lowes.

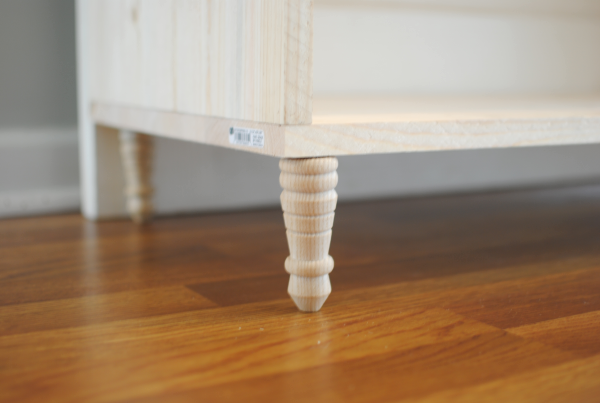
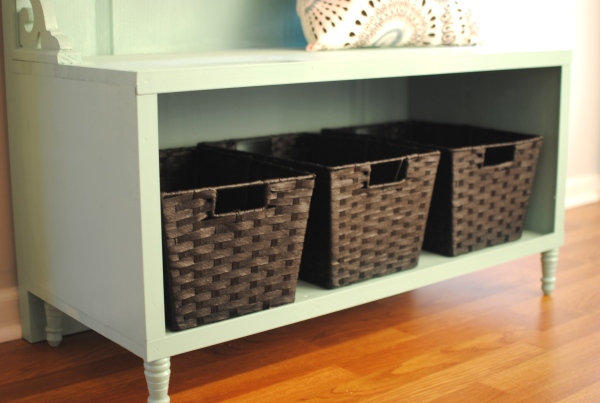
I also knew that I wanted to have sweet little spindle feet on the bottom of the hall tree to dress it up. I found these 3.25 inch feet at Lowes for $1.47 each for a total of $5.88. I had really only planned to have the 4, but hubby brought up that it might be more sturdy to do ahead and put on 4. It didn’t look as silly as I was expecting it to look once we got them on. Though next time, I’d probably go for thicker legs.

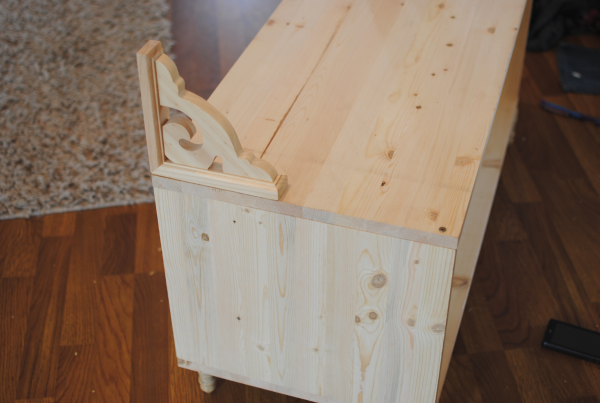
Then it was time to dress the bench up a bit. I got these exterior house accessories at Lowes as well. Not exactly what I was hoping for, but they made nice and delicate arm pieces for the bench. They were a whopping $8.50 each for a total of $17 bucks.

Then we attached the bench to the door using long wood screws through the backside of the door. This included one each directly into the pretty little arms.

This picture is absolutely horrific, but you can see that we added the shelf on top. We didn’t make this as wide as the door, leaving a couple inches on each side. I used wooden shelf pieces to give it some pizazz. The shelf was around $11 total including the support pieces. They were surprising inexpensive!

I knew that it had to get difficult at some point and this is where it did. Getting the shelf to line up perfectly with the screws in the back was the hardest part. In the end, we didn’t do it perfectly and the shelf is not flush on both sides, but it holds and we aren’t very concerned about it. You’d have to be looking to really notice it.

We also added framing around the bench’s opening to finish off the edges a bit. I simply got a thin framing piece and we cut with a handsaw to fit, then tacked it on. It gives the box a sort of “lip” around the edges. I also primed and painted at this point. I used paint that I found at the Habitat Restore. I got a gallon of this beautiful aqua/greenish color for just $4!

Then came the finishing touches. I splurged on these hooks at Lowes for $4.50 each for a total of $13.50. I really didn’t want to spend that much on simple hooks, but I liked the color and knew that I wanted the bins to be dark like this too.

Now for the biggest function of this hall tree—bins! I got these smaller bins at Lowes for $7 each or $21 total. They look wicker but are an eco substance that mimics it. Nice and durable for the ravaging that our family might put them through.

I am in love with this hall tree for many reasons. It was so easy to make, even for the wood-working challenged. We didn’t even have to break out a big saw. I love the color that we painted it. So cheery and such a beautiful accent to the entryway. And I love that it was completely custom and not out of a box.

Did I mention that I love its functionality? I have been working on making sure that backpacks get hung along with coats and purses. I also have a rule to make sure all shoes go in the shoe bins. Once the deep winter hits, we’ll also keep scarves and gloves here too.

And my fancy shelf? I can use it for more storage with smaller bins or maybe even just place a seasonal item up there like a pumpkin to be festive!

Yay for DIY! What do you think?


Like this post? SHARE it!

Related Posts Plugin for WordPress, Blogger...

Oven Roasted Pork Tenderloin

You don’t have to have read this blog for very long to know that I’m a crockpot girl. My life would probably be over if mine were to die or perhaps if I lost it. Don’t put the latter past me. I’m a scatter-brained mess. But there comes a time in every cook’s life when you have to do things the hard way. You know, in the oven or on the stove. And that’s alright, it’s not the end of the world. And sometimes, you can even create some really great things in the oven.

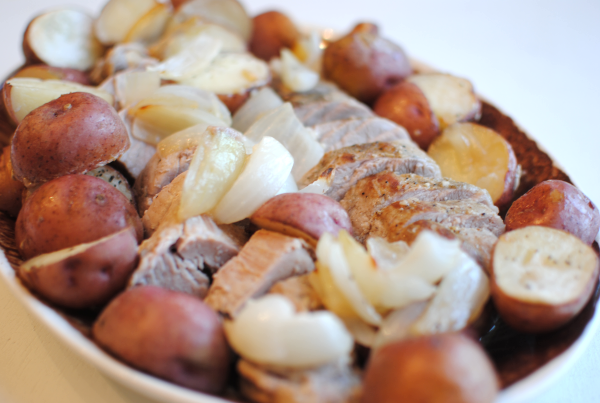
Like this amazing pork tenderloin for instance.

Need something to feed a crowd and make an impression? A pork tenderloin might just do the trick. Surrounded by roasted potatoes and onions, this meal looks fit for a king. Or whatever you prefer to call your husband!

There are probably thousands of ways to make a roast on the internet. You’ll find some wonderful recipes and you may even have your own tried and true recipe. This is my favorite version from the oven.

Sometimes I like to stuff my pork tenderloin with garlic and parmesan cheese. It breaks up the middle of the meat and adds a tenderness along with flavor inside. You simply butterfly the tenderloin and insert whatever tasty ingredients that you like. Now is also the time to season it up. I used rubbed sage, onion powder, and a drizzle of olive oil.

Confession: I haven’t worked very much with rubbed sage before. I’m not familiar with it’s pairings and flavor. However, the moment that I smelled it, I knew it would make a great seasoning for this pork and I was right! I really like rubbed sage.

Then use butcher’s twine, or sewing thread like I did, and tie it back up. Now you’re ready for browning.

Some say that this is the key to creating a perfect pork tenderloin. Browning the meat on the outside before finishing the inside in the oven. I’d agree with them on that. Most meats just have a tendency to look more appealing browned.

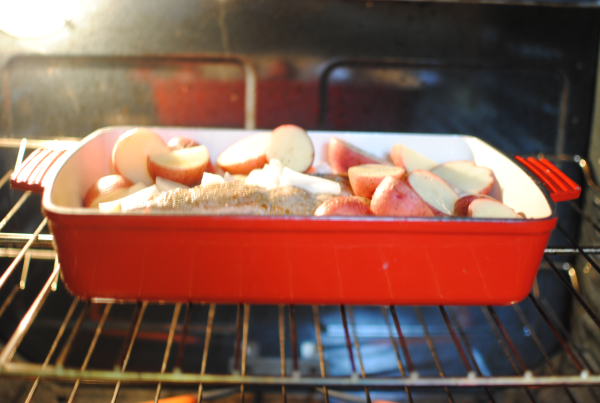
Chop up your favorite veggies. The sky is really the limit here. I made mine with red potatoes and large chunks of onion. You could also do apples and sweet potatoes. Root veggies taste wonderful with the flavor of the tenderloin. Place the meat into a baking dish surrounded by your veggies. Season the veggies and drizzle with olive oil. Or you can add a splash of white wine. I did both!

Pop it into the oven and let it go.

Turns out perfect every time! So simple and plenty to go around. I also wanted to point out that you can easily make a tasty gravy to pour over everyone’s slices! So simple and uses the juices from the roast with all that yummy flavor. See the recipe below.

Can you possibly go wrong with meat and potatoes?


Oven Roasted Pork Tenderloin
Recipe Type: Main Dish
Author: Pennywise Cook
You just can’t go wrong with mouth-watering, juicy pork tenderloin and roasted veggies!
Ingredients
  • 2 Pork Tenderloins (Most come packaged in twos)
  • 1 Medium Onion, Cut into large pieces
  • 8-10 Medium Red Potatoes, Cut in half
  • 4 Tsp Minced Garlic
  • 4 Tsp Parmesan Cheese
  • 1/2 Tsp Rubbed Sage
  • 1/2 Tsp Onion Powder
  • Drizzle of Olive Oil
  • 1/4 c. White Wine
  • Salt and pepper
  • For the Gravy:
  • 2-3 tbsp flour
  • water
Instructions
  1. Preheat oven to 400°.
  2. In a small bowl, combine minced garlic and parmesan cheese. (Should be paste-like) Set aside.
  3. To butterfly meat, cut a slit in the tenderloins lengthwise but not all the way through. Use a meat mallet to flatten each tenderloin. Fill each tenderloin with equal amounts garlic parmesan paste. Use butcher’s twine or thread (or whatever you have on-hand) to tie up your tenderloins.
  4. Heat a skillet oven medium high heat. Mix together rubbed sage and onion powder and rub the tenderloins down with them. Drizzle skillet with olive oil. Brown each tenderloin on each side for 4-5 minutes until just browned but not completely cooked. Remove and place into a large roasting dish.
  5. Arrange potatoes and onions (or veggies of your choice) around meat. Season with salt and pepper. Pour white wine over the entire pan.
  6. Place in oven and cook for 20-30 minutes or until internal temp reaches 165°. Remove from oven and let the meat rest for 10 minutes before slicing into pieces.
  7. For the Gravy (optional)
  8. Pour off the juices from the bottom of the roasting pan into a skillet. Heat and add flour, mixing well. Slowly add in water until desired consistency. Lower heat until thickened. Pour over meat.

Like this post? SHARE it!

Related Posts Plugin for WordPress, Blogger...

Simple Baked Risotto

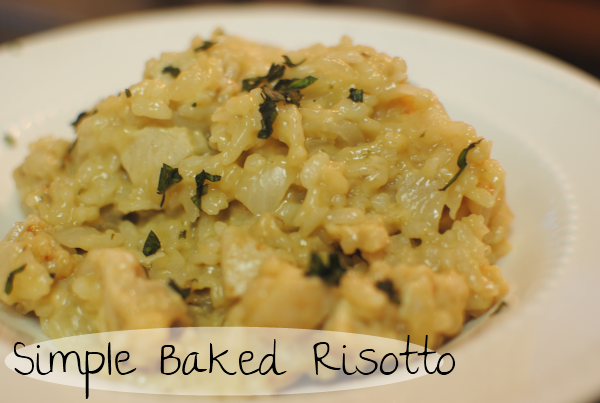
Please excuse the incredibly horrible picture. Once again, it was another night pic with horrible lighting. We’re going to have to start eating dinner at lunchtime!

Rewind back a few years. I’m sitting in my living room watching (a favorite of our’s) Hell’s Kitchen. Like most episodes, all I hear is screaming about the risotto. But in my head, I’m thinking what in the heck is risotto? Maybe I’m just a bit sheltered or perhaps it’s not common, but I had never ever heard of it before. To me, it seemed like a bunch of rice.

In reality, that’s really all that it is. Just a really creamy and rich Italian rice that has to be stirred a lot. Creamy you say? Yes, creamy because of cheese and broth. Are you listening yet?

It wasn’t until I took a trip to England that I got to actually enjoy a bowl of creamy risotto. It was at this glorious place that I got to try it. This is the Piazza inside the Corn Exchange in Leeds. It is one of the most beautiful places that I’ve ever stepped foot inside. Starting in the 1800’s as a place for the trading of corn, it’s now a popular shopping center with a fine dining restaurant down below.

This is a picture of the Smoked Salmon Risotto with Chargrilled Asparagus that I had when we ate there. Doesn’t it look divine? My risotto didn’t look quite as amazing, but it did make me reminisce a bit about my trip.

Here we were watching the changing of the guards at Buckingham Palace. One of the coolest experiences that I may ever have! I even messed with a few of the fuzzy-headed guards while we were there. In case you were wondering…..no. They did not move a muscle.

If I could, I’d be back in England in a heartbeat. So much history and interesting places to see. Oh yeah, and the food was incredible too!

Risotto is generally cooked in large skillet and tended to for a while. I just don’t have the patience, so I took the easy way out…..in the oven. The entire family loved it! I was complimented not once, but twice for this one (it’s a big deal at our house). The version that I made ended up being the main course since I put chicken in it. Though for many, it might just be a side dish. I did take a very big shortcut with this. I used Tyson grilled chicken cubes from the refrigerated section of the store. You could also use a rotisserie chicken if you want to pull it off the bone. Or perhaps just cook up your own chicken breast. Either way, chicken adds a meaty touch.

I don’t consider myself to be an expert at risotto (or anything dish at that, well maybe pb&j). I’ve got some perfecting to accomplish on this one for sure. But it sure is tasty work!

Recipe adapted from My Recipes.

Simple Baked Risotto
Recipe Type: Side, Main Dish
Forget stirring, whip up creamy risotto by utilizing the oven instead of your elbow!
Ingredients
  • 1 and 1/2 c. Arborio Rice (or other short grain rice)
  • 2 cups cooked and cubed chicken
  • 1 small onion, chopped
  • 2 Minced Garlic Cloves
  • 1/2 c. White Wine
  • 2 and 1/2 c. Chicken Broth
  • 2 tbsp Butter
  • 3/4 tsp salt
  • 1/8 tsp pepper
  • 1/2 tsp Italian Seasoning
  • 1/2 c. Parmesan cheese
  • 1/2 c. Mozzarella Cheese
Instructions
  1. Preheat oven to 400°.
  2. In a large high-sided skillet or dutch oven, melt butter. Place rice, garlic, and onion into pot and saute for about 3-4 minutes.
  3. Stir in the wine, chicken broth, salt & pepper, italian seasoning and transfer to the oven. Bake for about 30-35 minutes until most liquid has been absorbed. Remove from oven.
  4. Stir in the chicken and cheese until the cheese is melted. Serve immediately.
Notes

The texture should be creamy with a little liquid. Though mine ended up a bit sticky. Gonna work on it a bit more.

Have YOU ever made risotto, be it baked or the traditional way? I’d love to hear how it turned out!


Like this post? SHARE it!

Related Posts Plugin for WordPress, Blogger...

Candy Corn Fudge

I realize that those of you out there who don’t like candy corn are probably cringing right now. But luckily for you, this fudge doesn’t actually taste like candy corn. And for those of us who do like candy corn, you can make some of this for your candy corn-hater friends and keep all of the actual candy corn for yourself. With Halloween just around the corner now, it’s everywhere!

For Christmas last year, my husband got me 6 bags of candy corn. He got a stellar deal on them after Halloween and put them up until Christmas. He knows the way to my heart. 😉

True story.

And no, that’s not all that he got me. 🙂

This fudge isn’t for those watching their sugar. Or calories, or carbs at that. It’s high in everything I’m sure, but is a worthy splurge for the candy holiday. It also looks quite festive and makes a great party snack!

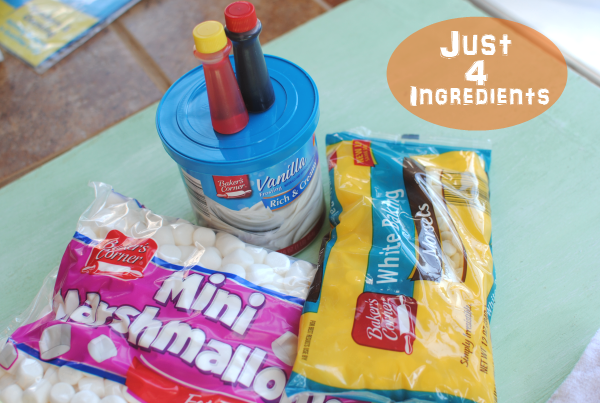
I can’t help but love this recipe because it only contains 4 simple ingredients. Needless to say that the steps are simple too! In total, it took me about 30 minutes, 1 dirtied mixing bowl, a dirtied measuring cup, and a major sugar high to make this.  When I say major sugar high, I mean I ate waaaaay too much of the ingredients while making it.

Learn from my mistakes and don’t do it if you want to eat any of the actual fudge. 😉

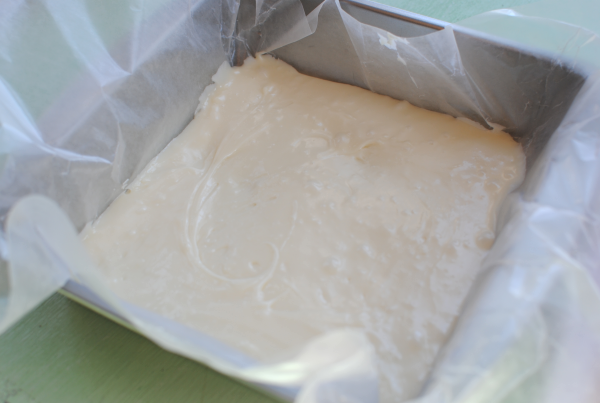
That’s a mix of white chocolate chips, marshmallows, and vanilla frosting. Who wouldn’t want to dive right into that?! This picture begins the layering process which is much easier than it sounds.

We’ve given the white a little time to cool and set and here comes the orange layer! It happens pretty fast.

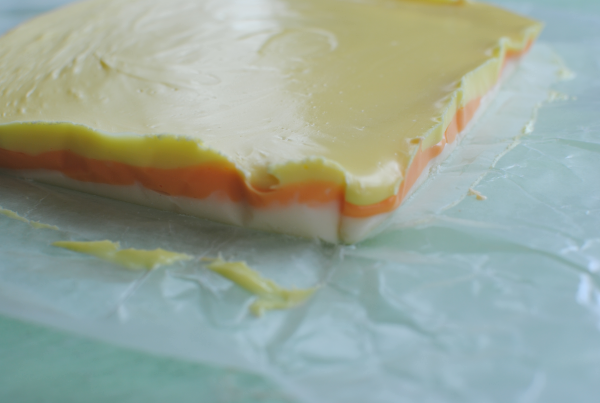
And after finishing up the layering, you’ll be proud that you decided to use wax paper because it makes it super easy to remove from the pan and cut into perfect little fudge pieces!

This would be a great fun fall snack to make with the kiddos. Stirring in the coloring is the best part, aside from licking the spoon. I’ve always got an eager spoon-licker around here.

Here’s how to make it!

Candy Corn Fudge
Recipe Type: Dessert, Snack
Author: Pennywise Cook
With just 4 ingredients, you can create fun and festive fudge that mimics the look of candy corn!
Ingredients
  • 1 Package Mini Marshmallows
  • 1 Tub Vanilla Frosting
  • 1 12 oz Bag White Chocolate Chips
  • Orange and Yellow Food Coloring
Instructions
  1. Line a square baking dish with wax paper.
  2. st Layer:
  3. In a large mixing bowl, place 3/4 c. white chocolate chips, 3/4 c. mini marshmallows, and 1/4 c. + 2 tbsp vanilla frosting. Microwave on 50% power for 30 seconds. Remove and stir. Return to microwave and heat for another 30 seconds. Stir and pour into bottom of baking dish. Smooth out to all of the edges. Place in refrigerator to set for 10-15 minutes.
  4. nd Layer:
  5. Place the same ingredients in bowl and microwave as you did the other layer. Add orange food coloring to melted mix until you reach desired color. Pour onto cooled and set white layer. Smooth out to all edges and return to refrigerator for another 10-15 minutes.
  6. rd Layer:
  7. Place the same ingredients in bowl (use up the rest of the white chocolate chips, but you may have some leftover marshmallows and frosting) and microwave as you did the other layer. Add yellow food coloring to melted mix until you reach desired color. Pour onto cooled and set orange layer. Smooth out to all edges. At this point, I place mine in the freezer for 10-15 minutes for it to set really well.
  8. Using wax paper, pull out from dish and cut into squares. Store in refrigerator to keep firm.

Like this post? SHARE it!

Related Posts Plugin for WordPress, Blogger...