This Makeover Has Hit the Fan {Before & After}

Let’s talk dust bunnies for a moment, shall we? Most people have them. You could clean out from under your bed, dust your blinds, and wipe down your ceiling fan blades daily and they would always come back. However, I must say that for some reason my house is haunted with dust monsters.

Or perhaps abominable dust bunnies would be a better description. I found this out when we decided to do a little makeover on our ceiling fans. We only have 2 of them in the entire house so I knew it wouldn’t be too difficult to update them a bit. I think the thing I looked forward to the most was finally getting rid of the dust. We’ve been in our house for almost 5 years and have never dusted our fan blades once. While I am ashamed of that statement, I can at least say that we have finally done it!

I knew I didn’t want to spend very much to update these fans. They aren’t in bad shape and don’t really look half bad, but I didn’t like their colors. We have a darker furniture thing going so that was our main objective. That and updating the globes. We updated both the bedroom and living room fans. Both looked exactly the same so consider this both before pictures.

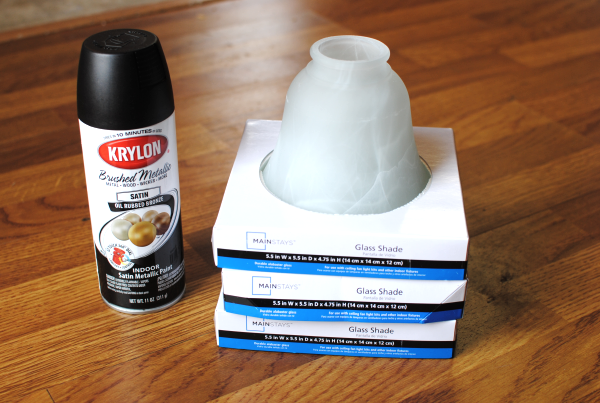
Surprisingly enough, these were the only materials that we needed to give them an update. I had originally planned to cover the blades in fabric to cover up the light colored wood blades, but when we got the blades down we found out they were reversable! And the other side was a darker color so there was no need to change them. Unfortunately they were a little red, but I’m going to try to deal with it for now.  Also, the fan pulls that we got to replace the old ones aren’t shown here, but we did get new ones.

Materials breakdown:

Krylon Oil Rubbed Bronze Spray Paint $4
Glass Globe Shades $5 x 3= $15
Fan Pulls $3 x 2= $6
Total Fan Makeover Cost: $25 

Not bad considering you’d pay at least double that for a new fan that looks like what we were going for.

Ceiling Fan Disassembly

Here’s Mr. Pennywise taking down the old fan. It was fairly easy to get down. We just had to make sure to remember what wires went where. Funny story, keep reading.

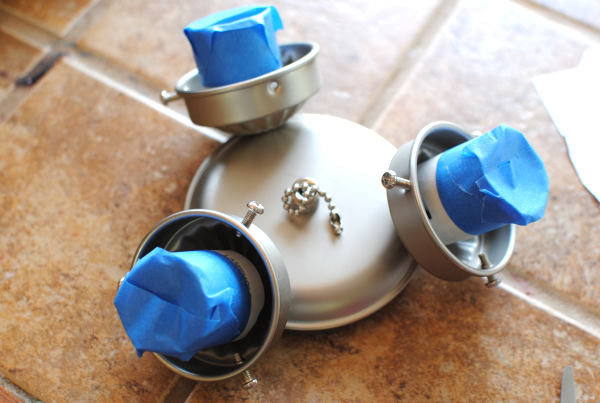
For most of the parts it was ok to just spray without a care in the world, but some places I covered so that the paint wouldn’t get inside the wiring or sockets.

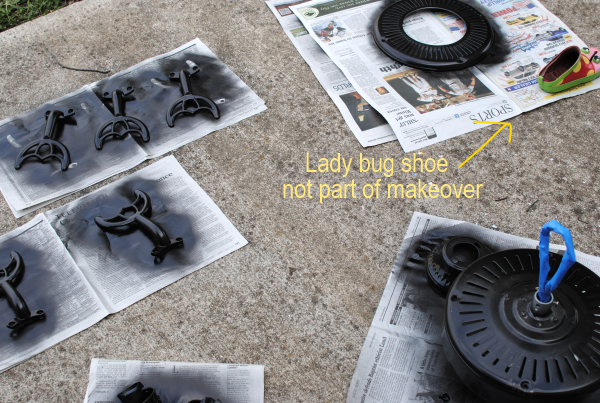
And the transformation was taking shape. I LOVE the oil rubbed bronze paint. It’s almost black but has a really great bronze tone to it that kinda shimmers in the sun. Just fabulous.

It was a super windy day and the lady bug shoe was very helpful to hold down the newspaper. 😉

And here is Mr. Pennywise reassembiling the fan. You can already tell it’s going to look a lot better! Just changing the color made a big difference.

And here is the finished product….

MUCH better huh? The glass globes together with the new color and fan blade color really does a lot. Looks like a whole new fan!

We did the exact same makeover on the Living Room fan only with different glass globes. When I saw these in the store I didn’t like them. I thought they looked wet and weird. However, they were out of the ones that I used in the bedroom so I had to get these or ones that were amber colored. I chose these and I’m glad I did! I really actually like this clear look with the bubbles. It reminds me of an Allen Roth ceiling fan that’s high end and would cost about $100 more!

If you are considering a ceiling fan makeoever be sure to check the other side of your fan blades. Who knows, maybe you’ll get lucky like me and save some cost in your makeover too!


Like this post? SHARE it!

Related Posts Plugin for WordPress, Blogger...

Cauliflower Chicken Fried “Rice”

We have this little Chinese buffet right around the corner from where I live that is all you can eat for $5.98. We’re talking lo mein, shrimp, wontons, those amazing Chinese donuts, and we mustn’t forget- chicken fried rice. That’s why I love those buffets, on occasion of course. Where else can you stuff your face until it’s time to unbutton your pants for just $5.98?

Or take it from me, just wear elastic pants next time…

Since I don’t go into the gut-busting buffets too often, I sometimes just make my favorite Chinese dishes at home. One of the easiest is chicken fried rice. I mean come on, it’s the perfect way to use up leftover rice and chicken. It makes one of those double duty meals that starts as one thing and turns into another. That’s a smart or shall I say, pennywise move.

Cauliflower is one of my favorite vegetables. Not only for it’s affordability, but for it’s taste and ability to pretty much adapt itself to any dish. Take for instance the Doughless Pizza Crust. Whodathunk that you could turn cauliflower into pizza and make it taste good?

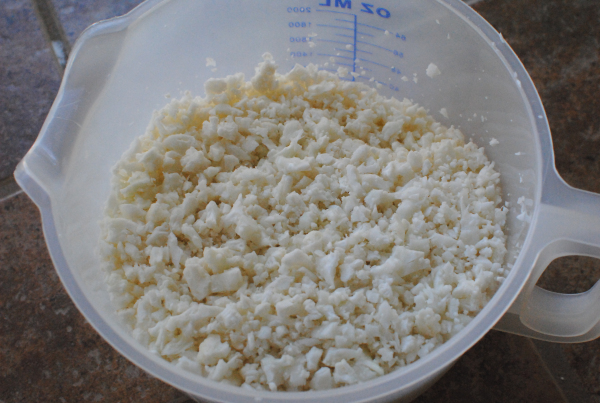
When you make up the “riced” cauliflower for the pizza crust, this is what it looks like. It’s basically very finely ground. It reminded me of rice. Hey! I wonder if that’s where the term “riced” came from? Ah yes, we are learning together here folks!

This brought me to  thinking about fried rice and how you could easily just throw some grilled chicken into the cauliflower and add some seasonings and such to make a mock chicken fried rice.

Voila! It totally worked! I did not even COOK the cauliflower before putting it in. I had originally planned to microwave it like you do with the pizza crust, but I got to thinking that might make the cauliflower too soft. I then decided to place it in the fridge for a little while to get it cold. I made the rest of the veggies and chicken and then added the cauliflower very last.

I tend to think in terms of calories. Weighing out the calories for the difference in rice and cauliflower, you’ll save about 168 calories per cup using cauliflower. And if you’re a carb person, the difference is a whopping 39 carbs less in a cup of cauliflower! So needless to say, it’s a healthier choice.

Don’t expect it to taste exactly like rice. That would require a magic wand, but this does come close if you ask me. Definitely as satisfying and scrumptious.

If you try this, PLEASE tell me what you think! I’d love to hear your thoughts as I just whipped this together the other night.

Cauliflower Chicken Fried “Rice”
Recipe Type: Main Dish, Side Dish
Author: Pennywise Cook
A healthier alternative to starchy rice, try this cauliflower chicken fried “rice” instead! You won’t miss the rice!
Ingredients
  • 3 Cups, Riced Cauliflower
  • 1 Large Boneless, Skinless Chicken Breast cut into bite-size pieces
  • 1 Tsp Olive Oil
  • 1 Can Mixed Vegetables (or Frozen and thawed), drained
  • 1 Egg, Beaten
  • 1/2 Tsp Minced Garlic
  • Pepper
  • 2 Tbsp Soy Sauce
  • 1/2 Tbsp Teriyaki Sauce
  • 1/2 Tsp Sesame Oil
  • 2 Green Onions, Chopped
Instructions
  1. “Rice” your cauliflower by placing in the food processor or blender and making it finely ground. Place in the refrigerator until ready to use.
  2. In the oil, pan sear the chicken breast along with the garlic. Add pepper. Push to one side of skillet and cook the egg.
  3. Add in the cauliflower, veggies, soy sauce, teriyaki, and sesame oil. Cook over medium heat until heated through.
  4. Top with green onions and serve!
Notes

I used canned veggies and it turned out ok. Frozen would be even better since they have more variations on the veggie combinations.

The colder that your cauliflower is, the better.

This would also be great even without the chicken!


Like this post? SHARE it!

Related Posts Plugin for WordPress, Blogger...

Basil Ricotta Mac and Cheese

Isn’t it funny how there is never enough time in the day? I can have a completely clear day planned with maybe one thing on my to-do list and half the time I don’t even get that one thing accomplished. Of course, I do have a tendency to go off on tangents. My husband makes fun of me beceause I can barely get a sentence out. In fact, the other day I was telling him something and in the middle of my sentence remembered something else and began to tell him about that instead. He looked at me with the funniest face and said, “Did you just interupt yourself?”. I stopped and thought about it for a moment and then decided yes, I did in fact interupt myself! Leave it to me!

Much like my thoughts getting side-tracked, I easily get distracted when I’m cleaning the house. I’ll be cleaning one thing and come across something that just bothers me and I have to clean that. All the while forgetting about my original intention. It may take me the whole day (and sometimes week) to get the original mission accomplished.

A near future goal of mine is to create a cleaning list for the week. I’ll let you know how that works out. 🙂

Needless to say, time gets away from me sometimes. And on those days, we either have a fend for yourself night for dinner or I whip something up that doesn’t need a lot of work. Mac and cheese is always a great go-to option. Always a pleaser for the kiddos and the picky husband as well.

It’s not exactly the best grown up meal. So when I was having a “day” the other night I decided to liven it up a bit and use up some ricotta cheese that I had in the refrigerator and add a little bit of basil. And to make it more of a meal I added some ground turkey. It was fantastic and even pleased my 5 year old!

Hey, maybe she’ll eat her peas now. Nah….

Basil Ricotta Mac and Cheese
Recipe Type: Pasta, Main Dish
Author: Pennywise Cook
This grown up version of everyday mac and cheese is sure to please everyone!
Ingredients
  • 2/3 Box Elbow Macaroni
  • 1 lb Ground Turkey
  • 1/4 c. Flour
  • 2 c. Milk
  • 2 c. Shredded Cheddar Cheese + additional for topping
  • 1/4 c. Bread Crumbs
  • 1/2 c. Ricotta Cheese
  • 1/2 Tsp Onion Powder
  • 1/2 Tsp Garlic Powder
  • 1 Tsp Basil, Chopped
  • Salt and Pepper to Taste
Instructions
  1. {reheat oven to 350 degrees.
  2. Prepare macaroni a couple minutes less than directed on the box. Drain and set aside.
  3. Meanwhile, brown ground turkey and stir in ricotta cheese. Add in seasonings and basil.
  4. In a saucepan, stir together flour and milk and cook to a boil until thickened. Then stir in shredded cheese. Mix well.
  5. Mix together pasta, ground turkey mixture, and cheese mixture. Pour into a greased baking dish and top with additional shredded cheese and bread crumbs. Bake for about 10 minutes until cheese is melted and breadcrumbs begin to crisp.


Like this post? SHARE it!

Related Posts Plugin for WordPress, Blogger...

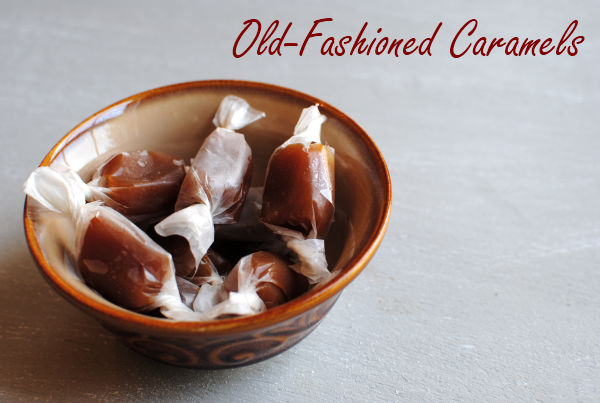
How to Make Old-Fashioned Caramels

Let’s go back to a simpler time shall we? How about way back 80 years ago when things were cheaper. For instance, a new house would cost you only around $7000.  Gas was about a dime per gallon and 1 lb steak was only about $.20.

If we only had a time machine…

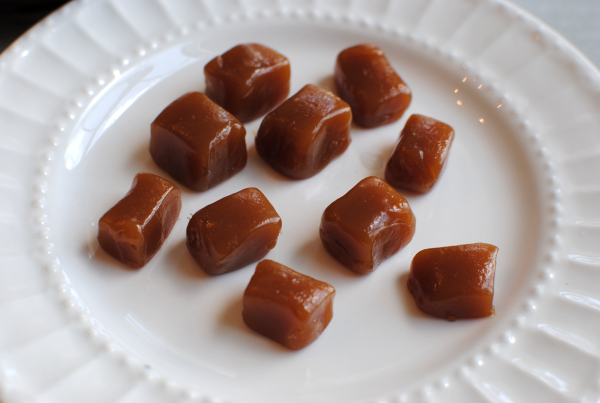
Luckily there are some things that can “transport” us back to that time with music, food, and relic furniture. One of which is my personal favorite, food. Popular in the 1930’s and a treat still on store shelves today are old-fashioned caramels. I think that it’s almost impossible to dislike smooth and rich caramel isn’t it? I guess I should never say never because I have some pretty picky eaters in my family, but I can assure you they really loved these caramels.

I’ve never really been one to make candy that often. A little peanut brittle or chocolate bark here and there, but nothing extremely involved.

And I have a confession- I have never used a candy thermometer in my life. Most recipes will say this is extremely important but I’ve always been able to get by without one.

So I found this really simple Old-fashioned Caramels recipe in my Pillsbury Cookbook and it looked so simple and tasty that I had to make some up.

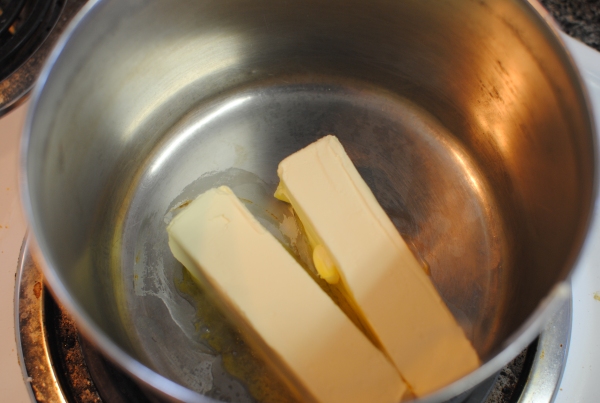
It starts with melted butter.  You know this is going somewhere good when it involves that much butter. But just for the record, I use light butter.

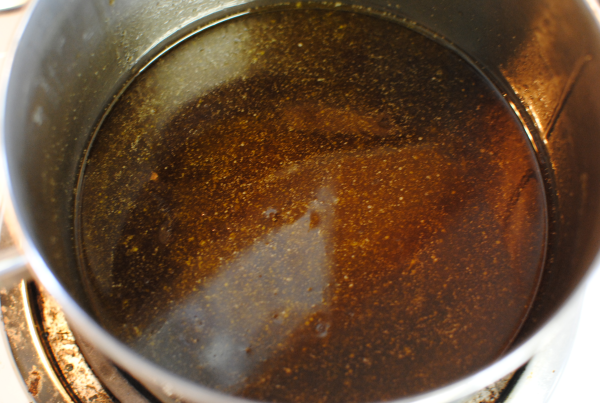
Then you stir in the brown sugar and corn syrup until completely dissolved.

Lookie there, it’s already looking like caramel! The next step is to remove it from heat and add in sweetened condensed milk. Then we get it nice and bubbly for about 25 minutes stirring constantly so it doesn’t burn.  Now is the time when a candy thermometer should be used, so if you’re prepared and have one, use it.

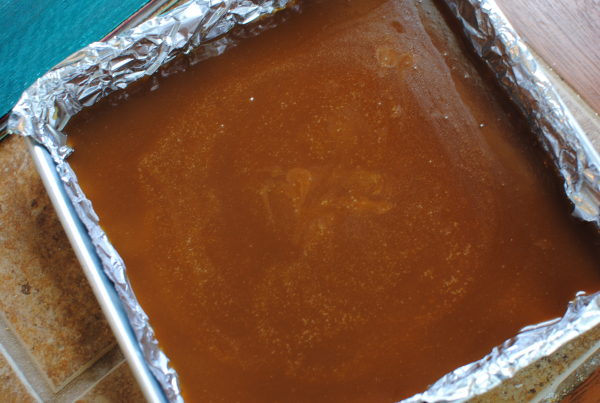
Then it’s all a matter of pouring it into a 8×8 pan and letting it harden.

Note- I do NOT recommend using foil to line your pan unless you have very hefty foil. It was a nightmare getting it off the caramel once set. Also be sure to keep your caramel in the refrigerator until ready to eat so that it stays nice and firm.

Once set, you can cut it into small squares and wrap it in squares of wax paper for easy eating and sharing. It’s oh so yummy! Even my hubby who is a strict chocolate lover loved this caramel.

How to Make Old-Fashioned Caramels
Recipe Type: Dessert, Treat, Candy
Author: Pillsbury
With just 5 ingredients you can create a time machine back to a simpler yet sweet time.
Ingredients
  • 1 cup butter
  • 2 1/4 cups firmly packed brown sugar
  • 1cup light corn syrup
  • 1(14-oz.) can sweetened condensed milk (not evaporated)
  • 1 1/2 teaspoons vanilla
Instructions
  1. Lightly grease a square baking dish.
  2. In a medium saucepan, melt 2 sticks butter. Add in brown sugar and mix well. Then add in corn syrup. Stir until sugar is dissolved.
  3. Remove from heat and add sweetened condensed milk.
  4. Heat over medium heat for 20- 30 minutes until it reaches 244 degrees.
  5. Remove from heat and add vanilla.
  6. Pour mixture into greased pan and let sit until firm.
  7. Wrap in wax paper and store in refrigerator.
Notes

This is not a diet dish by any means. Eat at your own risk!

Happy Pennywise Cooking!


Like this post? SHARE it!

Related Posts Plugin for WordPress, Blogger...

Simple Homemade Iced Coffee

There’s a definite time of day that if you were to come to my house and talk to me, I might just bite your head off. Don’t you just love these confessions? I’m sure that I’m not the only one with this issue. I’m talking about the moment in time before you’ve completely woken up and you have

not.

had.

your.

coffee.

It’s not because I’m an angry person. It’s not because I dislike you. It’s because I am just not a morning person. I never have been one and I don’t ever see myself becoming one. When I was in high school I can remember sleeping until 3 in the afternoon. Can I do that now? Absolutely not. Do I want to sleep that late now? Absolutely. Will it ever happen again? Absolutely not. Should I ask you another question and answer it for you again? Absolutely.

You’ve probably ordered some iced coffee at McDonald’s or Starbucks before. What did it cost you? An arm and a leg? Sounds about right. That’s such a rip-off considering what’s actually in it. Until recently I had always gotten mine at fast food places and thought wow this would be nice to have at home. Then one weekend my sister came up and stayed with us for a bit. (This is the part where I share with you how I slow I really am)

She walked up to my Keurig and made up a cup of coffee like normal. Then she grabbed her plastic wannabe fast food cup complete with straw and filled it up with ice. She poured the hot coffee over the ice and then poured a little creamer in it and stirred it all up. It’s almost as if a McDonald’s staff member appeared in my kitchen and created an iced coffee in front of me. I asked her if I could taste it and she handed it over. It tasted exactly like what you would pay $4 at the store. How did I never figure this out before? So insanely simple a concept that makes having your favorite coffee drink right from your very own kitchen.

And honestly, because this is such a simple recipe (not really even a recipe at all), I’m not going to even give this a box y’all. Here are the steps:

1) Make your coffee and pour it over ice.

2) Sweeten as usual.

3) Add creamer or milk.

4) Optional: Add a squirt of canned whipped cream and a few drops of chocolate sauce to make it fancy.

DONE!

No need for a run to McDonald’s, Starbucks, or that fancy coffee shop around the corner.


Like this post? SHARE it!

Related Posts Plugin for WordPress, Blogger...

Loaded Potato Cheesecake

Aside from my sweets, potatoes are my other downfall. Give them to me in any form possible and I will eat them happily. When I was pregnant with both my girls, I craved nothing but potatoes. All I wanted was fries, mashed potatoes, and mostly fully loaded potatoes. You know, the ones slathered in a pound of artery-clogging butter, a double donkey dollop of daisy, and of course massive amounts of cheddar cheese and bacon. There is just nothing that compares to this kind of happiness.

Besides cheesecake….

Which brings me to my epiphany. I sat there looking at leftover potatoes on my counter. I have a tendency to let them go bad so I vowed to use them up somehow, someway. And I always have cream cheese on-hand. I thought to myself, are there savory cheesecakes? And if so, are there loaded potato cheesecakes? I began a mission on “The Google” as my sister calls it, to see if there had ever been such a recipe. I mean come on, cream cheese makes mashed potatoes delicious so why not build the potatoes into the cream cheese and call it a savory cheesecake?

To my utmost surprise, I could not find a single recipe for Loaded Potato Cheesecake. What is the world thinking? Cue the gears a turnin in my noggin’. I got out my handy dandy notebook and began this recipe.

And what do you know? It actually turned out incredible!!! This simply doesn’t happen to me on the first time y’all. It just doesn’t.

Not me. Not ever.

I will try something 5-10 times before getting it right. I guess the moons have aligned and the kitchen gods decided to cut me some slack and save my sanity because this one turned out just right. One of my main concerns was the crust. I was so sure that it was going to end up really soggy. But no, It turned out just right and just makes each bite perfect.

This may never happen again so enjoy!

Loaded Potato Cheesecake
Recipe Type: Appetizer, Main, Vegetable
Author: Pennywise Cook
This savory dish is a great twist on everyday cheesecake. Impressive and tasty at the same time!
Ingredients
  • 1 and 1/4 c. Ritz Crackers, Crushed
  • 1/3 c. Shredded Cheddar Cheese + 1/2 c. + 1/4 c.
  • 3 Tbsp Butter, Melted + Additional 2 Tbsp, Melted
  • 2 Packages Reduced Fat Cream Cheese, Softened
  • 3 Medium Red Potatoes (about 3 cups), washed, chopped into bite-size pieces and boiled until soft
  • 1 c. Reduced Fat Sour Cream
  • 2 Eggs, at Room Temp
  • 3 Green Onions, Chopped
  • 4 Pieces Bacon, Cooked and crumbled
Instructions
  1. Preheat oven to 350 degrees.
  2. In a small bowl combine Ritz Crackers, shredded cheese, and 3 tbsp melted butter. Press into a greased 9″ springform pan. Set aside.
  3. Beat cream cheese until fluffy. Add in eggs one at a time, beating cream cheese after adding each egg.
  4. Add in sour cream, salt, and 2 tbsp melted butter. Combine well. Gently fold in potatoes, green onions, bacon, and 1/2 c. shredded cheese.
  5. Pour into pan. Bake at 350 degrees for 15 minutes. Then Reduce heat to 225 and bake for 1 hour and 15 minutes.
  6. In the last 10 minutes, top with additional shredded cheese and allow to melt.
  7. Cool and serve!
Notes

As you can see, I tried to lighten it up as much as I can. While some things just won’t work in reduced fat form, this dish does not taste like it contains anything healthy at all!

It’s a crowd pleaser for sure.


Like this post? SHARE it!

Related Posts Plugin for WordPress, Blogger...

From Spice Rack to K-Cup Holder {Before & After}

If you have a Keurig, then you are probably aware of the ungodly prices for accessories and extras that go along with it. Honestly, I’m just glad that the machines themselves have come down in price. If you don’t have a Keurig yet and have considered getting one, you might check out Amazon. They have decent prices on the machines and they also have a huge K-Cup sale on Fridays!

Chances are that you’ve seen the K-Cup carousels and the fancy little drawers for the Keurigs. Both range in price from around $25- $35 at most stores. Sure they are handy, but after the cost of all the K-cups you have to buy and the cost of the machine itself, who wants to shell out yet another $25 for that? Somebody who really needs a place to store their K-cups I guess.

I am just too cheap to pay for one of those, so I’ve made do with the box they come in.

Until now…

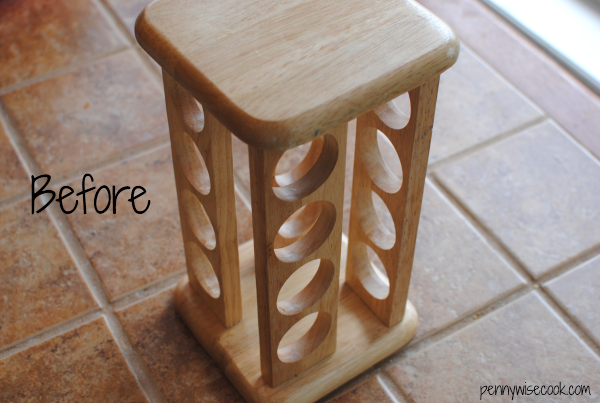
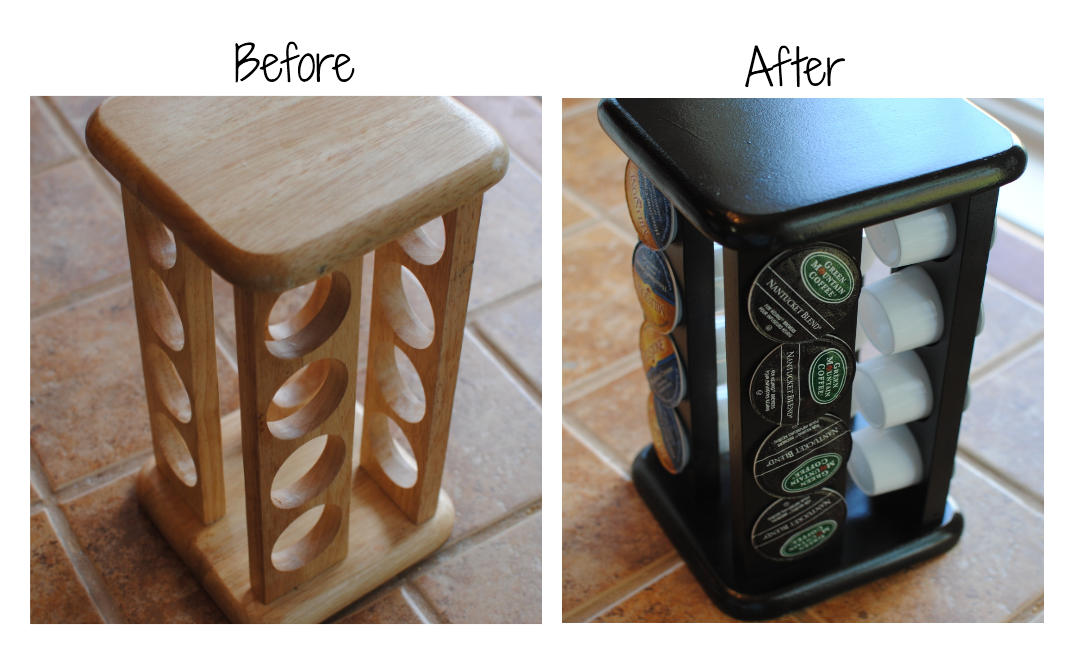
Goodwill is my hero. They have given me inspiration for a lot of things and now they have swooped in to save the day for my K-cup dilema! I found this empty spice rack at my local store for just $.99. To most, this would look like junk. One might think their spices wouldn’t fit its holes or think the color was all wrong. Or some might just have no idea what it is.

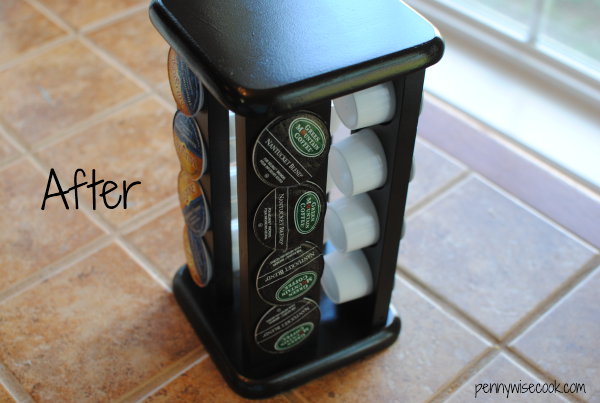
But I saw my new K-cup holder in this thrift store treasure. So I went home, cleaned it up a bit and then gave it a shiny new coat of spray paint to bring it into modern-day. Wow, what a difference!

The K-cups fit just perfectly and it’s not too big nor too small for my kitchen. Just goes to show that someone’s trash (or Goodwill donation) is someone else’ treasure!

Who needs a $25 K-cup carousel when you can repurpose a Goodwill spice rack for $.99?

Question of the Day: Do you have a K-cup holder? If so, what kind?


Like this post? SHARE it!

Related Posts Plugin for WordPress, Blogger...

English Muffin Batter Bread


It is FRIDAY folks! Excuse me while I stop to do the It’s Friday and It Makes Me Wanna Dance dance. ::dances a jig:: There, that’s better. Now we can better reflect on our plans for the weekend.

Let’s see what’s on the agenda for this weekend….clean out the garage, place dirt in raised garden beds, create lightbox for ceiling light in kitchen. Better yet, let’s not reflect on plans for the weekend. Mine isn’t actually looking all that exciting after all. If I can get all of that accomplished, however I will be ecstatic! Got any special plans yourself?

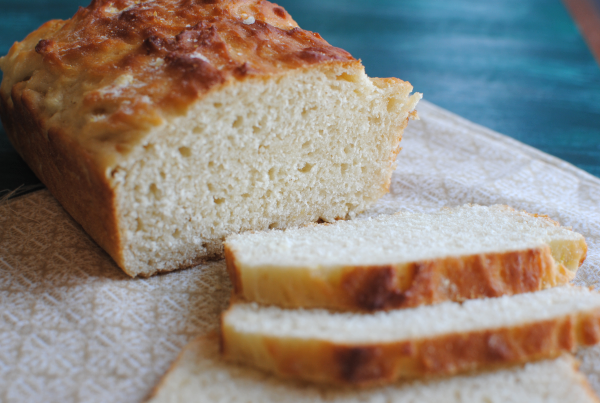
You may just want to bake up a batch of this bread at some point. It’s a fairly easy recipe with common ingredients and creates a rich loaf of English Muffin type bread.

While you’d expect this bread to be just like an English muffin, I found that it was quite the contrary. In fact, I’m not really even sure why it’s called “English Muffin Bread” to be honest. What I can tell you, is that it tastes incredibly buttery and yet it doesn’t contain an ounce of butter! I kept saying that the entire time I was eating the entire loaf it. You may have heard me talk about how divine it smelled while in the oven over at the Pennywise Cook facebook community!

This recipe makes 2 whole loaves. The first loaf was gone the first day. We were cutting pretty pieces like pictured above and properly eating them one after the other, then somehow things changed when we got to the second loaf. Instead of neat as a pin slices, we were just diving in for big chunks of it at a time. It’s yumminess somehow sent us into a much more primitive method of serving.

By primitive method I mean lazy. And by serving I mean stuffing our faces. Apparently we have no shame when it comes to good bread.

So how about it. Need a new bread recipe that tastes like butter and is so yummy you’ll eat it in chunks? Find it below.

Recipe from The Pillsbury Cookbook.

English Muffin Batter Bread
Recipe Type: Bread
Author: The Pillsbury Cookbook
Serves: 24
Easy yet rich English Muffin Batter Bread.
Ingredients
  • Cornmeal for dusting
  • 4- 4 and 1/2 All-Purpose Flour
  • 1/4 c. Sugar
  • 2 Teaspoons Salt
  • 2 Pkg Active Dry Yeast
  • 1 and 1/4 c. Water
  • 1/2 c. Oil
  • 2 Eggs
Instructions
  1. Grease two 8×4 loaf pans and dust with cornmeal.
  2. In a large bowl, combine 1 and 1/2 c flour, sugar, salt and yeast.
  3. In a small saucepan , heat the water and oil until very warm (120 degrees or so). Add the warm liquid to the dry mixture and blend at low speed until moistened. Then beat 2 minutes on medium speed.
  4. By hand, stir in 3 cups flour to create dough ball. Cover dough loosely with plastic wrap and let rise in warm place until doubled in size, around 50 minutes.
  5. Stir the batter vigorously for 30 seconds the spoon into loaf pans. Cover and let rise for another 40 minutes or so until dough doubles in size.
  6. Meanwhile preheat oven to 375 degrees. Bake 20-30 minutes until all loaves sound hollow when tapped.
  7. Remove pans immediately and cool on wire racks.
Notes

A great place to let this dough rise is in your oven with just the oven light on. Or if your oven light is out, place the dough next to a bowl of hot water in your oven.


Like this post? SHARE it!

Related Posts Plugin for WordPress, Blogger...

Easy Chicken Tortilla Casserole

We went on a bike ride last night with the girls. I love riding during the sunset. I feel all nostalgic and corny riding off into the sunset like a cowboy.

Don’t you always get that feeling when you ride your bike in the evening? No? Just me? I digress…

You know that saying:

I can only please one person per day. Today is not your day. Tomorrow isn’t looking good either.

There are many days when I feel like just saying that to folks. Especially my picky eaters. It’s not always easy pleasing those who don’t like green or even red things on their plate. It’s a matter of trial and error and you just try different things until you find something they like! And sometimes you just say eat it or starve! 😉

Luckily most children grow out of their I don’t like that stage as their taste buds mature. Even I remember tons of things I never used to like that I love now. For instance of all things, onion bagels. I remember my momma forcing me to eat an onion bagel one morning and it was traumatizing to say the least. I mean come on, why else would I remember this? But now I love them. That is if I can find them in the store. Where are those things anyways? Have they stopped making them?

Today’s recipe is one that most every person will love. Simple enough for those who hate to cook, but fancy enough to make if you have company coming. It’s quite tasty too!

This Chicken Tortilla Casserole is brimming with juicy chicken breast, spicy rotel, and corn tortillas are what this whole dish is all about.

One word of warning. Use MILD rotel if your family doesn’t like things hot. We used original and it was way too spicy for us. I will be using mild next time.

Recipe adapted from Homemaking Challenged.

Easy Chicken Tortilla Casserole
Simple ingredients lead to a pleasing chicken meal even for the pickiest of eaters!
Ingredients
  • 2 Large Boneless, Skinless Chicken Breasts, Cut into Bite-size Pieces
  • 1 (10 oz) Can Rotel
  • 2 Cans Cream of Chicken Soup
  • 12 (6 in) Corn Tortillas, Cut into bite-size pieces.
  • 1/2 Tbsp Chili Powder
  • 1 Cup Mexican Blend Shredded Cheese
  • 1 Tbsp Olive Oil
  • 1 Tsp Garlic, Minced
Instructions
  1. Preheat oven to 350 degrees.
  2. In a large skillet brown chicken pieces in oil with chili powder and garlic. Remove from heat.
  3. Meanwhile in a large bowl, mix 2 cans cream of chicken with 1 can rotel.
  4. In bottom of a greased 8×8 baking dish, place 1/3 tortilla pieces. Place half of chicken on top evenly. Place 1/2 the cream of chicken mixture over top.
  5. Repeat layers ending with tortilla pieces. Cover with foil and bake for 40 minutes.
  6. Place shredded cheese on top and bake an additional 5 minutes once cheese melts.
Notes

This might even be possible with canned chicken in a pinch.

You could also make this ahead the night before and then bake when ready to serve! It could freeze well too.

If you want to get fancy like me and add cilantro on top you can. I won’t hold you back…


Like this post? SHARE it!

Related Posts Plugin for WordPress, Blogger...

Glitter Grapes {Healthy Snack}

I have an addiction. Yes, let me just bust that confession out to you now. While if you’ve read this blog or Saving with Amy for any length of time, you know that I love sweets. Unfortunately, most of my cravings for them hit at night. No it’s not a good thing and yes I work my tail off at the gym! But this simply means that I try and make every attempt possible to make my sweets healthy.

Ahem, healthy-ER anyways.

Although sometimes you just need a dadgum hot fudge sundae….

TODAY is not that day. No, we are going to talk GRAPES today! And not just any grapes…….glitter grapes!

I already love them in their everyday form. Plump, sweet, and tasty without a thing done to them. However, after coming across this amazing idea at Pure Sugar, I love grapes about 100 times more. They only way to make grapes even better is to give them a bath and then roooooooooll their little grape bodies in a pile of sour jell-o mix!

Jell-o. Yep. So simple, yet so incredibly delightful. They have now been dubbed “Glitter Grapes” for their shinyness in the light. Also known as “sour patch grapes” because of the tang the jell-o mix gives them. Trust me, the kids will love them and unfortunately they might become your very next sweet addiction like mine. It really is just like eating candy.

But it’s A-OK because they are grapes and you cannot possibly feel bad about eating those can you? Naaaaaaah….

Glitter Grapes {Healthy Snack}

Glitter Grapes {Healthy Snack}

Enjoy a healthy snack of sour grapes that taste like candy!

Ingredients

  • 1 Pound Green Grapes
  • {Water}
  • Jell-O Mix

Method

  1. Rinse grapes in colander leaving some water on grapes.
  2. Place jell-o mix on a plate and roll grapes in batches through the mix.
  3. Refrigerate grapes for at least an hour for the jell-o to set.
  4. Serve and try not to eat the whole batch!

Notes

I used watermelon jell-o because the melon fusion that original recipe wasn't available at my store. However, I think the flavors that can be used is completely up to you! Whatever you fancy!

These would also be amazing FROZEN!

http://www.pennywisecook.com/glitter-grapes-healthy-snack/


Like this post? SHARE it!

Related Posts Plugin for WordPress, Blogger...