Life Is Like An Onion…

…you peel it off one layer at a time and sometimes you weep.

A quote from Carl Sandburg and boy he wasn’t kidding! It’s almost impossible for me to cut an onion without tearing up. Well it just depends on the circumstances. If the onion is very small, sometimes I can manage to chop without weeping.

But the tears aren’t the only problem that I have with onions. My favorite grocery stores like Aldi and Save-A-Lot tend to have 2-3 pound bags of onions on sale a lot. I find that I need a couple onions for my meals during the week and then I don’t use the last 4 or 5 and they go bad! Then the very next week, I’d need more onions and I’d grab another bag and the cycle continued. The frugalista inside me won’t let me just buy how many onions I know I need so just buying a few isn’t an option.

But those days are over folks. This is one of those “duh” tips that I’m sharing today. Even if you’ve thought about it, this might just make you wanna go ahead and actually do it.

Go ahead, buy that bulk bag of onions and feel no shame. Know that not one of those onions will go unused. Know that you have weeks and even months to create a masterpiece with those flavorful veggies.

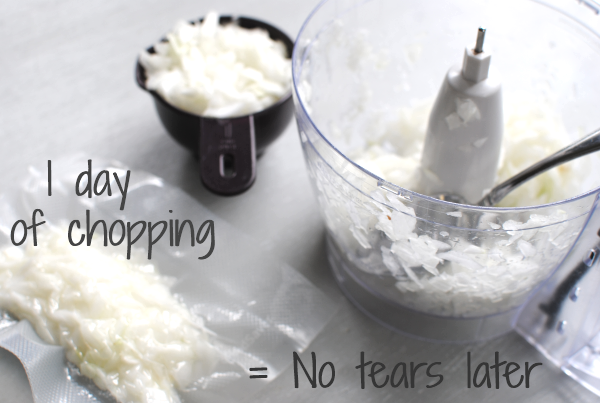
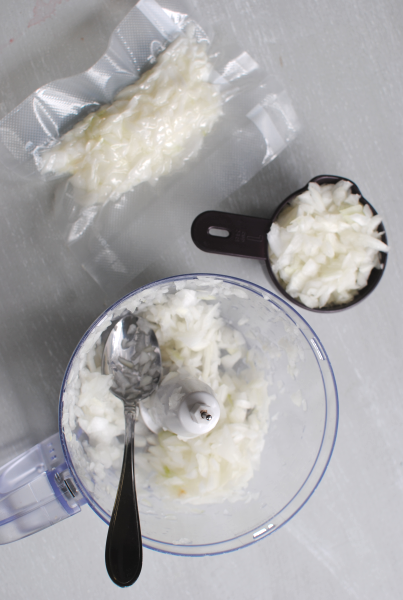
Bust out the food processor and pop your onions in. Chop them up to your liking and then place them in a freezer bag, making sure to remove all the air.

I measured mine into 1 cup portions since that’s the frequent amount that I use. After my day 30 minutes of chopping, I ended up with 12 cups of pre-chopped onions ready to place into a tasty meal. I’ve already used a couple of the portions and I didn’t even thaw them to use them.  Though some recipes may need them to be thawed.

So there you have it. A simple tip from a simple mind. Save your time, tears, and most of all MONEY.

And by the way, this would also work with anything other vegetable that you use frequently of course. 🙂


Like this post? SHARE it!

Related Posts Plugin for WordPress, Blogger...

{Kitchen Tip} Cinnamon Rolls from Plain Biscuits

I told you yesterday about my surprise party and sudden house guests. I was so excited to have them since I don’t get to see my sister, niece, and nephew very often. It’s always so fun when cousins get together. They got to have a sleep over and to our surprise, they actually went to bed before midnight.

In the morning, I wanted to make up some breakfast for everyone but I wasn’t sure if cocoa pebbles would fit the bill. So I scoured my refrigerated and found some biscuits that I had gotten for cheap when they were on sale. You know those Pillsbury ones go on sale for $1 all the time and you can get them even cheaper with coupons. I assessed my bacon and egg situation and alas, there just wasn’t enough to make a real breakfast.

I checked out Google and adapted this recipe from Healthy and Homemade’s idea for cinnamon rolls made out of regular biscuits. I had all of the ingredients and didn’t have to make up any special dough which really cut down on the time.

They were so easy and the perfect breakfast in a pinch. We don’t eat cinnamon rolls too often around here so we don’t usually have them in the refrigerator. But for times like this when you need a last minute breakfast, this recipe is perfect.

{Kitchen Tip} Cinnamon Rolls from Plain Biscuits
Recipe Type: Breakfast, Brunch
Author: Adapted from Healthy and Homemade
Cook time: 20 mins
Total time: 20 mins
Need a fancy breakfast in a pinch? Whip out the biscuits and make your own cinnamon rolls!
Ingredients
  • For the Cinnamon Rolls
  • 7.5 oz Can of Biscuits
  • 2 Tbsp Butter, Melted (I used Blue Bonnet Light)
  • 2 Tbsp Sugar
  • 1 Tbsp Cinnamon
  • Sliced Almonds for Topping
  • For the Glaze
  • 1/2 c. Powdered Sugar
  • 1 and 1/2 Tbsp Skim Milk
  • 1/2 Tsp Vanilla Extract
  • 1/2 Tsp Creamy Peanut Butter
Instructions
  1. Preheat oven to 350 degrees. Mix together the cinnamon and sugar and place on a plate.
  2. Open dough and roll out each biscuit into a long cylinder. Dip into butter and then into cinnamon sugar. Gently roll into a pinwheel and place in a greased baking dish.
  3. Follow the same steps until you have finished with all biscuits.
  4. If you have leftover butter and sugar, mix together and pour over the top of the cinnamon rolls.
  5. Bake for 20 minutes.
  6. Meanwhile combine glaze ingredients in a small bowl and brush over cinnamon rolls when they are done.
Notes

You may be wondering about that little bit of peanut butter that made it’s way into the glaze ingredients. I added this for depth of flavor and it was very subtle but yummy. My husband didn’t even notice it until I pointed it out, but he really liked it.


Like this post? SHARE it!

Related Posts Plugin for WordPress, Blogger...

How to Get Rid of Gnats and Fruit Flies

I can probably speak for all of us when I say that bugs are CRAZY this year! They are everywhere and taking over the world! Ok so maybe not taking over the world, but they are really bad this year. We had such a mild winter (at least around here) that the bugs never really got a chance to get hibernated so they came back out with a bang.

I’m a door watcher these days. If you come to my house, be prepared to always shut the door behind you. If it doesn’t get closed I will not be a happy camper because Bobby bug and his momma probably just brought their cousins with them to secure a new place in our house. My husband is worse than me. He goes on bug killing rampages with his fly swatter and won’t stop til he gets them all. Sometimes, depending on his determination that day, it will only take a few minutes and other times it takes an hour.

We got those window clings that actually do a great job of getting a lot of fruit flies. But for some reason this year they are fixated on our ceiling fan cords and the middle of the room. I found this idea on Pinterest last weekend at Passionate Homemaking and thought I’d try it out. It looked as though it would work, but seemed too easy. I thought I’d give it a try anyways.

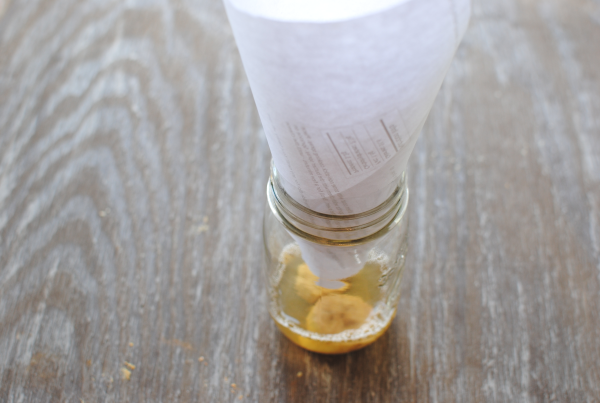
This is the miracle contraption.

Don’t underestimate the power of the miracle this jar will perform.

1 Jar (or something like it that you have on hand)
1 Piece of Paper
Scotch Tape
Banana Slices (or something else nasty that bugs like)
1/2 inch – 1 inch Apple Cider Vinegar
2 Drops Dishwashing Liquid

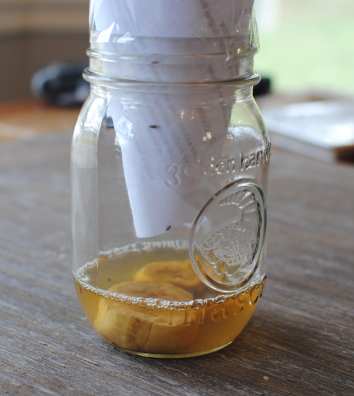
The idea is that the flies will go into the paper funnel attracted to the vinegar and bananas and then not be able to get back out and eventually fall to their deaths in the slimy detergent-y liquid below. It only took a few moments for these little guys to fall into my evil trap. There are more on the other side. They kept moving every time I’d move the jar around!

It took a while for them to give up. But then by the next morning…

Ew! Yeah, not the most appealing view but satisfying all the same. Mission accomplished.

Let me know if you try this and have the same success!


Like this post? SHARE it!

Related Posts Plugin for WordPress, Blogger...

Simple Homemade Iced Coffee

There’s a definite time of day that if you were to come to my house and talk to me, I might just bite your head off. Don’t you just love these confessions? I’m sure that I’m not the only one with this issue. I’m talking about the moment in time before you’ve completely woken up and you have

not.

had.

your.

coffee.

It’s not because I’m an angry person. It’s not because I dislike you. It’s because I am just not a morning person. I never have been one and I don’t ever see myself becoming one. When I was in high school I can remember sleeping until 3 in the afternoon. Can I do that now? Absolutely not. Do I want to sleep that late now? Absolutely. Will it ever happen again? Absolutely not. Should I ask you another question and answer it for you again? Absolutely.

You’ve probably ordered some iced coffee at McDonald’s or Starbucks before. What did it cost you? An arm and a leg? Sounds about right. That’s such a rip-off considering what’s actually in it. Until recently I had always gotten mine at fast food places and thought wow this would be nice to have at home. Then one weekend my sister came up and stayed with us for a bit. (This is the part where I share with you how I slow I really am)

She walked up to my Keurig and made up a cup of coffee like normal. Then she grabbed her plastic wannabe fast food cup complete with straw and filled it up with ice. She poured the hot coffee over the ice and then poured a little creamer in it and stirred it all up. It’s almost as if a McDonald’s staff member appeared in my kitchen and created an iced coffee in front of me. I asked her if I could taste it and she handed it over. It tasted exactly like what you would pay $4 at the store. How did I never figure this out before? So insanely simple a concept that makes having your favorite coffee drink right from your very own kitchen.

And honestly, because this is such a simple recipe (not really even a recipe at all), I’m not going to even give this a box y’all. Here are the steps:

1) Make your coffee and pour it over ice.

2) Sweeten as usual.

3) Add creamer or milk.

4) Optional: Add a squirt of canned whipped cream and a few drops of chocolate sauce to make it fancy.

DONE!

No need for a run to McDonald’s, Starbucks, or that fancy coffee shop around the corner.


Like this post? SHARE it!

Related Posts Plugin for WordPress, Blogger...

Kitchen Tip: Shaping Sliders

Sliders have become more and more popular over the years haven’t they? It seems a lot of the mainstream restaurants have some type on slider on the menu. I am in absolute love with the Ruby Tuesday Turkey Rubies. They are amazing. When I’m craving them, it’s not always possible to go out to eat with a very busy 1 and 4 year old. I could order them to go, but what’s the point in eating out if you’re going to eat at home? We rarely get food to go.

To make sliders at home, you may think that you have to have one of those fancy slider grills or shapers. But in reality, it’s as easy as a little kitchen trick involving of all things, muffin tins and cupcake liners. I saw this idea and new I had to try it when I made up these Asian Turkey Sliders one night.

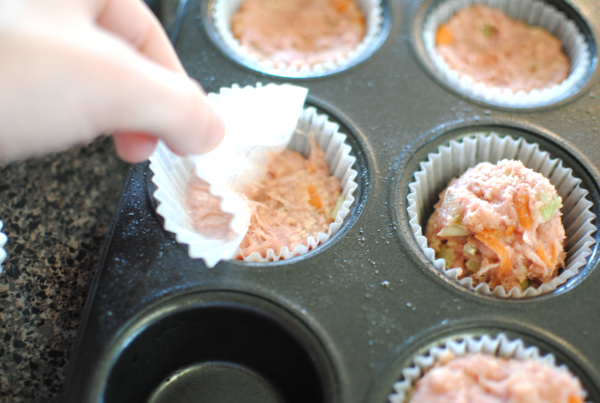
Start by placing cupcake liners into your muffin tins like so. No need to use fancy ones, just ones that you might have leftover. (Try not to get jealous of my ugly white Dollar Tree cupcake liners) If you want to make sliders a lot, you might even consider having a set of liners just for making sliders!

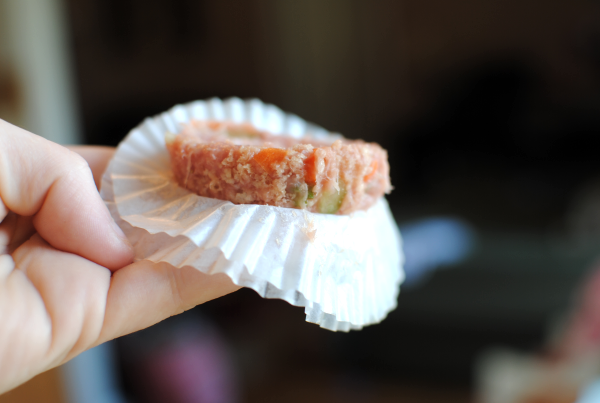
Then using a new cupcake liner for each slider, simply press them into that patty shape in the tin. I know my meat may look a little weird, remember it’s Asian turkey! 🙂

After that fairly simple process you’ll have all uniform and tidy slider patties ready for the grill or skillet! Love finding shortcuts in the kitchen like this that make life easier. And with sliders, the possibilites are endless. I mean come on, they are just tiny hamburgers and there are TONS of variations of hamburgers.

I will say that using these Perfect Wheat Dinner Rolls as a slider bun would be a great idea. 🙂

Question of the Day: Have you ever made sliders before?


Like this post? SHARE it!

Related Posts Plugin for WordPress, Blogger...

How to Make Royal Icing Cookies

Silly me, I posted this accidentally the other day with no content inside. I’m sure that some of you were wondering about that. You’ll have to forgive me, I have a very frantic brain!

My girls both have their birthdays in May. It’s great for getting them out of the way in just one month out of the year, but I think eventually they will wish they were born in different months. You know how siblings can be.

This year I was extremely excited to make up these super cute royal icing cookies for Addie’s birthday party. I’ve made all kinds of cookies before, but never ones that are topped with royal icing. I thought for sure that the process would be difficult and that mine would end up ugly. I must admit that I can’t draw. Therefore, anything that requires free-handing just doesn’t look good coming from these fingers. Much to my surprise, royal icing was a cinch to work with and my cookies came out fantastic!

Believe me, if I can make these pretty, you can too!

It starts with your favorite sugar cookie recipe. I scoured the web to find one that would roll out well and hold  up to all the work I was going to put them through. I eventually found one that worked like a charm. Don’t worry, the recipe is below. And of course, if you have a tried and true family sugar cookie recipe, but all means use it!

Once you make up your royal icing (it takes no time at all), the best way to start is by outlining the cookies with a line of royal icing. This kinda creates a barrier that will eventually hold in your “flood” of royal icing. It doesn’t have to be perfect!

The next step happens once the outlining is dry. I found that since it wasn’t much icing that by the time I was done outlining, the very first cookies were already dry and ready to flood. By making the icing almost a liquid, you simple drop about a teaspoon or so (depending on the size of your cookies) of the royal icing into the middle of each cookie and then use a toothpick to spread it evening over the entire cookie, getting all of the nooks and crannies. Though this is a little tedious, I find it fun.

So after you have “flooded” your cookies with royal icing, they will look like this. Kinda wet to begin and then as they dry you’ll notice they harden and have a matte finish. That means it’s time to decorate them!

Add whatever decorations that you want. I used more royal icing and some sugar pearls to adorn Princess Addie’s cookies. I monogrammed some of them too. I think that’s a nice touch if you’re making them for a birthday or anniversary.

Ready for the recipes to make royally iced cookies?

Royal Icing Recipe courtesy of Brown Eyed Baker. Sugar Cookie Recipe courtesy of Spark People.

Royal Icing Cookies

Royal Icing Cookies

Perfect iced cookies are easier to make than you think!

Ingredients

    For the Cookies
  • 1 1/2 cups - granulated sugar
  • 2/3 cup - butter
  • 2 whole eggs
  • 2 Tbsp - 2% milk
  • 1 tsp. - vanilla extract
  • 3 1/4 cups - white flour
  • 2 1/2 tsp - baking powder
  • 1/2 tsp - salt
  • For the Royal Icing
  • 4 cups powdered sugar
  • 2 tablespoons meringue powder (or powdered egg whites)
  • 6 tablespoons water
  • Toothpicks
  • It is recommended that you have pastry or icing bags along with a decorating tip for outlining and decorating the cookies. It's possible that a heavy duty ziploc bag will work if you do not have the other. But I highly suggest using pastry bags and decorator tip.

Method

    To Make the Cookies
  1. In a large bowl, cream the butter and sugar. add in the extract, eggs, and milk until blended.
  2. In a medium bowl, whisk together all of the dry ingredients. Add the wet ingredients to the dry and mix with a mixer until well combined.
  3. With your hands, shape the dough into a ball. Wrap the dough ball in plastic wrap and refrigerate for 2-3 hours. (This will make it easier to roll out)
  4. Preheat oven to 400 degrees.
  5. Lightly grease your cookie sheets. Roll out half or 1/3 of the dough at a time while the rest is in the refrigerator.
  6. Flour cookie cutters and cut out your shapes.Re-roll out your trimmings and shape them too. Place the cookies 1/2 inch apart on cookie sheet. Bake for 8 min or until light brown.
  7. LET COOL COMPLETELY.
  8. For the Royal Icing
  9. Mix all ingredients on low speed for 7-10 minutes or until it loses it's shine. Add water by the teaspoon if becomes too stiff.
  10. Divide the icing into bowls for however many colors you plan to have. Add the food coloring and mix well. Place a damp paper towel over the top while not using it so it doesn't dry out.
  11. To outline the cookies, use the same color that you plan to flood the cookie with to outline. Create an outline of the entire cookie with one line of icing. Allow all cookies to dry before moving onto the next step.
  12. To flood the cookies, start by adding drops at a time to the color icing that you wish to flood your cookie with. You will want it to be pretty liquidy. If you lift your spoon up and it drizzles back into the bowl and disappears quickly, you have the right consistency. Using a squeeze bottle or spoon, place a little royal icing on your cookie. Use a toothpick to evenly distribute the icing to the entire cookies. Be careful to not make it too thick.
  13. Let all of the cookies dry COMPLETELY before you begin to finish their decorations.

Notes

For the cookies, the thinner that you roll the cookies, the firmer and crispier they will be. If you leave them fairly thick, they will be softer and chewier.

This recipe makes about 72 cookies depending on the size of your cookie cutter. I made fairly large ones and I'd say I had about 30 or so.

http://www.pennywisecook.com/royal-icing-cookies/


Like this post? SHARE it!

Related Posts Plugin for WordPress, Blogger...

Sugar Cookie Ice Cream Bowls

I was busy making up cookies for Addie’s 5th birthday last week. Which by the way, I am still in shock that I have a 5 year-old. Doesn’t seem possible that she is already that big. I’m going to try to get over it and not have a mini meltdown. Instead, I’ll just eat a SUGAR COOKIE BOWL full of ice cream! I got the idea from this picture. Pretty self explanatory.

Yeah, it’s quite an epiphany. Eating ice cream out of a cookie? I’m totally down with that. I think the only thing better than that would be eating ice cream out of a brownie. Hmmm, I’m getting ideas….

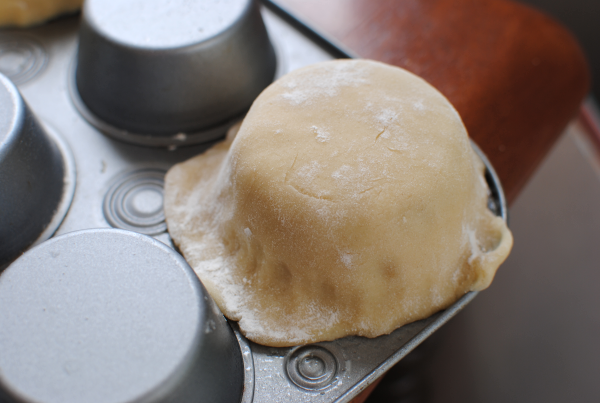
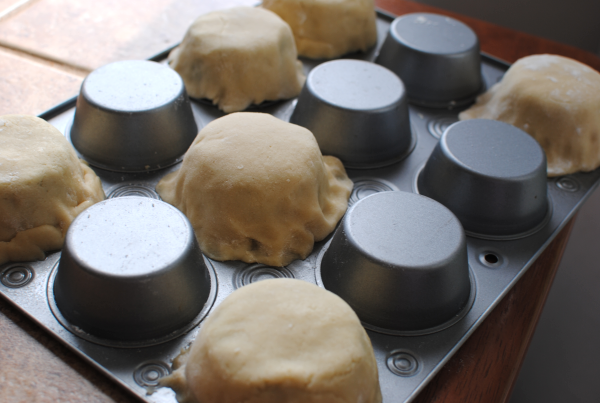
It’s best to have a good batch of sugar cookie dough to use. I found the BEST recipe last week and it worked like a charm. You simply lay the dough over the muffin tin cups and bake as usual.

You can also cut the dough using the top of a glass to get a perfect circle. Or you can just wing it like I did. I even had to patch a few up. It didn’t matter though because they still baked up fine.

Tah dah! Oh yeah, it’s a bowl that’s a sugar cookie. Incredible isn’t it? This is where you place your ice cream…

Or even fruit if you’re being good….

Sugar Cookie recipe courtesy of Spark People.

Sugar Cookie Ice Cream Bowls

Sugar Cookie Ice Cream Bowls

Eat your ice cream out of a sugar cookie!

Ingredients

  • 1 1/2 cups - granulated sugar
  • 2/3 cup - butter (or shortening - half of each is recommended)
  • 2 whole eggs
  • 2 Tbsp - 2% milk
  • 1 tsp. - vanilla extract
  • 3 1/4 cups - white flour
  • 2 1/2 tsp - baking powder
  • 1/2 tsp - salt

Method

  1. Cream butter and sugar together in a large bowl. Add eggs, extract, and milk and mix well.
  2. Mix dry ingredients with a wire wisk in a medium bowl. Add dry ingredients to wet ingredients in large bowl. Mix until combined well.
  3. With hands, shape dough into a ball. Wrap with plastic wrap and refrigerate for 2-3 hours.
  4. Meanwhile, preheat oven to 400 degrees F.
  5. Lightly grease muffin tins. Roll half or 1/3 of the dough at a time on a floured surface. Keep the rest in the fridge.
  6. Roll dough to 1/8-1/4 inch thick.
  7. Flour a glass or cup and cut shapes. Re-roll trimmings and reshape. Place over muffin tin wells making sure to cover the whole thing with no holes.
  8. Bake for 8 min or until light brown.

Notes

You are free to use whatever sugar cookies your prefer, even store bought. I just found this recipe to be really great to molding and rolling.

It's not a bad idea to make your dough the night before and roll it out in the morning. The colder it is, the easier it is to work with.

This works with chocolate chip cookie dough too!

This recipe makes a LOT of dough (like 72 cookies depending on your size) so if you only plan on making a few, half this recipe.

http://www.pennywisecook.com/sugar-cookie-ice-cream-bowls/


Like this post? SHARE it!

Related Posts Plugin for WordPress, Blogger...

Hot to Cut a Pineapple

Today’s post may not be something new to some of you, but if you’re like me- a pineapple can seem intimidating. I don’t know if it’s the big leaves at the top or the pointy eyes that stare at me, but there is something about a pineapple that makes it seem a little scary to cut. I put together this tutorial to try and help ease your pineapple fears, if you have them.

And this is just one way to do it. There are many different ways but if you’re looking for bite-size chunks, this is the way to go.

While they may seem intimidating, inside pineapples are really just juicy and soft sweeties. We love pineapple around here but there are two factors that have always kept us away from purchasing them. 1) Price. I don’t want to pay $3.99 for a pineapple when I can buy it canned for $.99. 2) Difficulty. I don’t want to buy something I have to labor over when I can buy it already cut in a can. However, if #1 is right, then #2 can be canceled out.

Most things revolve around price for me! Aldi had their pineapples for only $.99 the other day and since I grabbed a few, I was chopping up pineapple left and right.

Let’s get started cutting our pineapples….

Start by washing your pineapple. I didn’t get a picture of me doing this, but you know how it goes. Run it under some water and pat it dry.

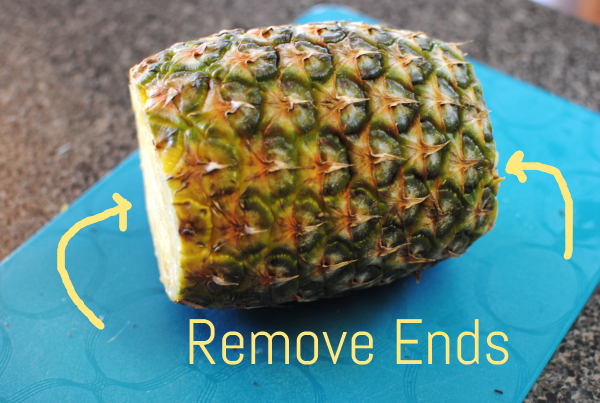
1) Remove the ends including the leaves and the bottom. Try to leave as much pineapple as you can, especially if your pineapple is a stubby, short one.

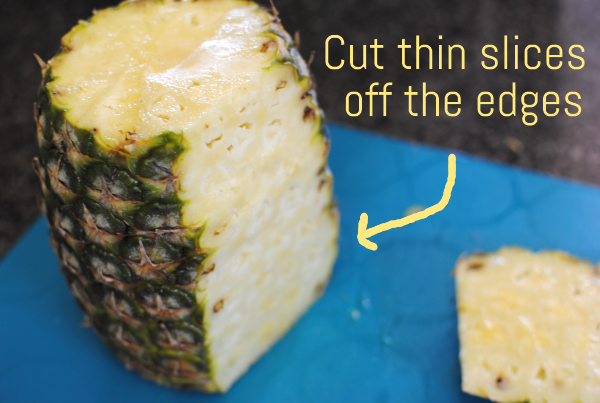
2) Using your knife, cut thin slices off the edges removing the skin. Try to leave as much pineapple there as you can…

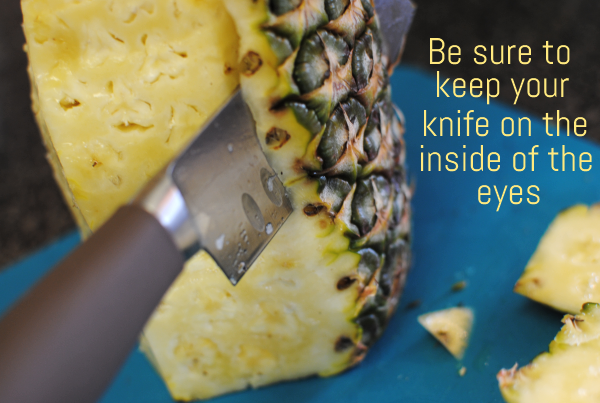
…just be sure to keep your knife on the inside of the pineapple eyes. You don’t want to bite into any of those tough eyes later on.

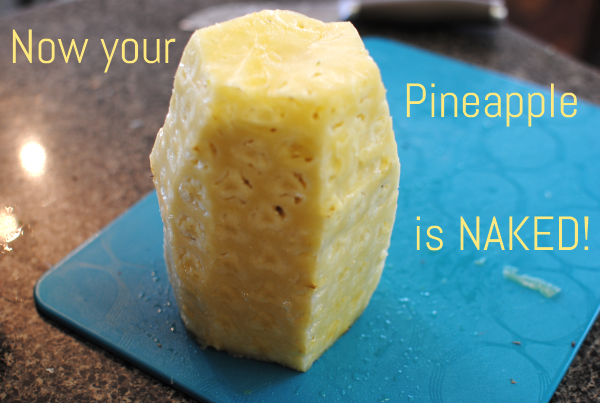
Now you have a stripped and naked pineapple!

Now that we’ve violated the pineapple, it’s time to chop it up.

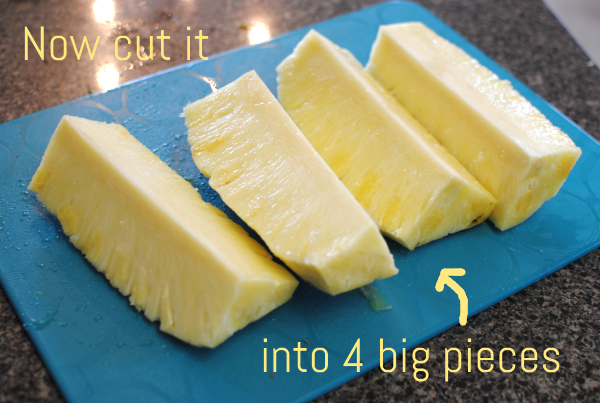
3) Cut the chunk into 4 big pieces like so. We’re getting so close.

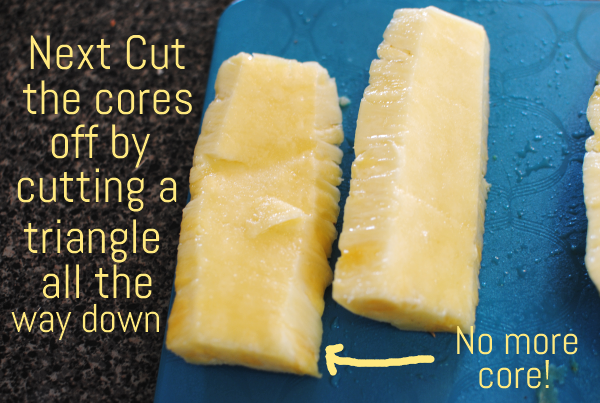
4) Next, cut the middle triangle down each one to get remove the cores.

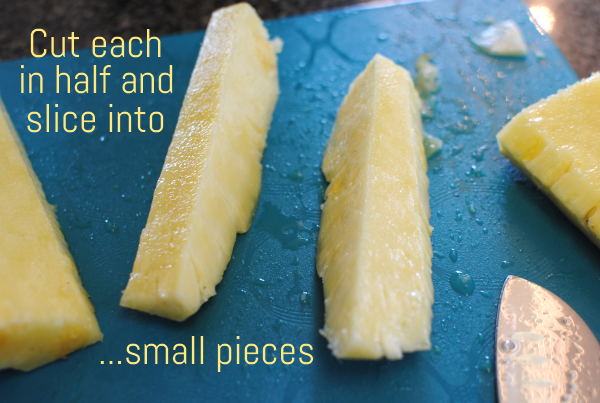
5) Cut the 4 larger pieces into 8 smaller pieces. Then chop those up into bite-size pieces.

You have officially conquered the pineapple!

See? Aren’t they pretty? This is the point where I can’t stop everyone from grabbing bites every 2 seconds.

These big bite-size juice pineapple pieces make amazing additions to fruit skewers for grilling you know!

I hope that this tutorial helps you to not be so scared of those rough yet tasty fruits.

Have you ever cut a pineapple before? Or do you stick with the pre-cut kind?


Like this post? SHARE it!

Related Posts Plugin for WordPress, Blogger...

Kitchen Tip: Saving Hardened Brown Sugar

There’s this obstacle that I come across in my cabinet every now and then. I usually just push it aside and continue looking for whatever I was looking for. I try my best not to pay much attention to it because it means that I will have to “deal” with it. I’m talking about the ever so yummy, yet easily hardened…..brown sugar. The molasses in  brown sugar contains much more moisture than regular white sugar so it goes hard if this moisture is lost. It’s usually due to improper storage. Or in my case, lazy storage.

I don’t use it that often so it remains that ingredient way back behind the high and mighty flour, the sugar as white as the driven snow, and behind the fake but amazing artificial sweetener that saves me calories when I’m feeling fat. But I came across it the other day and decided that it was time.

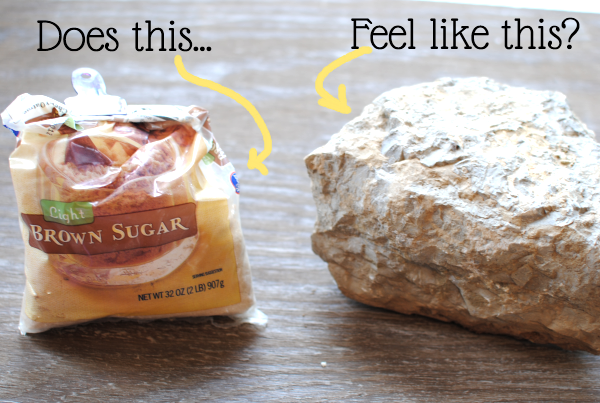
It was time to deal with the rock that IS my brown sugar.

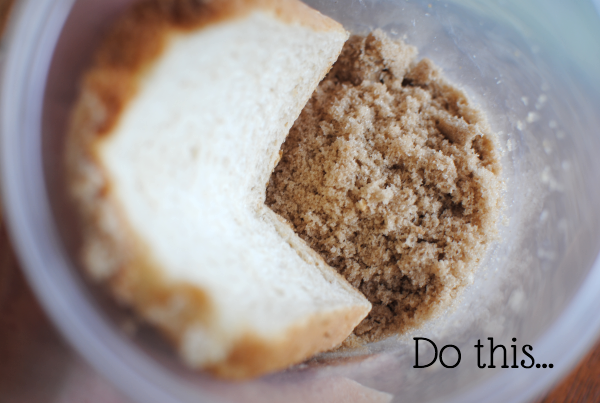
One way that I’ve always known about but have just been too lazy to do is placing a piece of bread inside a container with the brown sugar. The bread helps it regain it’s moisture leaving the brown sugar soft and fluffy. And that piece of bread? Yeah, it will become a rock itself.

I suggest using an end piece if you don’t want to use up your precious pretty pieces.

Way to save brown sugar #1: Place the brown sugar in a container with a piece of bread overnight. It may take up to a couple days. I always keep one in mine now in order to prevent this. You can just change out the pieces every now and then.

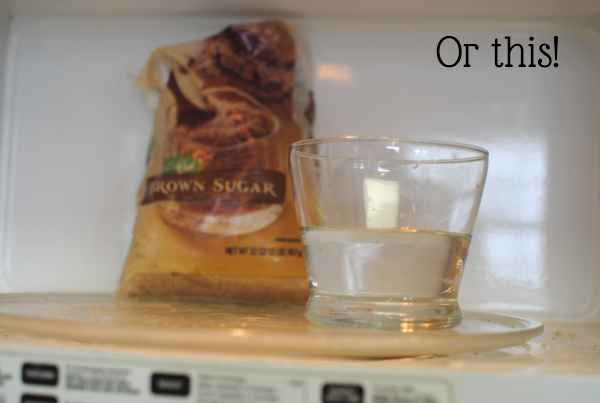
Or then there’s a microwave method. No, we’re not talking about making caramel. Adding a cup of water or placing a damp paper towel in with the brown sugar and nuking it for a few seconds can quickly give it back it’s moisture making it usable again.

Way to save brown sugar #2: Place the bag of brown sugar in the microwave open with a cup of water or very damp paper towel. Microwave for about 20 seconds. See if it’s softened to your liking and possibly put it back in for another 10 seconds or so if necessary.

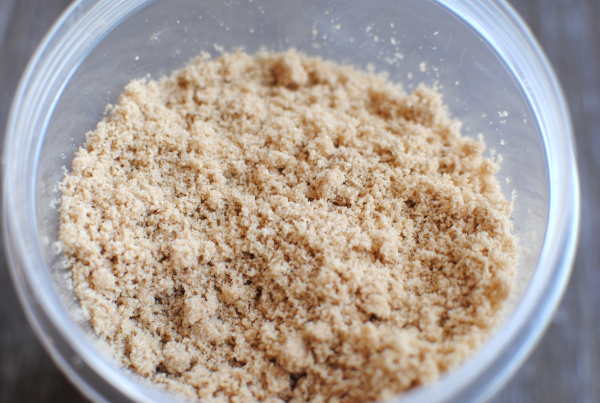
And eventually you’ll have nice, moisturized, fluffy, ready-to-use brown sugar.

Do you have any other tips for softening brown sugar again? I’d love to hear them!


Like this post? SHARE it!

Related Posts Plugin for WordPress, Blogger...

5 Ingredients That Should Be In Your Pantry

No matter who you are, there are most likely times when you’d like to save a little money. Whether it be after the hemorrhage of money around Christmas time, when you’ve just shelled out your life savings for a medical bill, or just when you’d like to save up for something nice. Buckling down your finances is just part of life for most. And then there are weeks when you just don’t feel like braving the stores or searching for deals.

It doesn’t matter what the case, there are staple ingredients that can save you money and create meals in a pinch. Also very versatile, these also provide the base for several different types of meals in case you have a craving.

Here are 5 ingredients that you should have in your pantry (in no particular order) that can keep you AND your wallet sane when necessary.

1) Rice
Of course this is on the list! There are so many recipes that can easily be adapted and prepared with rice. From shining as the most important ingredient in a main dish to being mixed with herbs as a side dish, rice never disappoints even the pickiest of eaters. Not only is it extremely versatile, but it’s also very affordable. Buying it in bulk can really save your pennies in the long run. Coupons can also help to save money on rice. Mahatma and Riceland Rices usually have coupons out that can often make a bag close to free at stores that double coupons.

When it comes to rice, a little goes a long way. Since the grains absorb the water that it is cooked in, your cup of rice will actually become 2 cups when cooked properly.

Some simple ways to use rice:

  • Cheeseburger Rice- 1 lb ground beef, 1 and 3/4 c. water, 2/3 c. ketchup, 1 tbsp mustard, 2 c. uncooked minute rice, 1 c. cheddar cheese. Brown the meat then drain, add water ketchup and mustard and bring to boil. Stir in the rice and sprinkle with cheese. Cover and cook 5 minutes and serve. (courtesy Razzle Dazzle)
  • Leftover Rice in Chicken Fried Rice– Using leftover rice, throw it in the skillet with chopped onion, bite-size pieces of chicken, a scrambled egg or two, and any vegetables that suit your fancy. A few tablespoons of teriyaki and soy sauce and you have chicken fried rice worthy of being called homemade takeout.
  • Slow-Cooker Red Beans and Rice– Throw a pound of dried red beans along with a chopped onion and garlic into a slow cooker with 7 cups of water. (Add smoked sausage if preferred) Cook on high for 6-7 hours. Serve over cooked rice for a weeknight meal without any fuss.

2) Pasta
Just like rice, pasta is a very verstaile ingredient that can used in several easy dishes. Needing only water to come to life, even the simplest of additions can make for a filling meal. A typical box of spaghetti won’t run you more than $1.50 at the store and the stores brands are even cheaper most places. During a sale or with a coupon, you can sometimes get it nearly free. This is one of the few things that I always have a bunch of, just in case.

Some simple ways to use pasta:

  • Simple Spaghetti– I couldn’t give you suggestions without mentioning the obvious. Store bought or homemade pasta sauce creates a meal for the whole family in literally minutes. Add in meats or veggies to make it even more hearty.
  • Baked Ziti– Using your favorite pasta sauce, ricotta cheese, and mozzarella cheese, you can easily whip up yummy Baked Ziti. Always a crowd pleaser.
  • Pizza Pasta- Using canned tomatoes, pepperoni, and mozzarella cheese along with spices can add some italian pizza pizazz to your pasta!

3) Flour
There’s no mistaking the role of grains in the art of cooking. Many recipes, including the cravable sweets and savory biscuits call for flour. It’s the cornerstone of breads and other baked goods that are simple and inexpensive to make at home.

Simple ways to use flour:

  • Basic Yeast Bread– Combining 6 cups of all-purpose flour with 2 tablespoons dry yeast and 2 cups of water can create a simple bread. Let the ingredients rise for 15 minutes, then divide the dough into two. Bake at 400 degrees for 40-50 minutes.
  • Simple Biscuits– Using only 2 cups of self-rising flour, 1/2 cup butter, and 1 cup milk you can create a dozen homemade biscuits! Bake dough at 400 degrees 10 to 15 minutes.
  • Easy Fried Chicken– Scramble an egg. Dip fresh chicken in egg and then cover in flour. Skillet fry chicken on both sides until golden brown.

4) Canned Tomatoes
These little babies are a part of a meal in my house at least 2-3 times a week. Canned tomatoes can be used in just about anything and add flavor, texture, thickness, and color to several meals. Keeping a few cans of whole tomatoes or diced tomatoes on hand is a smart way to have a back-up meal at your fingertips at all times.

Simple ways to use canned tomatoes:

  • Creamy Tomato Pasta– Soften a block of cream cheese and mix with a can of (your preference) tomatoes in a skillet. Serve over cooked pasta.
  • Easy Chili– Combine canned tomatoes with kidney beans, ground meat, and chili seasoning and you have a simple chili in no time at all.
  • Simple Salsa– Use your canned tomatoes to combine with lime juice, chopped onion, minced garlic, fresh cilantro, salt, pepper, and jalapenos for heat to create a simple at-home salsa.

5) Dry Beans
These little gems make any dish hearty and full of fiber. You can’t beat their affordability compared to canned beans and they don’t go bad for at least a year! These are the exact traits that I look for in a pantry item for saving money on meals. Like rice, they tend to double once reconstituted which means more for your money. They key is soaking them completely covered for at least 4 hours up to 24 hours before cooking.

Beans make a great addition to any meal. The recipes are endless! Stock your pantry with your favorites then add to any soup, stew, casserole, or chili.


Like this post? SHARE it!

Related Posts Plugin for WordPress, Blogger...