Triple Thick Banana Cranberry Smoothie

This is a Sponsored post written by me on behalf of Carton Smart for SocialSpark. All opinions are 100% mine.

One of the forgotten ingredients around the holidays that can tend to get a bad rep is of course, the cranberry sauce. Typically at the family gatherings that I attend, someone always buys it "just in case" and then it never makes it to the table. However, this all changed last year when my oldest realized that she is in love with such cranberry sauce.

Now it is simply a requirement. 

Don't get me wrong, I like cranberry sauce. I'll even eat the kind out of the can. Although sometimes it can have a tinny taste to it depending on the brand. I got to try out some pretty cool products from Tetra Pak that are packaged in cartons, not cans! How perfect is that? No tinny taste and not only that, but they use 1/3 less packaging compared to cans.

 photo 62adf36b-e1dc-4d93-98c1-aa80d97a468d_zps600d562e.jpg

Tetra Pak doesn't just package cranberry sauce either. You can find a variety of products for making your upcoming holiday meals!

 photo 1898ca76-3272-4baf-a8df-07abf60e15e3_zps1bf425e9.jpg

The products that I got to try out seemed so much more compact in their little cartons. I love the fact that they make less waste than your regular everyday food packaging.

 photo d1d52bb8-c150-4f19-9a7c-b8c9ab3c8df3_zpsac6b75dd.jpg

 photo 795e421d-1ec8-414e-b1b8-dde8f5f23ded_zps62983f0a.jpg

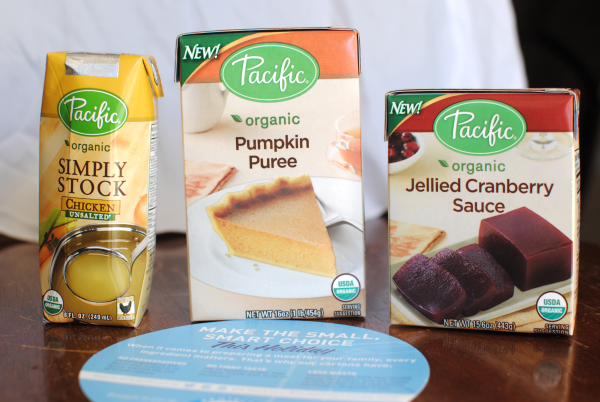
Here are the beauties I got to try out. Look at that cranberry sauce. You can even enjoy a different shape than the famous can circle when you get it from a carton.

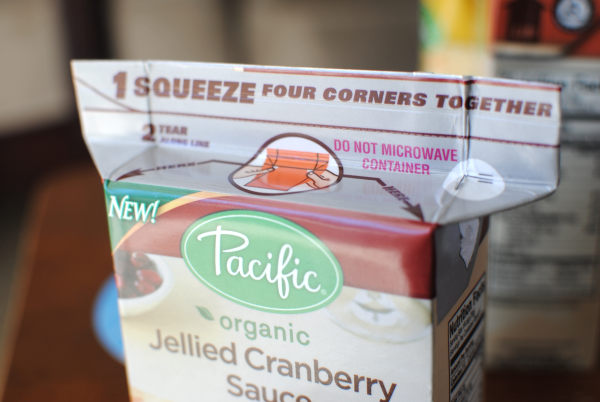
I think what I loved most about the carton was how easy it was to open

I used some of my cranberry sauce to surprise my daughter with as an afterschool snack. We found out that my youngest is also a very big fan of cranberry sauce now too. Had to break up a sibling fight over it!

How can you be Carton Smart this holiday season? Well, you could make something up like I did! I some of the cranberry sauce to whip up a quick smoothie for my hubby while he was working. You know me and my experimentations. I threw this together in about 5 minutes and it was really good! A great way to use up leftoever cranberry sauce if you ever need to. 

Triple Thick Banana Cranberry Smoothie

Ingredients

1 whole banana, frozen
1/4 c. cranberry sauce
1/4 c. water

Directions

Blend all ingredients in a blender until smooth. Viola! 

In the meantime, you should Become Carton Smart and check out the other products that you can get in a carton. It makes a difference, it really does!

You can also follow them here:

Tweet @CartonSmart and Follow #CartonSmart on Pinterest

Visit Sponsor's Site


Like this post? SHARE it!

Related Posts Plugin for WordPress, Blogger...

Candy Cane Brownies

Candy Cane Brownies 1

The following post is brought to you by McCormick! All opinions expressed are 100% mine.

Christmas reminds me of so many things. The birth of Jesus Christ, Santa, presents, stockings, family, and so much more. And I can almost taste the flavors of Christmas when I start to imagine it each year. You have your cinnamon and apple, gingersnaps, chocolate from Santa’s chocolate chip cookies, and then there’s peppermint.

It’s not Christmas until I’ve seen a candy cane y’all!

I’ve never been a diehard peppermint fan. I wouldn’t even say that I eat even 1 candy cane per Christmas season. But I will say that when you have severe coffee breathe, peppermints are your best friend!

I am a fan of peppermint ice cream, peppermint and white chocolate, and any other creamy combination like those. I just love how it can be complemented by something that will take it’s sting away a little. You know what I’m talking about?

Last Christmas, I made homemade peppermint marshmallows. They were soooo good! I used extract to give it the flavor so no crunching from the peppermints was necessary.

Candy Cane Brownies 3

McCormick makes a good pure peppermint extract perfect for capturing that Christmas flavor this year. I cannot WAIT to share this next recipe with you. It is one of those recipes that your friends and family will probably request that you make for them over and over every year.

I’ve only made it once and it has already been requested a second time!

Let me start off by saying that I saw a picture of these taken by the talented folks at McCormick and I thought wow those look tasty. Mine will never look like that, but maybe they’ll at least taste like them! You know those recipes that are impossible to actually make look as appealing as they do in the original presentations. Well, I can attest that these will look very close to the original if you follow all the directions correctly! You’ll be famous for these!

Candy Cane Brownies 2

And trust me, they aren’t as difficult to make as they look. They take a little bit of time, but you can just catch-up on your face book or watch a Christmas movie while you’re slaving away.

Candy Cane Brownies
Recipe Type: Dessert, Treat
Author: McCormick
Ingredients
  • 1 pkg (family size) Fudge Brownie Mix
  • 2 and ½ c Powdered Sugar
  • ½ c butter (1 stick) + 7 tbsp, divided
  • 1 and ½ tbsp heavy cream
  • 1 tsp McCormick Pure Peppermint Extract
  • 12 oz Semi-Sweet Baking Chocolate (I used choco chips)
  • Crushed Peppermint Candies, optional
Instructions
  1. Preheat oven to 350°. Prepare brownie mix as directed on package. Spread into greased foil-lined 15x10x1 dish. (I used a 9×13 pan)
  2. Bake 15 min or until a toothpick comes out clean. (I baked mine for more like 26 minutes.) Cool on wire rack.
  3. Meanwhile, beat powdered sugar, 7 tbsp butter (melted), cream, and peppermint extract in a large bowl on medium speed until well-blended. (this mixture will be extremely thick, sorta like a peppermint patty middle) Spread evenly over cooled brownies. (You might need to use your hands to press it down evenly among the brownies. I also had to take a little from thicker spots and add it to the thinner places) Refrigerate for 30 minutes.
  4. Microwave chocolate and remaining ½ c butter (melted) in a large microwave safe bowl on HIGH for 2 minutes or until the butter is melted. (You may need to adjust the time depending on your microwave) Stir until the chocolate is completely melted. Spread over chilled brownies. Sprinkle with crushed peppermint candy, if desired. (I refrigerated mine again at this point to harden the ganache on top)
  5. Cut into 36 squares and serve!

You can find the original recipe where they like to call these Peppermint Bars over at McCormick!


Like this post? SHARE it!

Related Posts Plugin for WordPress, Blogger...

Free LEGO Minifig Holiday Card

This post brought to you by LEGO. All opinions are 100% mine.

Each year there are tons of cute little ways to personal holiday cards over the web. I'm sure you've seen the Elf Yourself thing that goes around each year. I still have our previous years saved and I watch them every now and then. I get a big giggle out of seeing a video of my 2 year old dressed in an elf suit and break dancing like a hip hop star.

Here's a new idea that was very timely this year. Addie has discovered that she loves LEGOs as of recently. We have even been going to LEGO club at our local library. I always expected LEGOs to be a boy thing, but Addie has proved that to be untrue. She absolutely loves creating little scenes with LEGOs. 

I came across this holiday card offer where you can make your very own family into a LEGO family and then send it around all of your social media pages to share with family and friends. I had a blast creating ours. You can choose everything from skin color to facial expressions and even the outfit. I played around with the facial expressions a bit until I found the ones just right for each of us. 

What do you think of my card? Pretty cute huh? The best part is that it's FREE!

You can head over and make your own LEGO Minifigure Family and share it with your friends and family this Christmas!


Visit Sponsor's Site


Like this post? SHARE it!

Related Posts Plugin for WordPress, Blogger...

Krispy Oreo Cookie Balls


I remember the very Christmas that I was introduced to what was called “Oreo Balls”. The most wonderful and decadent morsels made of crushed Oreo cookies and cream cheese all contained within a crust of white chocolate.

It does not get any better than that.

I must have made them 5 times that Christmas for different functions. And they have become a go-to treat ever since. While some desserts and treats can end up so stressful over the holidays, it’s always nice to have something like these Oreo Cookie Balls to fall back on since they are so easy! And not to mention that they taste amazing.

The best part is that you can practically make them festive for any holiday. Christmas is especially fun because they easily look like little snowman heads. Or simply add some red or green glitz and glam with sprinkles while they are still wet. Put them on a stick or serve them in a bowl!

You can find some super fun ideas for creating your own festive Oreo Cookie Balls HERE. There’s everything from penguins to Nutter Butter Cookie Ball ideas there. I also think that the pretzel idea for reindeer antlers is genius! You can also follow @Oreo on twitter for more cookie ball inspiration.

I made this last batch a little more on the simple side when it came to decoration. My coloring didn’t exactly work out for turning red, so I settled on pink which didn’t really matter because they were just going to get eaten anyways.

The biggest change that I made this time around was a complete experiment. I attempted to merge 2 of my favorite treats into one: Oreo Balls and Rice Krispy Treats. I decided to make them both as normal and then simply stir them together and finish off the cookie ball recipe as normal. Hence the name Krispy Oreo Cookie Balls. While the first day that I made them they were Krispy, I must confess that they lost that “krispiness” after the next day or so. That cereal tends to become soggy after a while so it didn’t surprise me. But I will say that I liked the way that the Rice Krispy Treat made the Oreo Balls lighter and not as rich. I also used Almond Bark instead of regular semi-sweet chocolate chips.

We enjoyed them!

Pure bliss in every bite. They are addicting and sure to be a hit at any holiday gathering! I’ll give you the original recipe and also the recipe that I made in case you want to try it out.

Original Oreo Cookie Balls
Ingredients
  • 1 pkg (8 oz) Cream cheese, softened
  • 36 Oreos, finely crushed (about 3 cups)
  • 4 pkgs (4 oz) semi-sweet baking chocolate, melted
Instructions
  1. Mix cream cheese and cookie crumbs until blended.
  2. Shape into 48 (1-inch) balls. Freeze 10 min. Dip balls into melted chocolate; place in a single layer on a pan covered in wax paper.
  3. Customize how you’d like!
  4. Refrigerate an hour or so until set.
  5. Enjoy!


Krispy Oreo Cookie Balls

1 pkg (8oz) cream cheese, softened
36 Oreos finely crushed (about 3 cups)
1 pkg Almond Bark, Melted

Mix cream cheese and cookie crumbs until blended.
Meanwhile heat 3 tbsp milk in a sauce pan over low heat. Add 10 oz bag mini marshmallows and stir until melted.
In a large bowl, add 6 cups Rice Krispies to melted marshmallows. Combine well.
Stir together Rice Krispies Mixture with Oreo Mixture until well-combined.
Shape into 48 (1-inch) balls. Freeze 10 min. Dip balls into melted almond bark; place in a single layer on a pan covered in wax paper.
Customize how you’d like!
Refrigerate an hour or so until set.
Enjoy!

This is a sponsored post written by me, made possible by Yummly, on behalf of Oreo. All opinions expressed are 100% my own. For more information, review my disclosure policy.


Like this post? SHARE it!

Related Posts Plugin for WordPress, Blogger...

Cilantro Salsa Burgers

It’s summer time and there’s no stopping the men and their grills. Am I right? It’s a right of passage. And can we really complain? The chance to sit back and relax while watching someone else do all the cooking for once? I think I’ll take that deal.

During the summer we try to grill at least once a week. It’s nice for the whole family to get outside and enjoy summer nights playing together while daddy gets dinner ready. Memories are being made. Of course, grilling goes hand in hand with a very simple (yet taken seriously) dish, burgers. The oh-so-meaty, versatile, and flavorful burger. My husband would consider himself a connoisseur of burgers. And he has a right to. His most favorite food of all time and he’s eaten his way in burgers across the country.

One of the ingredients in most burger recipes is the binder, an egg. Have you ever used mayonnaise instead? It’s very tasty! A simple ingredient that can take your burger from boring to bam.

Hellmann’s is celebrating their 100th anniversary! Can you believe that they have been around that long? You know that a product is good when it’s been around for that many years and people still enjoy it today. As part of Hellman’s 100th celebration, they are helping to provide 1 MILLION meals to Feeding America to fight against hunger nationwide. They are also teaming up with celebrity chef Mario Batali (I’m a fan!) to showcase classic Hellmann’s recipes with a modern twist.

In fact, they have a contest going right now to give YOU a chance to win a trip to New York City with a seat at the World’s Longest Picnic Table celebrating Hellmann’s 100th anniversary. You simply have to make Mario’s twist on Hellmann’s classic recipes your own. The Create A Recipe With Mario facebook app has more details about the contest. These are simple and classic recipes, it would be a cinch to enter!

I was stoked to give it a try so I created these Cilantro Salsa Burgers.

Theses are the ingredients. I have to admit that I’ve never considered putting salsa on my burger, but I love trying new things so I was all for it. The cilantro and lime really bring a new and spin on your every day burger. This is a refreshing burger to say the least!

Getting your hands dirty is the best part! Or the worst, depending on who you are. I consider this fun and blissful. 🙂

Mario used ground chuck for his burger, but I used ground turkey to make them a tad bit more healthy.

Viola! Easy peazy lemon sqeezey. My husband gave his burger stamp of approval so you can be sure they are good. I hope that you’ll give these a try. And I also hope that you’ll enter Hellmann’s 100th Anniversary Contest to win the trip to New York City by creating your own twist.

Cilantro Salsa Burgers
Recipe Type: Burger, Main Dish
Cuisine: Grilling, Meat, American
Author: Pennywise Cook
A simple yet tasty burger recipe made with salsa, corn, and cilantro!
Ingredients
  • 1 lb Ground Chuck
  • 1 lb Lean Ground Turkey
  • 1/2 Onion, Peeled and Grated (makes for good juice)
  • 3 tbsp Worcestershire Sauce
  • 1/4 c Hellmann’s Mayonnaise
  • 1 tbsp Chili Powder
  • 1/4 c Cilantro, Chopped fine
  • 2/3 c Whole Kernel Corn
  • Zest of 1 Lime
  • Juice of 1 Lime
  • Salt and Pepper to Taste
  • 1 c Salsa (for topping burgers)
  • 8 Hamburger Buns
  • Sliced Cheese (optional)
Instructions
  1. Heat a skillet or grill to medium high heat.
  2. Combine all ingredients except for the salsa. Shape into patties.
  3. Grill to desired temperature.
  4. Top with 2 tbsp salsa each and serve!
Notes

For the corn, you can use canned if you like. Just make sure to drain it well. You could also use frozen, just be sure to thaw it. And of course, fresh will work too!

This is a sponsored post written by me on behalf of Hellmann’s and Yummly. All opinions expressed are 100% my own.


Like this post? SHARE it!

Related Posts Plugin for WordPress, Blogger...

Summer is a Piece of Cake!

Welp, Memorial Day has come and gone which means WELCOME SUMMER! Wahoo! I got to sleep in this morning until about, oh, 7:15. That’s good right? The kids slept in, but me? No. I’m still stuck in let’s get going, get your shoes on, eat your breakfast mode. I’m hoping that nonsense will wear off soon. I’ve got to at least work up to sleeping to 8:00, don’t ya think?

My youngest turned 2 this weekend! It’s hard to believe that she is already 2. Her favorite show is Mickey Mouse Clubhouse, so naturally that became the theme of her party. I had a TON of fun putting it together. Don’t worry, I have a post all about it coming up.

I wanted to share with you my Cookies N Cream Cupcakes. While I didn’t put together a step by step with these, they were really simple. I used Devil’s Food Cake Mix for the cupcakes. Only, I added a sweet surprise. Before baking, I placed a chocolate sandwich cookie in the bottom of each liner and then a dollop of marshmallow cream on top. THEN I plopped cake batter in. So they baked up with a cookie and filling inside!

For the frosting, I made a simple buttercream (no shortening in this one) and added about 1/2 cup of crushed chocolate sandwich cookies to the mix. Then piped it on and voila! These were so incredibly tasty. The cookie inside became soft after a while which I thought I wouldn’t like, but I found them to be even tastier that way.


Of course, I had to Mickeytize them for the party. Here’s a sneak peek of the Mickey fun! More on that later…

I think summer is one of the best times to create cool cakes. Not just because most of us have a little more time on our hands, but because the kids can help out! That is, if they can tear themselves away from the TV and video games…

Betty Crocker has got some really cute ideas for summer cakes. And you know that Betty Crocker likes to make things easy for us moms. There are some really cute cake ideas on the Betty Crocker website. I LOVE the Watermelon Cake. I think I’ll be trying that one out this summer. Considering that most of my family doesn’t like really watermelon, maybe they’d like it in cake form? I also find the butterfly cake to be adorable. It looks a little complicated, but Betty Crocker even provides a template for making it. How helpful!

Have you seen the cupcakes made in ice cream cones yet? It’s a popular pin on Pinterest right now. Check out the infographic that Betty Crocker put together about how to easily put those cuties together.


Have you made the ice cream cone cupcakes before? I haven’t yet braved them so I’d love to hear your thoughts!

I made these In The Garden Cupcakes last year. They were a blast to make. You can find out how to make them here.

I’m full of inspiration for making cakes this summer now! You can find more summer cake inspiration from Betty Crocker!

This is a sponsored post written by me on behalf of Betty Crocker. All opinions expressed are 100% my own.


Like this post? SHARE it!

Related Posts Plugin for WordPress, Blogger...

Things That Say Cluck: Dinner Made Easy

I can’t help my love for chicken. I love it almost any way that you can cook it up. Though if it’s difficult, you most likely won’t catch me trying. I’m all about the simplicity of meals as most of you already know by now. I’m also fond of eating healthy and this is another reason why chicken is my meat of choice on most occasions. With the exception of frying it, you can really eat very healthy when you pick chicken over other meats. If you’re like me in the simple and healthy boat, then listen up!


Check out those stats! Here’s an interesting fact: the stats based on the survey above state that 66% of women and 61% of men admitted to cooking most often with chicken! Kinda staggering consider how men like their steaks and pork chops don’t you think?

One of my favorite shortcuts when it comes to simplicity (and healthy too!) are the Tyson® Grilled & Ready® products. I actually just made dinner with them last night. I cut the grilled strips into bite-size pieces, tossed them with some brown rice and stir-fry veggies along with some seasonings and voila! Super fast and easy chicken fried rice. 

Tyson® Grilled & Ready® chicken and beef products are fully cooked, available in the frozen and refrigerated sections. Tyson® Grilled & Ready® frozen chicken and beef products are conveniently packaged in resealable bags to create delicious and smart meals in minutes

Or check out this yummy Chicken Avocado and Pear Wrap Recipe below.

 Chicken Avocado and Pear Wraps

Recipe courtesy of Tyson Foods, Inc.


Prep Time: 10 min

Cook Time: 0 min            

Total Time: 10 min

 Ingredients:

 6 ounces Tyson® Grilled & Ready® Fully Cooked      Refrigerated Grilled Chicken Breast Strips

  • 2 large whole wheat tortillas
  • 1/2 cup cream cheese
  • 1 shallot, finely chopped
  • 1 avocado, peeled, pitted and      julienned
  • 1 small pear, julienned
  • 1/4 cup walnuts, coarsely chopped

 Cooking Instructions:

 Prepare Grilled & Ready® Chicken Breast Strips according to package directions.

  1. Spread each tortilla with cream cheese to within 1/2 inch of edges. Sprinkle evenly with chopped shallot.
  2. Arrange chicken in a line across center of tortilla, top with avocado and pear slices. Sprinkle walnuts      over top.
  3. Roll up and tuck in the ends. Wrap in plastic wrap and refrigerate until ready to serve.
  4. Slice in half for presentation.

Serving Suggestion:

Serve with a side of fresh fruit. 

Nutrition Facts:

 Calories 370 Total Fat 14 g Protein 22 g Carbohydrate 41 g Cholesterol 35 mg Sodium 640 mg

 Serves: 4

Countdown to a Better You Program 

Just in time for summer, Tyson® Grilled & Ready®  is rolling out a program designed to help you feel better about yourself! The Countdown to A Better You program not only helps you eat healthier with Tyson Grilled & Ready products, but it also gives you a chance to win some awesome stuff! The “Countdown to a Better You” program will motivate you to eat smarter by encouraging you to create good-for-you recipes with a variety chicken and beef products. To reward you for eating better – the more products you buy, the better the prize!

You’ll need to go HERE  and click on the “Countdown to a Better You” tab to register for the program which runs through June 21st, 2013. Start purchasing the Grilled & Ready products. You only need 6 of them to be eligible for the first prize level! You can also enter the sweepstakes for a chance to win 1 of 10 gran prizes- a $500 visa gift card!

1. Buy Tyson® Grilled & Ready® products
2. Save UPC codes from eligible Tyson® Grilled & Ready® products
3. Redeem by mailing in UPC codes along with the submission form available at Facebook.com/GrilledandReady to receive gift codes you can use at online retailers.  

 You decide the value of the gift code.

 6 UPC codes = $10 gift code
 9 UPC codes = $25 gift code
12 UPC codes = $50 gift code 

Plus, while supplies last, there are 10,000 product coupons available on their facebook for download!

I was compensated for this sponsored post made possible by Mom Spark Media. All thoughts are 100% my own.


Like this post? SHARE it!

Related Posts Plugin for WordPress, Blogger...

YumEarth Organic Candy Review and Giveaway

We’re at the grocery store picking up our weekly groceries. There’s but one thing that I can guarantee that my daughter is going to ask for….

Gummy snacks.

We’re talking fruit snacks, fruit roll-ups, gummy bears, and you name it. She’s going to request that we throw it in the buggy. Yes buggy. That’s what we call them here in the south y’all. I don’t usually mind grabbing some for her snack box at school or perhaps something to snack on in the afternoons. But sometimes, I have to draw the line. She would eat them every second of every day if I let her.

I often find awesome deals on YumEarth Organic Gummy Bears on Amazon so I was thrilled to get a chance to try these out for myself. And to let my little gummy connoisseur try them for herself.

I didn’t actually tell her that these were organic before she tried them. I didn’t think it would matter and I was right! She loved them and so did I.

I will say that I was a little thrown off by their color. They seemed a little drab in color and not as bright as most gummy bears, but that didn’t mean they tasted bad. They were still really yummy. They reminded me of a cross between gummy bears and fruit snacks. Gummy bears tend to be tougher and fruit snacks are usually soft. This was a blend of the two. Either way, it only took us a couple of days to go through our tasty bag of 10 packs.

Come to find out, YumEarth was founded by two DADS who were on a mission to share wholesome treats with their kids. YumEarth is dedicated to making delicious treats and sweets with all-natural ingredients, no artificial colors, no artificial flavors, and no major allergens, such as gluten, nuts and dairy. Pretty sure that most anyone can eat these and not have to worry about any funky ingredients.

There are tons of everyday stores that carry these. So be on the lookout at your store or find out where you can locate them here.

In the meantime, you wanna win a FREE bag of these for yourself? It’s a GIVEAWAY!

____________________________________________________________________

YumEarth Organic Gummy Bear Bag Giveaway

Mandatory Entry: Leave a comment on this post telling me who you think would eat these if you won!

Optional Additional Entries:

This giveaway will end on December 20th at 11:59pm CT. I will contact the winner on December 21st and they will have 24 hours to respond. If I have not heard from them in 24 hours, I will name a new winner. This giveaway is open to those in the US only.

This review was made possible by Mom Spark Media. Thoughts are 100% my own. All prizing for MSM giveaways is handled by a third party unless otherwise noted. For this reason prize fulfillment can take up to 90 days after the winners information is received.


Like this post? SHARE it!

Related Posts Plugin for WordPress, Blogger...

$50 California Wine Club Giveaway!

You may have read my last post and review about the California Wine Club. Do you know someone who has a plaque or perhaps a magnet that says “Life is Too Short to Drink Bad Wine”?

Yeah, this just might be the perfect Christmas gift for them. Or hey, if it’s YOU with that magnet, we’re not going to judge. Go on ahead and grab yourself a membership. 😉

Basically, you get 2 bottles of homegrown, not-sold-in-stores, even award-winning wine each month delivered to your door. What a concept!

This is Bruce and Pam Boring. Their last name may sound less than enthusiastic, but their desire for wine certainly is not! They are the ones behind this specialty club and the tasters that bring you the unique wine each month. Isn’t it nice to have a face to go with a company?

I was recently sent another shipment from the California Wine Company with a Merlot and a Chenin Blanc from David Grehrs. Both of which I never would have had the opportunity to try if it wasn’t for this club! I’m not much a Merlot drinker, but I really enjoyed the Chenin Blanc. Nice and sweet, but not overly.

If you’re thinking about getting someone a unique and fun gift this year, be sure to check out the California Wine Company. Here’s how:

Wanna check it out for yourself? Here’s how to find them:

www.cawineclub.com
California Wine Club Facebook
California Wine Club Twitter

Now, how about a FANTASTIC giveway?! The winner will receive a $50 credit to try it all out for themselves!

__________________________________________________________________________

California Wine Club $50 Credit Giveaway

Mandatory Entry: Leave a comment on this post telling me your favorite kind of wine. Or one you’d like to try!

Optional Additional Entries:

This giveaway will end on December 12th at 11:59pm CT. I will contact the winner on December 13th and they will have 24 hours to respond. If I have not heard from them in 24 hours, I will name a new winner. This giveaway is open to those in the US only. 

This review was made possible by Mom Spark Media. Thoughts are my own. I received a 2 month Membership to the California Wine Club for the purpose of this review.


Like this post? SHARE it!

Related Posts Plugin for WordPress, Blogger...

California Wine Club is Nothing to Wine About

Could there be anything better than enjoying a cozy evening with a glass of wine and great conversation? Maybe a really tasty meal as well, but the wine really helps doesn’t it? I’m not a big drinker, but I do enjoy really good wine to take the edge off every now and then. I’m a MOM, what do you expect?

I can’t tell you how many times I’ve randomly picked a bottle out at the liquor store just hoping that it would taste decent. I’m no expert, but I know what I like and also enjoy trying new wines. Especially those recommended by friends. You know those friends, the ones that know everything about every wine out there.

We all have one of those friends don’t we?

Enter the California Wine Club. They are kinda like that friend. Bruce and Pam Boring started this club over 20 years ago. Each month, they travel California’s fertile wine country to local wineries. They meet the families that run them and taste their wine. Then they share them with the club! It’s like a “cookie of the month club”, but with wine.

My favorite part is that they all come from family-run mom & pop wineries. Usually, that’s where the hidden gems are and it’s awesome to be able to try wine that you might never have been able to experience before.

I received a membership this month and was thrilled to receive my first shipment! Each month, your membership comes with 2 bottles of wine. One red and one white. But they will work with you if you prefer all white or all red. You’ll also receive a copy of their magazine Uncorked. It’s full of info about the wine you’ll be drinking along with tips, recipes and more. Plus, discounts and special offers for reordering your favorites.

The coolest thing is that they share with you the story behind the winery where your wine came from. There is even a picture of the people/family that run it in the magazine. Plus, ahem, you get wine set to your front door. How incredibly awesome is THAT?

It really is cool idea. And with Christmas around the corner, this would make a stellar gift idea for the wine lovers that you know. Or you know, just a treat for yourself. Once you join, there’s no obligation. You can cancel anytime which means you can give it a try. They have a few different options of shipments to choose from as well.

Wanna check it out for yourself? Here’s how to find them:

www.cawineclub.com
California Wine Club Facebook
California Wine Club Twitter

And you do NOT want to miss out on my next post about these folks y’all. There might just be a giveaway in the works and I can’t WAIT to share! Stay tuned.

This review was made possible by Mom Spark Media. Thoughts are my own. I received a 2 month Membership to the California Wine Club for the purpose of this review.


Like this post? SHARE it!

Related Posts Plugin for WordPress, Blogger...