Homemade Peppermint Patties

Peppermint Patties 2

How was your Thanksgiving? Get enough turkey and dressing? What about family, did you get enough of them? I love spending time with my family both immediate and extended. I can’t wait until Christmas! Right before Thanksgiving break I had this bright idea that I could create homemade peppermint patties. I always love a challenge. If you remember back a couple of years ago, I attempted to make a bunch of homemade candy bars. I made Homemade Butterfingers, Homemade 3 Musketeers, Homemade Kit-Kats, and  Homemade Reeses Cups. All 3 of those were a success!

..And then I attempted the Milky Way and it was a disaster. I tried more than once even, and it just wasn’t happening. I gave up.

So maybe this is a way to redeem myself by making peppermint patties? Either way, I’m happy with the results and I can’t wait to share them with you!

Peppermint Patties 3

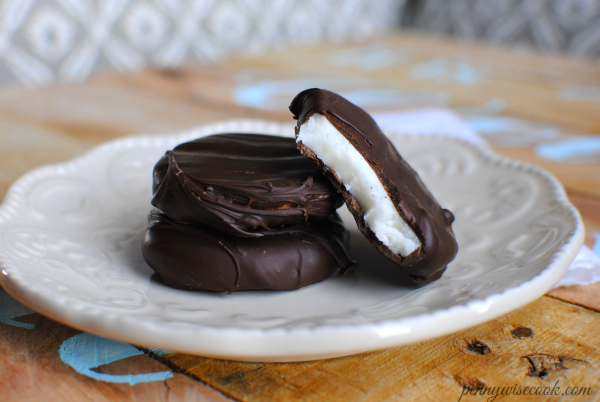
Do you remember my Candy Cane Brownies from last year? They are SO good and you must make some if you haven’t. My husband has been known to eat entire pans of them… I was getting ready to make them for Thanksgiving. There’s a layer of these brownies that consists of a thick  peppermint-y dough and I thought why not try to make this dough into peppermint patties? You could simply shape it and then dip it in chocolate!

So I did. 

Peppermint Patties 1

I’m going to be honest with you. The first TWO times I made them, I failed. I couldn’t figure it out and I almost gave up on these too. I decided that it could be the butter I was using. Some recipes it makes no difference if you use real butter or not. Others, you absolutely HAVE TO use real butter. THIS is one of the latter recipes. I thought it had something to do with the fact that the butter was melted or not. So I tried my artificial butter melted and then softened and both times, I failed. Blah. 

And then when I had the butter realization, it worked!

The moral of this butter story? USE REAL BUTTER.

Peppermint Patties 4

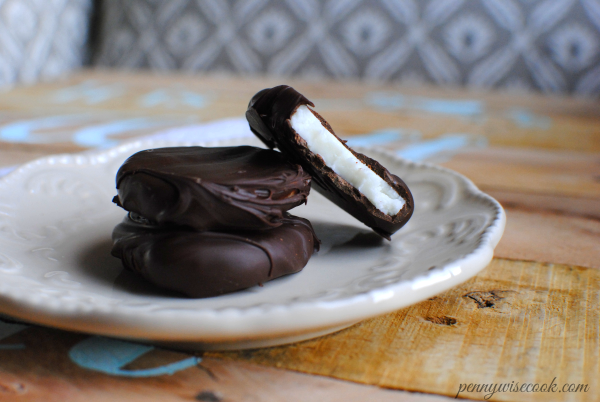
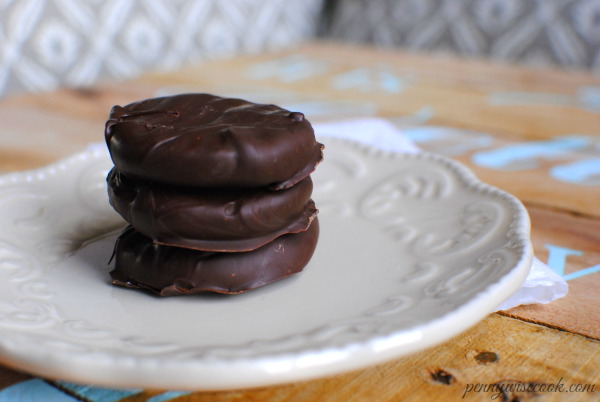
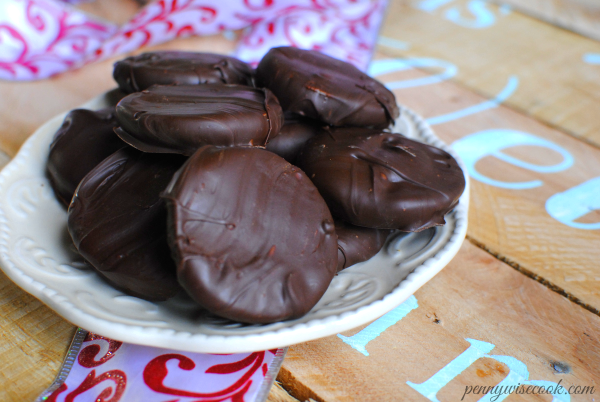
 I have had rave reviews about these. They are so smooth and creamy and remind me so much of the holidays. They would make great gifts.

Let me know if you try them!

Homemade Peppermint Patties
Write a review
Print
Ingredients
  1. 2 & 1/2 c. Powdered Sugar + some for dusting
  2. 7 tbsp butter, melted
  3. 1 & 1/2 tbsp heavy cream
  4. 1 tsp Peppermint Extract
  5. 4 c. Chocolate Chips (2 12 oz bags)
Instructions
  1. Beat powdered sugar with heavy cream and peppermint extract. Make sure to scrape the bowl. Slowly add in melted butter. Mixture should become like dough.
  2. Remove from bowl and knead. Sprinkle a little powdered onto counter surface. Knead dough until smooth.
  3. Roll out dough until fairly thin. Use something circular to cut out small circles. Place on wax paper and onto flat surface. Freeze circles for at least a couple of hours.
  4. After circles are frozen, remove from freezer and let sit out for a few minutes.
  5. Melt chocolate chips over double boiler or in microwave.
  6. Dip circles in chocolate and place on wax paper to set.
Notes
  1. Make sure that you slowly add in the butter. Once the mixture becomes a dough, if it's too runny or sticky, add in some powdered sugar to thicken it up.
  2. You can add more or less peppermint extract depending on how peppermint-y that you like it.
  3. I found that keeping them in the refrigerator keeps the insides more firm and more true to a real peppermint patty.
  4. You can make these bigger or smaller depending on your preference. I used the bottom of a piping tip the first time and they were a little bigger than I would prefer. You can use whatever you have around the house to make them the size you'd like.
Adapted from McCormick
Pennywise Cook http://www.pennywisecook.com/


Like this post? SHARE it!

Related Posts Plugin for WordPress, Blogger...

Easy Homemade Ice Cream Cake

Ice-Cream-Cake-Pic

Ever since I can remember I’ve been a fan of ice cream. Not just your everyday fan. We’re talking I have to have it quite often kinda fan. Not just once every now and then.

I inherited this strong love for ice cream from my dad. He taught me how to eat it straight from the tub with a fork.

Yes, a fork. 

I’ll never really understand why he liked to use a fork, but I’m almost 100% certain that it tastes better with a fork. #dontwaskmewhy

If you crave ice cream, then you might be in the mood for an ice cream cake come time for your birthday. 

Or just to stuff your face with on a random Tuesday night…

Check out this SIMPLE and awesome recipe for creating a beautiful ice cream cakey masterpiece. It looks like it came from DQ itself. I posted this recently over at Gathering Grain, but I thought it would be kind of me to let y’all in on the awesomeness as well.

Wax-Paper-Springform-Pan

 One thing you’ll most definitely need is a springform pan. If you don’t have one, you’ll want to get one. I use them for all sorts of things these days. It’s my magic tool for making things pretty. Amazon has a CuisinArt 9-inch Springform Pan for just $13.95.

Or you could just check your local thrift store next time you’re in there.

Coat your pan with non-stick cooking spray. Then place a strip of wax paper around the sides. This makes it so much easier when it’s time to take it out of the pan. It just peels off leaving it beautiful around the outside.

*Note*- Though I didn’t have this issue, a friend of mine still had some trouble with the edges sticking to the wax paper so you might even spray the top of the wax paper if you’re concerned.

Ice-Cream-Sandwich-Ring

And now, with the magic of blogging (not TV y’all because Lord knows I’m not Pioneer Woman), this is what you’ll come up with after you place your ice cream sandwiches. 

Cut them longways in half and then cut each of those halves in half again. This will give you 4 pieces per sandwich. Um k?

Filled-cake

Once again, we’re going to fast forward. You will make an easy oreo crust for the bottom and then spoon in softened ice cream (whatever flavor you choose!). I used 3 different flavors to get the neopolitan affect.

Pop into the fridge and then dollop some whipped cream and crushed cookies on top. Let set a little bit and then serve!

Or sit on your couch, use your fork, and go to town.

 Piece-of-Cake

A picture of the middle. Isn’t it pretty? It is amazingly tasty too. You’ll just have to try it for yourself!

Homemade Ice Cream Cake
A simple yet amazingly beautiful ice cream cake made in your very own kitchen.
Write a review
Print
Ingredients
  1. 18 chocolate sandwich cookies (Oreos)
  2. 1 tbsp milk
  3. 8-10 ice cream sandwiches (depending on the size of your pan)
  4. 3 pints ice cream of your choice
  5. 1 8 oz container whipped topping, thawed
Instructions
  1. Begin by removing your ice cream from the freezer. Let thaw and once its soft around the edges, transfer to bowls so the middle can thaw. Give it a good stir.
  2. Meanwhile, throw 15 chocolate sandwich cookies in a food processor to crush finely. You can also do this by hand if you don't have a food processor. I usually do this ahead of time to save time when assembling the cake. Once crushed, mix in the tablespoon of milk to create a crust mixture.
  3. Coat the bottom and sides of a springform pan with cooking spray. Cut a thick strip of wax paper and place it around the edges of the pan. The cooking spray will help it to stick. Cut any excess off the top.
  4. Cut each ice cream sandwich into 4ths and place standing up around the edges of the pan. It will appear like a wreath.
  5. Using your created crust mixture, press into the bottom of the pan evening it out all the way around.
  6. Pour your softened ice cream into the middle of the pan. Smooth out evenly. Continue with the other 2 pints of ice cream.
  7. At this point, I like to place my cakes into the freeze for about 30 minutes or so to firm up a bit before adding the whipped topping.
  8. Take out of the freezer and using a piping bag and tip or simply a ziploc bag with the tip cut, fill with whipped topping and add dollops all of the top of the cake.
  9. Crush your last 3 chocolate sandwich cookies and sprinkle over the top.
  10. Freeze for a couple of hours (or best overnight) and serve!
Adapted from Gathering Grain
Pennywise Cook http://www.pennywisecook.com/

Like this post? SHARE it!

Related Posts Plugin for WordPress, Blogger...

Easy Homemade Croutons

Happy Veteran’s Day! I am so very thankful for the men and women who served our country to give us our freedom. I don’t think that we show this enough all year. It’s a huge sacrifice to put your life on the line for people all around the country that you don’t even know and I am eternally grateful for those who have done so!

I’m a bit of a crazy salad person. I have been ever since high school. I love the crunch of crisp lettuce mixed with creamy dressing and other tasty components that go along with a salad. When we’re picking out a place to eat, my daughter will judge if I will like a restaurant by if they serve salad or not. And then she’ll say “Mom, you’ll love this place. They have salad!”. Thanks darling…

While I do like my salad, I also really like croutons. Like, really really like croutons. They are kinda like potato chips to me. Once I start, I can’t stop.

Do you have kiddos who don’t like the crust on their sandwiches? Or perhaps you make things that require you to cut off the crusts.

For instance:
Grilled Cheese Rollups
3-Ingredient Lady Fingers
White Bread Cinnamon Rolls

It’s recycling in a way. You can even freeze the crusts and make croutons later if you don’t have time right away. Just thaw them out before preparing to make croutons. How awesome is that?

Try to line them up and then just cut them into smaller pieces like above. They already look just like croutons don’t they? And in minutes they will be! Preheat the oven to 400°.

Spread them quite evenly onto a cookie sheet. Spray them well with olive oil cooking spray or butter cooking spray like me. Sprinkle with seasonings of your choice. I used italian seasoning and garlic powder.

Bake for about 4-8 minutes depending on your oven and you’re done. Store them in an airtight container and pop them out when you’re ready to eat a salad.

Or just eat handfuls of croutons…

….I don’t do that.

…Ok, maybe I do. Don’t judge.

Easy Homemade Croutons
Recipe Type: Salad Topping, Snack
Author: Pennywise Cook
Prep time:
Cook time:
Total time:
Here’s a double duty tip when you have leftover bread crusts. Make up a batch of healthy and homemade croutons!
Ingredients
  • Crusts cut off the bread of your choice
  • Seasonings of your choice (1 tsp italian seasoning and 1/2 tsp garlic powder are great!)
  • Cooking Spray
Instructions
  1. Preheat oven to 400°.
  2. Cut crusts into smaller square pieces or desired size.
  3. Spread evenly onto a cookie sheet.
  4. Sprinkle with seasonings.
  5. Bake for 4-8 minutes watching during baking to make sure they don’t burn. Mine took about 8 minutes.


Like this post? SHARE it!

Related Posts Plugin for WordPress, Blogger...

Homemade Tomato Soup

The other day my daughter came home from school and declared that she liked tomato soup. Can you imagine that? She said that they serve it at the cafeteria and that she really liked it. Then she proceeded to ask me to make some at home.

Music to my ears!

My little one actually requested something other than pizza, macaroni, or a hot dog. I was speechless.

And like any good mother, I set out to find a recipe that I thought she’d enjoy and put it on our menu plan for this week. To make the hubs happy, I made grilled cheeses (tomato soup’s partner) to go with the soup.

I found this recipe at Spark People and it is surely a winner!

The entire recipe took me only about 15 minutes to make. It made a large pot so there will be leftovers. You can even freeze this for later on.

Dipping my grilled cheese into this soup was absolutely a match made in heaven. I cannot express the happiness that this soup brought me.

I didn’t even know I liked tomato soup!

If you’re looking for a quick meal on a weeknight or perhaps a last minute idea for the weekend, this should be on your list! What’s even better is that there’s only about 71 calories per serving.

Low cal? For reals? Yuuuup!

This ain’t nothing like that mess in a can y’all!

Homemade Tomato Soup
Recipe Type: Spark People via NARKMEISTER
With just a few ingredients you can create super tasty homemade soup that pairs great with a yummy grilled cheese!
Ingredients
  • 2 Medium Onions, Diced
  • 4 Garlic Gloves, Chopped
  • 4 Cans of Chopped Tomatoes
  • 1 Pint of Stock (Your preference)
  • 1 Tbs Dried Basil
  • Low Calorie Fat Spray/Olive Oil
Instructions
  1. Brown onion and garlic in a few sprays of cooking spray over medium heat.
  2. Add 4 cans tomatoes and bring to a boil. Simmer 5 minutes.
  3. Add broth or stock and bring to a boil. Simmer another 5 minutes.
  4. Add basil and salt and pepper to taste.
  5. Use an immersion blender to smooth to your liking.
  6. Serve with a grilled cheese and enjoy!


Like this post? SHARE it!

Related Posts Plugin for WordPress, Blogger...