Easy Homemade Ice Cream Cake

Ice-Cream-Cake-Pic

Ever since I can remember I’ve been a fan of ice cream. Not just your everyday fan. We’re talking I have to have it quite often kinda fan. Not just once every now and then.

I inherited this strong love for ice cream from my dad. He taught me how to eat it straight from the tub with a fork.

Yes, a fork. 

I’ll never really understand why he liked to use a fork, but I’m almost 100% certain that it tastes better with a fork. #dontwaskmewhy

If you crave ice cream, then you might be in the mood for an ice cream cake come time for your birthday. 

Or just to stuff your face with on a random Tuesday night…

Check out this SIMPLE and awesome recipe for creating a beautiful ice cream cakey masterpiece. It looks like it came from DQ itself. I posted this recently over at Gathering Grain, but I thought it would be kind of me to let y’all in on the awesomeness as well.

Wax-Paper-Springform-Pan

 One thing you’ll most definitely need is a springform pan. If you don’t have one, you’ll want to get one. I use them for all sorts of things these days. It’s my magic tool for making things pretty. Amazon has a CuisinArt 9-inch Springform Pan for just $13.95.

Or you could just check your local thrift store next time you’re in there.

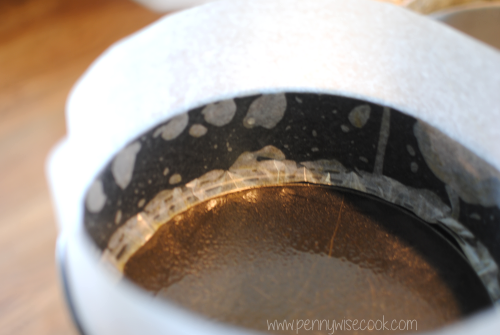
Coat your pan with non-stick cooking spray. Then place a strip of wax paper around the sides. This makes it so much easier when it’s time to take it out of the pan. It just peels off leaving it beautiful around the outside.

*Note*- Though I didn’t have this issue, a friend of mine still had some trouble with the edges sticking to the wax paper so you might even spray the top of the wax paper if you’re concerned.

Ice-Cream-Sandwich-Ring

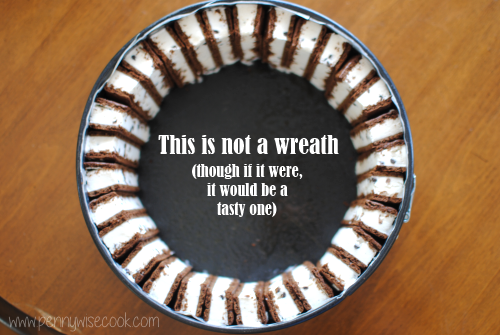
And now, with the magic of blogging (not TV y’all because Lord knows I’m not Pioneer Woman), this is what you’ll come up with after you place your ice cream sandwiches. 

Cut them longways in half and then cut each of those halves in half again. This will give you 4 pieces per sandwich. Um k?

Filled-cake

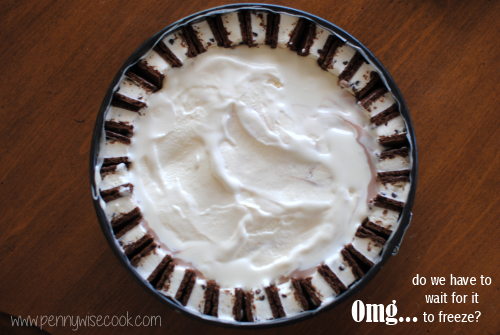
Once again, we’re going to fast forward. You will make an easy oreo crust for the bottom and then spoon in softened ice cream (whatever flavor you choose!). I used 3 different flavors to get the neopolitan affect.

Pop into the fridge and then dollop some whipped cream and crushed cookies on top. Let set a little bit and then serve!

Or sit on your couch, use your fork, and go to town.

 Piece-of-Cake

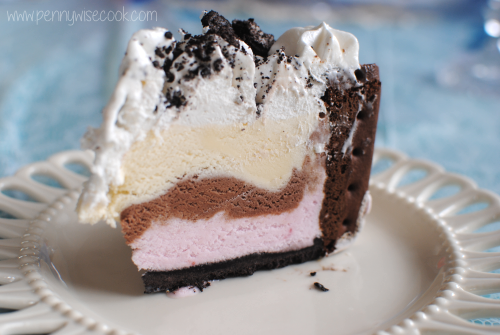
A picture of the middle. Isn’t it pretty? It is amazingly tasty too. You’ll just have to try it for yourself!

Homemade Ice Cream Cake
A simple yet amazingly beautiful ice cream cake made in your very own kitchen.
Write a review
Print
Ingredients
  1. 18 chocolate sandwich cookies (Oreos)
  2. 1 tbsp milk
  3. 8-10 ice cream sandwiches (depending on the size of your pan)
  4. 3 pints ice cream of your choice
  5. 1 8 oz container whipped topping, thawed
Instructions
  1. Begin by removing your ice cream from the freezer. Let thaw and once its soft around the edges, transfer to bowls so the middle can thaw. Give it a good stir.
  2. Meanwhile, throw 15 chocolate sandwich cookies in a food processor to crush finely. You can also do this by hand if you don't have a food processor. I usually do this ahead of time to save time when assembling the cake. Once crushed, mix in the tablespoon of milk to create a crust mixture.
  3. Coat the bottom and sides of a springform pan with cooking spray. Cut a thick strip of wax paper and place it around the edges of the pan. The cooking spray will help it to stick. Cut any excess off the top.
  4. Cut each ice cream sandwich into 4ths and place standing up around the edges of the pan. It will appear like a wreath.
  5. Using your created crust mixture, press into the bottom of the pan evening it out all the way around.
  6. Pour your softened ice cream into the middle of the pan. Smooth out evenly. Continue with the other 2 pints of ice cream.
  7. At this point, I like to place my cakes into the freeze for about 30 minutes or so to firm up a bit before adding the whipped topping.
  8. Take out of the freezer and using a piping bag and tip or simply a ziploc bag with the tip cut, fill with whipped topping and add dollops all of the top of the cake.
  9. Crush your last 3 chocolate sandwich cookies and sprinkle over the top.
  10. Freeze for a couple of hours (or best overnight) and serve!
Adapted from Gathering Grain
Pennywise Cook http://www.pennywisecook.com/

Like this post? SHARE it!

Related Posts Plugin for WordPress, Blogger...

2-Ingredient Homemade Magic Shell

Ever since I can remember, I have been in love with the dipped cones from Sonic. I remember as a kid, we’d be coming home from church or school and I’d close my eyes and imagine that my parents’ blinker would come on once we got to Sonic. Oh the joy that would come when I’d hear that click click click. And if we did stop, sometimes that joy would be crushed by my dad eating the tip off my dipped cone. I still have a complex about that to this day…

I also adore that Magic Shell liquid that you pour over your ice cream. You know the stuff. It starts as a liquid, but the minute that it hits your ice cream it starts to harden and forms a shell. It’s basically the same thing as the dipped cones from Sonic. No wonder I love the stuff.

It was only recently that I found out how extremely SIMPLE it is to make magic shell. You can pay around $3 bucks for a bottle of it at the store. After you read this recipe, you may never purchase it ever again. I know I won’t.

There’s something about the fun of starting off with a liquid and watching it turn to a solid. Brings me back to high school when we would do science lab. I was usually pretty bored until we did the hands-on experiments.

You see the TWO ingredients that are used to make this lovely, tasty, and sweet ice cream topping combine together to make your own little science experiment each time that you eat a bowl of ice cream. Coconut oil is the ingredient that essentially causes the hardening with contact to the cold. And then of course, you have your chocolate chips that mix with the coconut oil to create the “shell”.

Therefore, you end up with a liquid that becomes a chocolatey, yummy, shell on top of your creamy ice cream. And to think that this recipe only contains two ingredients that takes only seconds to make. You’ll never go back to store-bought, I promise…

 You can use your favorite flavor of chips to make this. Use butterscotch chips, white chocolate, dark chocolate, milk, or semi-sweet. I store mine in an old chocolate syrup bottle. With the coconut oil as an ingredient, it tends to harden in the bottle after a while at room temp. Simply pop it in the microwave for about 30 seconds and it’ll be back to liquid and ready to create a chocolate shell over your ice cream.

Recipe courtesy of I Wash, You Dry.

2-Ingredient Homemade Magic Shell
 
Recipe Type: Dessert
Author: I Wash, You Dry

With just 2 ingredients, you can create your own magic shell without a trip to the store!
Ingredients
  • 1/2 c. Coconut Oil
  • 12 oz. Semi-sweet Chocolate Chips (or your choice)
Instructions
  1. In a large microwavable bowl, combine the coconut oil and chocolate chips.
  2. Microwave at intervals of 30 seconds at 50% power, stirring between intervals.
  3. Pour over ice cream and allow to dry and harden.
  4. Store in an airtight container at ROOM TEMPERATURE.
 
Notes

If your magic shell hardens in the bottle, microwave it for about 30 seconds to get it back to a liquid again.


Like this post? SHARE it!

Related Posts Plugin for WordPress, Blogger...

Peanut Butter Choco-Banana Ice Cream

I am an absolute ice cream fanatic. There, I said it. It’s in my top favorite sweets out there. I have issues practicing portion control when a tub is placed in front of me. So as you can imagine, I try not to get into that position very often.

A while back, I shared a recipe for 1-Ingredient Banana Ice Cream over at Saving with Amy. For ice cream lovers like myself, this is quite a discovery that makes eating ice cream a little less guilt-stricken. You see, all it takes to make a batch of creamy and smooth no-add sugar banana ice cream is to freeze a few sliced bananas and then pop them into a food processor!  I know, right?

I can just feel you saying SHUT UP!


But around here, where there’s banana you’ll almost always find peanut butter. They go together like milk and cookies or Lucy and Ethel……..

….or perhaps me and ice cream.

I have a history of pairing peanut butter and banana together.

Exhibit A:

If you’re a fan of the duo, those are some recipes you could try.

Not only did I add in some peanut butter, I also added in another fave of mine…chocolate! There is nothing better than the combination of those three in harmony taking a dip in my ice cream cone. So soft and creamy.

That’s the stuff! And I just love that this is available whenever I’m ready. The bananas can be frozen for weeks or sometimes even months in the freezer and then popped out to be made into ice cream when you have a craving. And of course, you probably have a little powdered cocoa in the pantry along with some peanut butter.

3- Ingredient Peanut Butter Choco-Banana Ice Cream
Recipe Type: Dessert, Ice Cream
Author: Pennywise Cook
The base of this natural ice cream is simply frozen bananas. Add in some yummy touches like peanut butter and cocoa for an extra treat!
Ingredients
  • 2 Cups Frozen Banana Slices
  • 1 Heaping Tbsp Peanut Butter (creamy)
  • 2 Tsp Cocoa Powder
Instructions
  1. Place the bananas in a food processor and pulse until the bananas start to break up. Add in the peanut butter and cocoa.
  2. Process until small beads are created then scoop into bowl and ice cream and serve!
Notes

I must admit that these are complete estimates for the peanut butter and cocoa. I did not measure exactly but I don’t see how you could really mess this one up. 🙂


Like this post? SHARE it!

Related Posts Plugin for WordPress, Blogger...

Sugar Cookie Ice Cream Bowls

I was busy making up cookies for Addie’s 5th birthday last week. Which by the way, I am still in shock that I have a 5 year-old. Doesn’t seem possible that she is already that big. I’m going to try to get over it and not have a mini meltdown. Instead, I’ll just eat a SUGAR COOKIE BOWL full of ice cream! I got the idea from this picture. Pretty self explanatory.

Yeah, it’s quite an epiphany. Eating ice cream out of a cookie? I’m totally down with that. I think the only thing better than that would be eating ice cream out of a brownie. Hmmm, I’m getting ideas….

It’s best to have a good batch of sugar cookie dough to use. I found the BEST recipe last week and it worked like a charm. You simply lay the dough over the muffin tin cups and bake as usual.

You can also cut the dough using the top of a glass to get a perfect circle. Or you can just wing it like I did. I even had to patch a few up. It didn’t matter though because they still baked up fine.

Tah dah! Oh yeah, it’s a bowl that’s a sugar cookie. Incredible isn’t it? This is where you place your ice cream…

Or even fruit if you’re being good….

Sugar Cookie recipe courtesy of Spark People.

Sugar Cookie Ice Cream Bowls

Sugar Cookie Ice Cream Bowls

Eat your ice cream out of a sugar cookie!

Ingredients

  • 1 1/2 cups - granulated sugar
  • 2/3 cup - butter (or shortening - half of each is recommended)
  • 2 whole eggs
  • 2 Tbsp - 2% milk
  • 1 tsp. - vanilla extract
  • 3 1/4 cups - white flour
  • 2 1/2 tsp - baking powder
  • 1/2 tsp - salt

Method

  1. Cream butter and sugar together in a large bowl. Add eggs, extract, and milk and mix well.
  2. Mix dry ingredients with a wire wisk in a medium bowl. Add dry ingredients to wet ingredients in large bowl. Mix until combined well.
  3. With hands, shape dough into a ball. Wrap with plastic wrap and refrigerate for 2-3 hours.
  4. Meanwhile, preheat oven to 400 degrees F.
  5. Lightly grease muffin tins. Roll half or 1/3 of the dough at a time on a floured surface. Keep the rest in the fridge.
  6. Roll dough to 1/8-1/4 inch thick.
  7. Flour a glass or cup and cut shapes. Re-roll trimmings and reshape. Place over muffin tin wells making sure to cover the whole thing with no holes.
  8. Bake for 8 min or until light brown.

Notes

You are free to use whatever sugar cookies your prefer, even store bought. I just found this recipe to be really great to molding and rolling.

It's not a bad idea to make your dough the night before and roll it out in the morning. The colder it is, the easier it is to work with.

This works with chocolate chip cookie dough too!

This recipe makes a LOT of dough (like 72 cookies depending on your size) so if you only plan on making a few, half this recipe.

http://www.pennywisecook.com/sugar-cookie-ice-cream-bowls/


Like this post? SHARE it!

Related Posts Plugin for WordPress, Blogger...