Easy Vegetable Beef Soup

I sincerely apologize for not getting on here last week and wishing you guys a very Happy Thanksgiving! I’m normally a lot better about that, but this year I decided to truly disconnect from the outside world. Well, everything except for Words with Friends. I’m not sure that I could live without that.

So even though this is very late and you’re probably tired of hearing it, HAPPY THANKSGIVING! And now I can officially move on into the Christmas season. I’m just not the type to feel Christmas-y until I’ve digested my turkey and dressing. Anyone else feel that way?

We had a very fun-filled Thanksgiving with family and friends. I got to see my best friend from high school and even ran a 5k on Thanksgiving morning. It really was a great Thanksgiving. I hope that you enjoyed yours as much as I did!

I’ve got another recipe for you today that comes from my momma. It’s funny how our cooking skills and what we learn in the kitchen usually comes from those we are closest to. When I was little, watching my mom cook was nothing but dinner for my belly. But these days I look back on those days as valuable knowledge. And it’s especially fun to cook with her now.

This Vegetable Beef soup is a regular when I visit my mom and also here in our home. It’s simple, it’s fast, and it’s incredibly tasty.

The absolutely perfect soup to warm your soul on a chilly night.

This soup can be whipped up in no time. Even on those last minute weeknights when you have no idea what to make for supper. In fact, most of the ingredients are things you’ll probably already have on-hand.

The bulk of this recipe is the beef and plain old canned veggies. It really doesn’t get much easier than cracking open a can or two and making a soup that tastes like you’ve been working hard on it all day long.

I can’t wait for you to try this recipe out! Let me know what you think if you do…

Easy Vegetable Beef Soup
Recipe Type: Main Dish, Soup
Author: Pennywise Cook’s Momma
Warm up on chilly nights with this super easy, yet tasty vegetable beef soup!
Ingredients
  • 1 lb Lean Ground Beef
  • 1 Medium Onion, Chopped
  • 4 Cans Veg-All
  • 1 (28 oz) Can Diced Tomatoes, Undrained
  • 1 (15 oz) Can Tomato Sauce
  • 6 Beef Bouillon Cubes
  • 6 Cups Water
  • 1 and 1/2 tsp Garlic Powder
  • 1/2 tsp Salt
  • 1/4 tsp Pepper
  • 1 tsp Italian Seasoning
Instructions
  1. In a large dutch oven or soup pot, brown ground beef along with onion. Drain.
  2. Stir in the remaining ingredients and heat over medium heat until boiling. Reduce heat and simmer for 10-15 minutes.
  3. Serve with crackers and enjoy!

Like this post? SHARE it!

Related Posts Plugin for WordPress, Blogger...

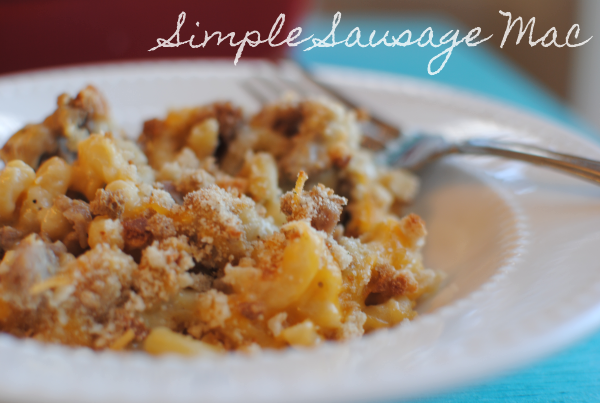
Simple Sausage Mac

Are you ready for Halloween yet? Well you better get that way because it’s on Wednesday! Can you really believe that we have already reached the end of October? I’d really love for someone to explain to me where the rest of this month has slipped away to. Maybe I’m just getting old or maybe time is speeding up. Either way, I’m going to hold on tight.

The weather is finally starting to cool off around here. I absolutely love the fall. Well, let me just say I love being cozy. I hate being cold, but I love being cozy. I’ve got a bunch of warm and comforting recipes coming up that I can’t wait to share with you. The fall is really when I have the most fun cooking. You can make up a big pot of something that sticks to your bones.

One of the first “comfort foods” that comes to mind practically anytime I hear that phrase is macaroni and cheese. It doesn’t get much more comforting than that. I’ve seen mac & cheese turn a frown completely upside down! Especially when it’s homemade. The boxes are good, but homemade is better.

And you know that here in the south, macaroni and cheese is considered a vegetable at most meat and threes….

The only issue that I’ve ever had with macaroni and cheese is that it’s so good that I eat too much. Well that and the fact that it needs a little bulking up so that it can be worthy of being called a meal. After all, we wouldn’t want to make mac & cheese only a side dish. It’s worthy of being the main attraction with a little adjustment.

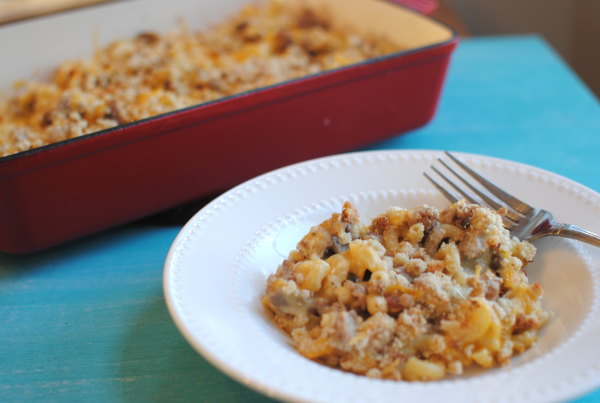
One of my favorite things about this macaroni and cheese is the secret topping. No longer a secret because I’m about to share it with you! We’re heading for Thanksgiving and there will be deals out the wazoo on stuffing mix. THAT my friend is a little something extra that can give macaroni and cheese a little spice. Breadcrumbs are great, but stuffing mix adds a little more crunch and even some nice flavor. I used Stove Top’s version for this. You can use whatever you’d like of course.

I bulked this up with sausage to give it a little flavor and to make it meaty. So yummy and extra comforting. I’d almost make this for a brunch!

Recipe adapted from Butter Busters Cookbook.

Simple Sausage Mac
Recipe Type: Side Dish, Main Dish
Author: Adapted from Butter Busters Cookbook
Bulk up your everyday mac & cheese and make it meaty. Perfect for dinner any night of the week!
Ingredients
  • 1 lb Turkey Sausage, Browned and Drained
  • 3 tbsp Melted Butter (light)
  • 1 and 1/2 tbsp flour
  • 1/2 tsp salt
  • 1/2 tsp pepper
  • 2 cups Skim Milk
  • 1 tbsp Melted Butter (light)
  • 2 cups Elbow Macaroni, Cooked
  • 1 tbsp Onion, Grated
  • 1/2 tsp salt
  • 1/4 tsp pepper
  • 2 cups Reduced fat Shredded Cheddar Cheese
  • 1/2 c. Crushed Cubed Style Stuffing Mix
Instructions
  1. Preheat oven to 350°.
  2. Combine 3 tbsp melted butter, flour, salt, and pepper in a small sauce pan. Slowly add skim milk and whisk well. Bring to boil, then lower temp until thickens. Set aside.
  3. Spray a 2 quart baking dish with non-stick cooking spray. Place half of the macaroni in the dish. Spread half of the cooked sausage over the noodles. Sprinkle half of the grated onion, salt, pepper, sauce, and cheese. Repeat layer. Drizzle 1 tbsp melted butter over top. Sprinkle with remaining cheese. Sprinkle crushed stuffing over the top. Cover and baked for 30 minutes. Then uncover and bake an additional 10 minutes.

Like this post? SHARE it!

Related Posts Plugin for WordPress, Blogger...

Oven Roasted Pork Tenderloin

You don’t have to have read this blog for very long to know that I’m a crockpot girl. My life would probably be over if mine were to die or perhaps if I lost it. Don’t put the latter past me. I’m a scatter-brained mess. But there comes a time in every cook’s life when you have to do things the hard way. You know, in the oven or on the stove. And that’s alright, it’s not the end of the world. And sometimes, you can even create some really great things in the oven.

Like this amazing pork tenderloin for instance.

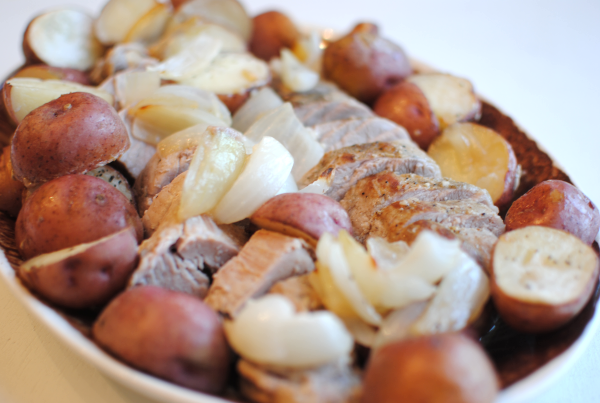
Need something to feed a crowd and make an impression? A pork tenderloin might just do the trick. Surrounded by roasted potatoes and onions, this meal looks fit for a king. Or whatever you prefer to call your husband!

There are probably thousands of ways to make a roast on the internet. You’ll find some wonderful recipes and you may even have your own tried and true recipe. This is my favorite version from the oven.

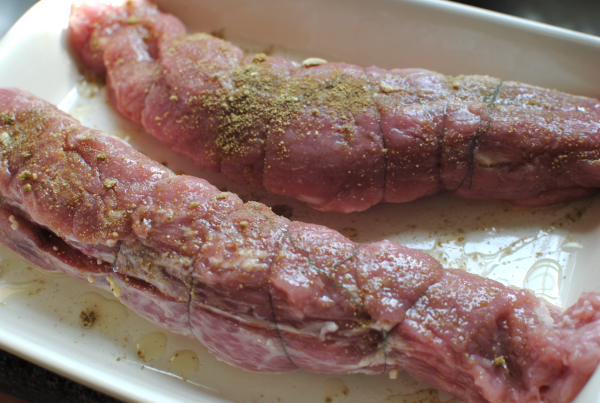
Sometimes I like to stuff my pork tenderloin with garlic and parmesan cheese. It breaks up the middle of the meat and adds a tenderness along with flavor inside. You simply butterfly the tenderloin and insert whatever tasty ingredients that you like. Now is also the time to season it up. I used rubbed sage, onion powder, and a drizzle of olive oil.

Confession: I haven’t worked very much with rubbed sage before. I’m not familiar with it’s pairings and flavor. However, the moment that I smelled it, I knew it would make a great seasoning for this pork and I was right! I really like rubbed sage.

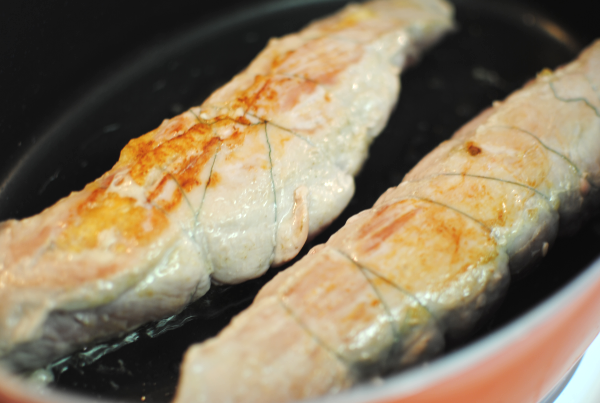
Then use butcher’s twine, or sewing thread like I did, and tie it back up. Now you’re ready for browning.

Some say that this is the key to creating a perfect pork tenderloin. Browning the meat on the outside before finishing the inside in the oven. I’d agree with them on that. Most meats just have a tendency to look more appealing browned.

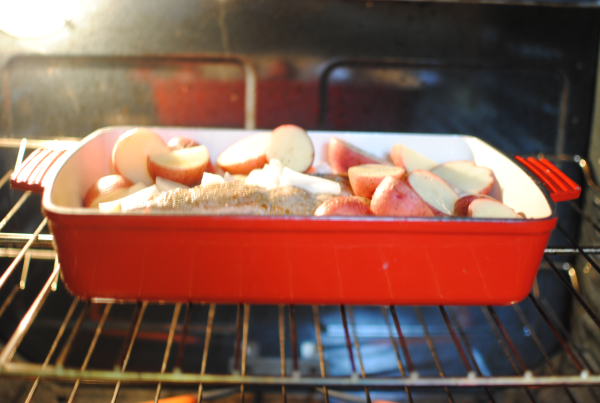
Chop up your favorite veggies. The sky is really the limit here. I made mine with red potatoes and large chunks of onion. You could also do apples and sweet potatoes. Root veggies taste wonderful with the flavor of the tenderloin. Place the meat into a baking dish surrounded by your veggies. Season the veggies and drizzle with olive oil. Or you can add a splash of white wine. I did both!

Pop it into the oven and let it go.

Turns out perfect every time! So simple and plenty to go around. I also wanted to point out that you can easily make a tasty gravy to pour over everyone’s slices! So simple and uses the juices from the roast with all that yummy flavor. See the recipe below.

Can you possibly go wrong with meat and potatoes?


Oven Roasted Pork Tenderloin
Recipe Type: Main Dish
Author: Pennywise Cook
You just can’t go wrong with mouth-watering, juicy pork tenderloin and roasted veggies!
Ingredients
  • 2 Pork Tenderloins (Most come packaged in twos)
  • 1 Medium Onion, Cut into large pieces
  • 8-10 Medium Red Potatoes, Cut in half
  • 4 Tsp Minced Garlic
  • 4 Tsp Parmesan Cheese
  • 1/2 Tsp Rubbed Sage
  • 1/2 Tsp Onion Powder
  • Drizzle of Olive Oil
  • 1/4 c. White Wine
  • Salt and pepper
  • For the Gravy:
  • 2-3 tbsp flour
  • water
Instructions
  1. Preheat oven to 400°.
  2. In a small bowl, combine minced garlic and parmesan cheese. (Should be paste-like) Set aside.
  3. To butterfly meat, cut a slit in the tenderloins lengthwise but not all the way through. Use a meat mallet to flatten each tenderloin. Fill each tenderloin with equal amounts garlic parmesan paste. Use butcher’s twine or thread (or whatever you have on-hand) to tie up your tenderloins.
  4. Heat a skillet oven medium high heat. Mix together rubbed sage and onion powder and rub the tenderloins down with them. Drizzle skillet with olive oil. Brown each tenderloin on each side for 4-5 minutes until just browned but not completely cooked. Remove and place into a large roasting dish.
  5. Arrange potatoes and onions (or veggies of your choice) around meat. Season with salt and pepper. Pour white wine over the entire pan.
  6. Place in oven and cook for 20-30 minutes or until internal temp reaches 165°. Remove from oven and let the meat rest for 10 minutes before slicing into pieces.
  7. For the Gravy (optional)
  8. Pour off the juices from the bottom of the roasting pan into a skillet. Heat and add flour, mixing well. Slowly add in water until desired consistency. Lower heat until thickened. Pour over meat.

Like this post? SHARE it!

Related Posts Plugin for WordPress, Blogger...

Sloppy Joe Stuffed Shells

I am always on the lookout for ways to change up everyday meals. Meatloaf and pizza are good. Don’t get me wrong. But sometimes, they just get old and boring. I have a lot of fun experimenting with food. It’s kind of a hobby of mine. It’s why this blog exists!

Stuffed shells are a family favorite. There are so many variations and concoctions that you can stuff them with. My latest creation? Sloppy Joe Stuffed Shells.

Sloppy Joes are so simple to whip up on a week night for dinner, but guess what? They are sloppy! (whodathunkit?) I was thinking that if we could eat them in shells, they might stay contained and actually be easy to eat.

Hey, we could get rid of that sloppy and just call them Joes! Joe Stuffed Shells……hmmm. Nah. You could possibly call them Not-So-Sloppy Joe Stuffed Shells. That’s too long. I give up. We’ll stick with Sloppy Joe Stuffed Shells.

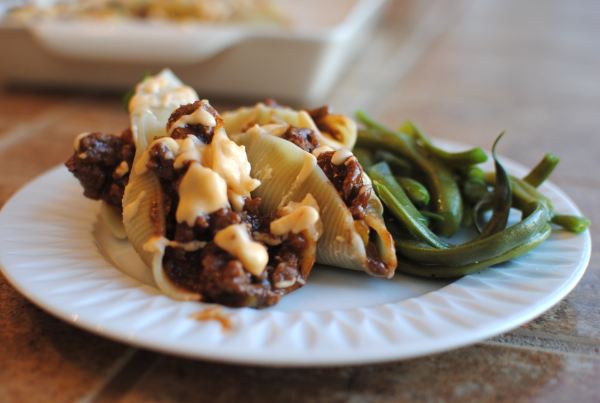
These aren’t made with the canned Sloppy Joe sauce. It’s homemade and extra easy. I even got to use a green pepper from my garden in it. I’m sure that you’re wondering about the cheese sauce on top there. Well, you see, my husband likes to add cheese to just about everything. And following suit, he asked if I could drizzle some cheese sauce on top of the shells too. I did this for him. Feel free to add it if you like, but they are still just as great without the cheese sauce.

Just as I suspected, these were quite neat to eat! Much neater than a messy old Sloppy Joe Sandwich. My husband isn’t a huge fan of Sloppy Joes themselves. We came to the conclusion after this meal that it was in fact, because they are sloppy. The shells make it really easy to keep all the yummy and sweet meat inside. Which means that you’ll most likely end up eating them with your fingers.

We did and we’re not ashamed!

The best part about this meal is that it’s super affordable. With the meat of your choice (ie ground beef, ground turkey, even chicken!), a few handy sauces, and simple spices, these shells comes together in no time and don’t even require baking.

Sloppy Joe Stuffed Shells
Recipe Type: Main Dish,
Author: Pennywise Cook
Believe it or not, Sloppy Joes don’t have to be sloppy when you make them in shells like this!
Ingredients
  • 1/2 Package Jumbo Shells (you can make an entire box, but you won’t need it)
  • 1 lb Extra lean Ground Beef
  • 1/2 c. Onion, chopped
  • 1/2 c. Green Onion, Chopped
  • 1 Clove Garlic, minced
  • 1/4 tsp salt
  • 1/2 c. Ketchup
  • 1/2 c. BBQ sauce (your choice)
  • 2 tbsp Brown Sugar (I used Splenda Brown)
  • 1/2 tsp Italian Seasoning
  • For Cheese Sauce
  • 2 tbsp Butter
  • 1/4 c. Skim Milk
  • 4 oz Cream Cheese
  • 1 c. Shredded Cheddar Cheese (Reduced Fat)
Instructions
  1. Prepare noodles according to package. Drain and set aside to cool.
  2. In a large skillet, brown ground beef with onion and green pepper. Drain and add in all other ingredients. Simmer for 5-10 minutes or until warmed through.
  3. Stuff shells with meat mixture.
  4. For cheese sauce- melt butter in a small sauce pan. Add the skim milk. Melt in the cream cheese stirring until smooth. Add in shredded cheese until melted and smooth. Drizzle over stuffed shells.
Notes

These could even make little appetizers at a party!


Like this post? SHARE it!

Related Posts Plugin for WordPress, Blogger...

Easy Peanut Chicken

How was your weekend? Is it really Monday already? The weekend just goes by way too fast. It’s Saturday morning and you’re thinking oh this is nice, I still have Sunday. Then all of the sudden it’s Sunday night and you’re like crap, tomorrow is Monday. Such is life.

I have some good news for you. Well actually, it’s a good recipe for you. It’s definitely good news for those of you who enjoy a little Asian flare. This recipe is via Coach Nicole at Spark People. Which means it’s healthy too! Always a bonus when you like something AND it’s not sky high with calories.

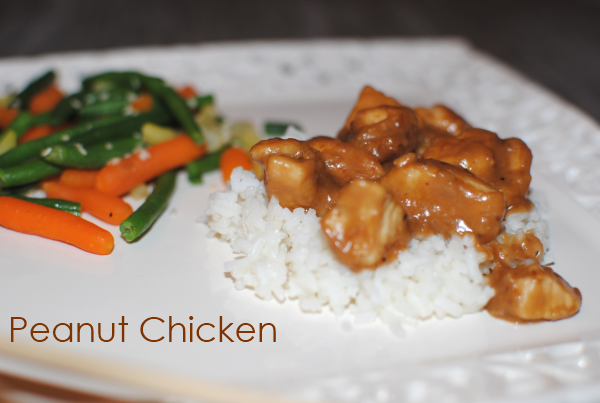
I’m a bad food blogger. I didn’t take many pictures and the ones that I did take are very dark. It was a late night, what can I say. Natural light is very hard to come by when you’re eating dinner at 8:00. So please enjoy the one halfway decent picture that I have for you. 🙂

My family LOVED this chicken. You’ve probably gotten to know a little about my family by now (they’re picky) and so you know that this is big! The only real complaint I have with this sauce recipe is that it doesn’t make very much. I would definitely suggest that you double it if you’re feeding a family of 4. Also, you’ll want to make sure and eat it soon after making it. I placed the sauce in my crockpot while we went to the Y and when we came back it had kinda thickened up in consistency.

This meal came together really fast. No really, it was extremely quick to make. Browning the chicken was the most time-consuming step. And you know how fast you can brown up bite-size pieces of chicken.

Isn’t it nice to learn from someone else’s mistakes?

Easy Peanut Chicken
Recipe Type: Sauce, Main Dish
Author: Coach Nicole (Spark People)
Don’t sacrifice flavor to make something healthy. Enjoy creamy peanut sauce with your chicken in minutes!
Ingredients
  • 1/4 c. Peanut Butter (creamy)
  • 2 tbsp Soy Sauce (low-sodium is best)
  • 1-2 Garlic Cloves, Minced
  • 1/8 tsp Ground Ginger (optional)
  • 1/3 c. Warm Water
  • 2 Fresh Chicken Breasts, Cut into bite-size pieces
  • Salt & Pepper to taste
  • 1 tbsp olive oil
Instructions
  1. Heat olive oil over medium-high heat. Season chicken pieces with salt and pepper and cook until browned.
  2. In a small bowl, whisk together all sauce ingredients. Pour over chicken and heat through.
  3. Serve over rice!
Notes

Like I said in the post, I would suggest doubling the recipe. I also added a little bit more water (maybe 2 tbsp) to make it just a little runnier. You can adjust that to your liking.

If you like a little crunch, you can also add a few peanuts to your chicken in the end.

This would also be very tasty with tofu, veggies, or just plain pasta!


Like this post? SHARE it!

Related Posts Plugin for WordPress, Blogger...

Slow Cooker Cheeseburger Soup

There’s a time and a place for soup. At least at my house it’s that way. When planning meals, soup is never an option. I honestly think that my family would rather eat cardboard than eat such a thing called soup. It’s not because soup is such a bad thing. It’s probably just because when put up against a hearty casserole or grilled steak, soup just doesn’t compare. And therefore usually ends up being bypassed and never even a consideration. This is something that I’d loved to change here in my family.

I love soup! For many reasons too. You can make huge amounts at once, it freezes well, and best of all it’s cheap to make! All of my favorite traits of a good meal. So when I came across this Weight Watchers Cheeseburger Soup recipe, I knew I had to make it.

It’s contains the word, cheeseburger. I knew my family would have to love it.

It’s really easy to make. I healthified mine up a bit with ground turkey in place of the beef. The fam didn’t even know it. I take that back. They know me enough by now that all I use is ground turkey so maybe they did know. Either way, they didn’t care! It turned out really yummy and there are plenty of reasons why I love this particular soup. Not only was it cheap, but I made it in the crockpot so there was no slaving over the stove all evening.

Not to mention that it’s low-calorie. I mean come on, something that the family will eat that’s actually low-cal too? It’s a winner!

I made a few small changes to the recipe and it turned out really good. Mine doesn’t look near as yummy as theirs does, but I can assure you that it was just as tasty I’m sure!


Recipe adapted from Weight Watchers.

Slow Cooker Cheeseburger Soup
Author: Adapted from Weight Watchers
A meal that the whole family will love, this cheeseburger soup is easy and low-calorie too!
Ingredients
  • Cooking Spray or Crockpot Liner
  • 1 and 1/2 tsp Minced Garlic
  • 1 Medium Onion, Chopped
  • 1 lb Ground Turkey (see notes)
  • 2 Tbsp Flour
  • 3 Cups Low-Sodium Chicken Broth (see notes)
  • 1 c. Reduced Fat Evaporated Milk
  • 8 oz Cubed Cheese (I used Colby Jack)
  • 1/2 Tsp Paprika
  • Salt and Pepper to Taste
  • Tortilla Chips for crumbling on top
Instructions
  1. Spray a skillet with cooking spray. Saute garlic and onions until tender. Spray the inside of a slow cooker with cooking spray and pour the garlic and onions into it.
  2. In same skillet, brown the ground turkey and break into small crumbles as it cooks. Pour off any grease and place into slow cooker.
  3. In a cup, combine 2 tbsp flour with 1/2 cup broth until there are no more lumps.Pour into the same skillet. Then add remaining 2 and 1/2 cup broth.Bring to a simmer making sure to scrape up the browned bits on the bottom of the skillet. Pour into the slow cooker.
  4. Add evaporated milk, cheese, paprika, and salt & pepper to the slow cooker and stir. Cook on low for 2-3 hours.
  5. Serve with broken up chips on top.
Notes

I used a pound of ground turkey in this soup, but after making it and seeing how “soupy” it actually was, I would probably add another 1/2 pound next time. If you like your soups like this meaty, you might consider it.

This recipe originally called for chicken broth. I think that I will try part beef broth next time since after all, it is cheeseBURGER soup. Seems to me there needs to be more beefiness.

And honestly, the picture of this soup does not do it justice. It’s a lot more appetizing than the picture lets on. 🙂

Just notes from my brain about this dish! Enjoy!


Like this post? SHARE it!

Related Posts Plugin for WordPress, Blogger...