13 Thanksgiving Side Dish Ideas

13 Thanksgiving Side Dish Ideas

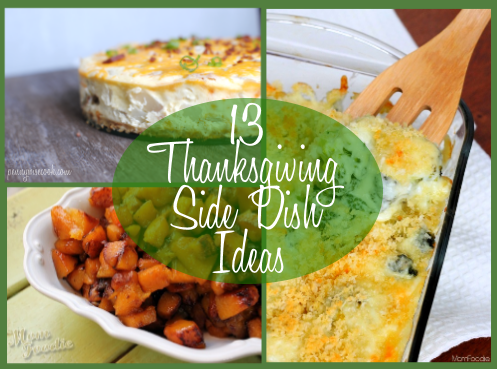
There are years when Thanksgiving draws near and I completely go blank when coming up with a menu. There are always staples that everyone expects to be on the table each year, but sometimes you just want some inspiration. I have come up with some yummy side dishes in this post consisting of 13 Thanksgiving Side Dish Ideas. Check them out! 

P.S.- *whispers* You can really make these anytime of year!

Hashbrown Casserole

Get a little taste of the country with Easy Cheesy Hashbrown Casserole. Comfort food at it’s best!

Creamed Spinach

Your kiddos might even enjoy this Cheesy Creamed Spinach this year!

Bacon Green Beans

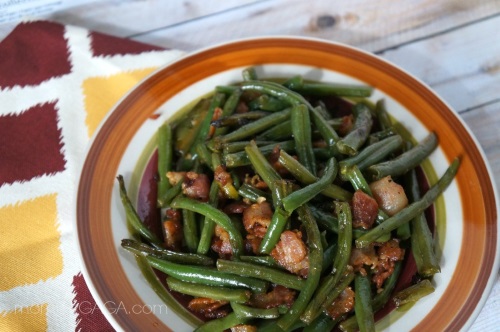
Can you go wrong with this Bacon and Green Beans Saute?

Sweet Potato Casserole

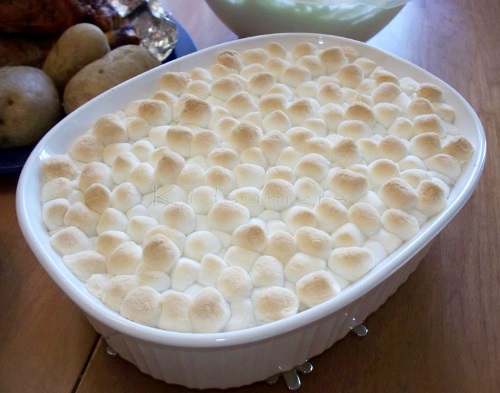
Is Thanksgiving even Thanksgiving without Sweet Potato Casserole?

Butternut Squash

This Roasted Apple Butternut Squash with Maple Cardamom Glaze looks amazing!


Slow Cooker Green Beans

Save yourself some time with these 2-Ingredient Slow Cooker Green Beans. SO tasty!

Roasted Broccoli

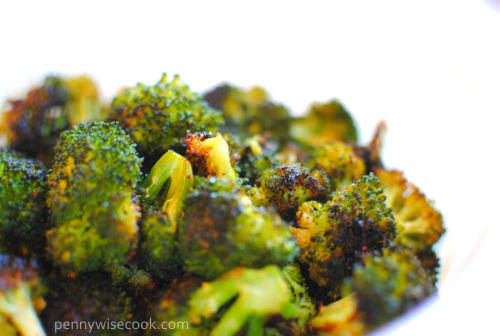
Here’s a healthy spin. Roasted Broccoli is an easy side dish!

Loaded Potato Cheesecake

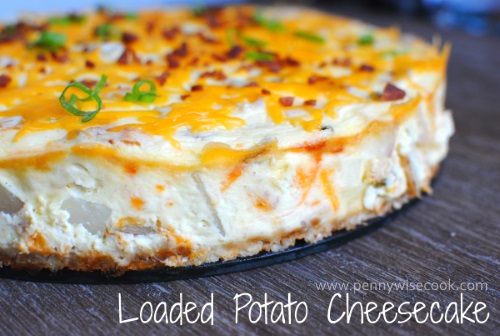
This one is to die for. Loaded Potato CHEESECAKE! Need I say more?

Dinner Rolls

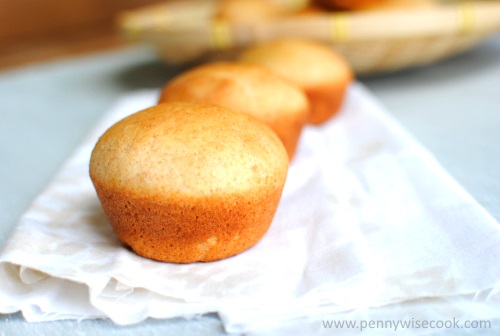
What’s a Thanksgiving feast without rolls? Check out these Perfect Wheat Dinner Rolls!

Broccoli Casserole

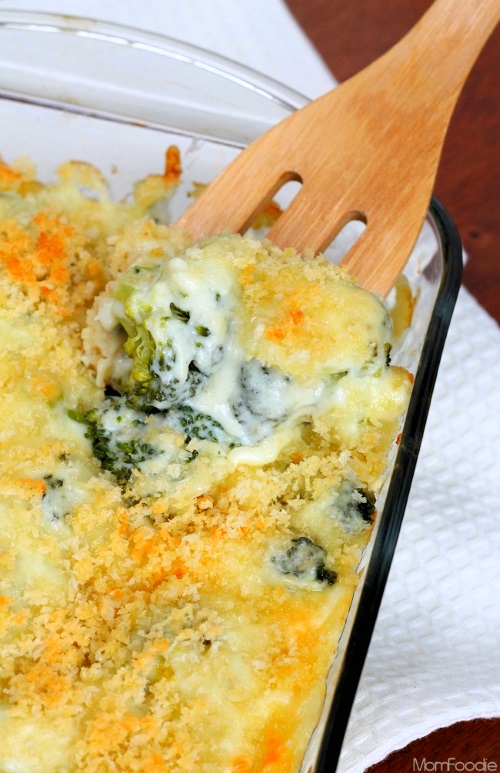
This Super Cheesy Broccoli Casserole looks so tasty!

Twice Baked Cauliflower

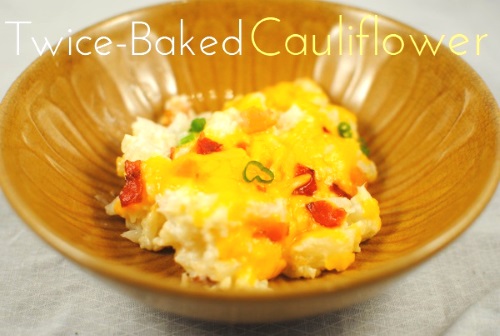
This Twice-Baked Cauliflower is great for those watching their carbs!

Mashed potatoes

And of course, you can’t forget the mashed potatoes! This recipe for Roasted Garlic Mashed Potatoes is a great addition to turkey and dressing!

Traditional Green Been Casserole

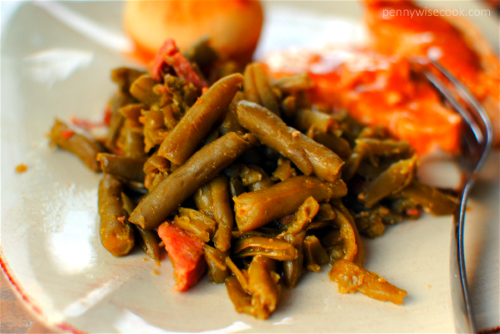
You can’t go wrong with Traditional Green Bean Casserole!


Like this post? SHARE it!

Related Posts Plugin for WordPress, Blogger...

Parmesan Peas

Parmesan Peas


I’m not exactly sure what it is about peas that makes them seem so unappealing. Did you see what I did there? For most kids I think it may be because they are green. Both of my girls have a strong aversion to green food no matter what it is. So when my oldest came home from school one day and told me that she liked peas, you can just imagine my confusion. 

1. She ate peas. Willingly. Without bribery or threatening. 

2. She ate peas at school of all places. This is also the place that she discovered she likes green beans. (Which I promise are the only two green foods that she likes.) I mean. What are the schools doing to their green foods to make them so enticing? They have new standards for how healthy things have to be so I know it’s not that they are slathering it all in butter. 

3. I gotta come close to making them at least half as good as the school. Woah. What is this world coming to with the statement that I just made?

I came across this recipe for Parmesan Peas and I figured it was worth a shot. If it doesn’t work then I may need to call my daughter’s cafeteria. Again. What weird statements I’m making.

PArmesan Peas1


I liked these peas, but I have a feeling that they weren’t as amazing as my daughter is used to. I will be tweaking these a little as I make them more. But for the most part, they are really tasty! The most important tip that I can give is to make sure that you serve them immediately after making. They do not taste the same after they get cold and sit there for a while. Just from my experience anyways. 

Also, be sure to use freshly grated parmesan and not the powered stuff. It works, but is not near as good.

Parmesan Peas
Write a review
Print
Ingredients
  1. 16 oz Bag of Frozen Peas or 4 cups Fresh Peas
  2. 1 tbsp Butter
  3. 1/2 cup Freshly grated parmesan cheese
  4. Little squeeze of lemon juice
  5. Dash of pepper
Instructions
  1. Fill a big saucepan 2/3 of the way full and bring to a boil.
  2. Add the peas and cook for 3 minutes if fresh and 1 minute if frozen. This will be your call as to if you think they are ready enough. I like mine to be really tender.
  3. Remove from heat and save a little amount of the cooking water. Drain.
  4. Put them back in the saucepan and add a little of the reserved water. Add the butter. Stir until melted.
  5. Stir in the parmesan cheese and make sure that all the peas get coated.
  6. Squeeze a tad of lemon juice and add a dash of pepper.
  7. Serve immediately!
Adapted from Ezra Pound Cake
Pennywise Cook http://www.pennywisecook.com/

Like this post? SHARE it!

Related Posts Plugin for WordPress, Blogger...

Summer Cucumber Salad

There are only about a thousand reasons to like summer. Sun, fun, vacation, strawberries, and the list could go on and on. But one of my favorite things are the cool and crisp summer salads. Cole slaw is always a great addition to any summer cookout, but is there anything cooler than a cucumber? Well sure, but they don’t have a saying about those things so we’ll stick with the chillin’ cucumber.

I was delighted to find a cucumber in my garden the other day. I have been waiting for them to grow so I could start adding them to my salads. If your garden is brimming with cucumbers, you might like this Summer Cucumber Salad recipe. There are many variations of this type of salad, so don’t feel like you have to follow it to the T. But this is my favorite combination of flavors.

I was at a family get-together a little while back when my stepsister brought a salad like this. I asked her what she put in hers and I remember thinking how simple it was. It was so tasty! Within a few days I had made my own and within a couple of days it was gone. I ate the entire thing myself.

I have no shame in admitting that.

After all, we’re talking about healthy foods here, right? Not chocolate cake.

It took me a few times making this to perfect the combination of flavors. And you may want to give or take some of the ingredients to get it to your liking. Also, might I suggest making this up the day or night before an event. The longer the cucumbers and onions get to marinate in the vinegar mixture, the better they taste. And oh do they taste lovely!

My family isn’t really the cucumber-eating type. They don’t eat onions that aren’t cooked and you can also bet they won’t munch on anything marinate in vinegar. But hey, more for me! I’ve probably eaten 4 or 5 whole Summer Cucumber Salads by myself this summer…

Wow, it sounds a lot more when typed out…

Summer Cucumber Salad
Recipe Type: Side Dish, Salad
Author: Pennywise Cook
Super easy summer ingredients come together to make a tasty, cool, and crisp summer salad!
Ingredients
  • 2-3 Cucumbers, peeled & cut into halves or quarters
  • 1 Medium Red Onion, cut into chunks and then peeled
  • 1 can Whole Kernel Corn, Drained
  • 1/4 c. + 3 tbsp Apple Cider Vinegar
  • 3 tbsp Olive Oil
  • 1/4 tsp Salt
  • 1/8 tsp Pepper
Instructions
  1. Place all ingredients into a medium bowl and cover with plastic wrap. Allow to marinate overnight or for at least 2 hours. Serve!
Notes

Some people like to also add tomatoes cut into chunks to this dish as well!

Feel free to use any onion for this. I just like to use red onion because it adds pretty color!

I would eat this within a few days of making. The vinegar breaks down the veggies.


Like this post? SHARE it!

Related Posts Plugin for WordPress, Blogger...

Oven Roasted Green Beans

On any given day here in our household, anything green won’t be eaten by the kiddos and sometimes even by the husband.

What is it about the color green that turns folks off?

It’s quite sad that it’s gotten such a bad rep when it’s one of the most nutritious colors to eat. This just makes the challenge for cooks like me to make those things that are green taste good enough to eat. Both of my girls wouldn’t touch green baby food. You know, those green peas and green beans all pureed and mushy. I can’t say that I blame them. I don’t think I’ll be indulging in a big ole jar of mushy green peas myself. When we went to England, that was a common side dish there. Of course I had to try it while I was there. But I was over it after my first taste.

With a bag of frozen green beans in my freezer, I decided it was time to use those babies up. I went for the roasting option hoping that they would taste good enough for the family to enjoy. After all, they always like my roasted broccoli and roasted cauliflower.

I started by parboiling the green beans straight from frozen. I wanted to get them thawed and mostly cooked and then finish them in the oven. I was surprised at how quick these cooked.

Then I drained them and spread them out onto a baking sheet lined with parchment paper. A little olive oil, salt, and pepper and into the oven they went.

After a nice stint in the green bean sauna (I know my analogies are ridiculous), they came out just perfect. Just roasted enough that some of them had a crunch, but still soft like you’d expect.

And what would make anything roasted taste better than parmesan cheese? Not a thing. A good sprinkling of that and you are set with the tastiest green beans this side of Mason Dixon Line.

When I was finished with these, I took one of them to my picky daughter for her approval. She gave me a look when she saw how green it was and I was fully expecting her to pass on the taste test.

Then it came….

She let out a “mmmmmm”. And I knew I was onto something. We had these with our dinner and they were a big hit.

Even though they were green. 🙂

Oven Roasted Green Beans
Recipe Type: Side Dish, Vegetable
Author: Pennywise Cook
Try a new take on everyday green beans by popping them into the oven to roast. Here’s how!
Ingredients
  • 16 oz Pkg Frozen Extra Fine Green Beans
  • 1 tsp Salt
  • 1/2 tsp Pepper
  • 2 Tbsp Olive Oil
  • 1/4 c. Parmesan Cheese
Instructions
  1. Preheat oven to 425°.
  2. Bring pot full of water to boil. Add green beans and boil for 5 minutes. Drain and dry.
  3. Lay green beans on baking sheet lined with parchment paper in a flat layer.
  4. Drizzle with olive oil and sprinkle with salt and pepper.
  5. Cook for 10 minutes. Remove from oven and toss. Return to oven for additional 5 minutes.
  6. Top with parmesan cheese and serve immediately!


Like this post? SHARE it!

Related Posts Plugin for WordPress, Blogger...

Slow Cooker Corn on the Cob

So I told you how I’ve been keeping things on the easy side the last few weeks. With Addie starting kindergarten and with family in town off and on these last couple weeks, the cooking has been a little out of routine. Out of routine meaning that I didn’t want to bore my guests with my food portraiture and involvement with my food. So I opted for easy yet tasty.

The other day I was talking to my mom about the Crockpot Baked Potatoes when she mentioned that she had also used her Crockpot to make up some corn on the cob. We usually just pop our corn on the grill when we’re grilling out, but it’s been so hot lately that we haven’t wanted to be outside for more than 10 minutes. Though, it’s FINALLY beginning to cool down just a bit around here. So to save a little propane and heat from the stove or oven, I decided to throw some ears in my slow cooker.

I seasoned them up with a little mayo concoction that I put together, then rolled them up in foil and placed them straight down into the slow cooker. I didn’t add water, I didn’t put anything inside to raise them away from the sides. I didn’t do anything at all, but just let them go. It worked great! The steam from the moisture in the corn is what cooks it.

With sweet corn being so cheap (in places not affected by the droughts), it’s an easy and tasty side dish for just about anything. Plus you can use corn on the cob to make up creamed corn, corn bread or muffins, and more. If you need cooked corn for a recipe and want it fresh, throw some ears into your slow cooker overnight and in the morning you’ll be ready with slow cooked and perfect corn!

Slow Cooker Corn on the Cob
Recipe Type: Side Dish, Crockpot
Author: Pennywise Cook (and Momma!)
Another shortcut idea that makes corn as simple as 1,2, 3 to make!
Ingredients
  • 4 Ears Corn on the Cob
  • 2 Tbsp Reduced Fat Mayonnaise
  • 1/4 Tsp Garlic Powder
  • 1/4 Tsp Onion Powder
  • Dash Salt and Pepper
Instructions
  1. Whip ingredients together and rub 1/4 mixture onto each ear of corn. Wrap in foil and place in slow cooker. Cook on lowest setting for 4-6 hours.
Notes

I used the low setting on my slow cooker, but if you have a “warm” you might consider using that for longer cook times.


Like this post? SHARE it!

Related Posts Plugin for WordPress, Blogger...

Oven “Fried” Squash And Another Reason I Don’t Like Bees

I absolutely cannot grow a squash to save my life. I started a little garden for herbs and a few veggies earlier this spring and for some reason, mother nature refuses to help me produce even one sign of a squash in my garden. I checked out Google and the only explanation that I can come up with is that we have no bees. Well, at least no bees that want to help me grow some squash. The bees have to transfer pollen to the blossoms while they are open in the mornings in order for the blossoms to produce a squash. Apparently the bees around here don’t like me and don’t want me to have yummy squash this year.

I see them flying around all happy and landing on the weeds, probably pollinating the weeds in place of my squash. Forgive me, I’m a little bee bitter right now…

On a less bee-hater note, Aldi does have great prices on squash and my in-laws have a bountiful garden that we get veggies from. So I don’t have to go without. I love my squash fried, but you know me and my frying. Unlike Nike, I just don’t do it. I usually try to find a way to make things taste fried without the actual frying process. This recipe gives you exactly that!

See how crunchy they are? If you bake them too long, they are almost like chips because they are so crunchy. But you won’t have that problem because you’ll bake them just right.

They are oh so yummy. These definitely satisfy that hunger for “fried” squash. I got this recipe from that cookbook that I told you about the other day and come to find out this particular recipe came from a cookbook from 1983! Southern Living’s Cook Light.

Only 64 calories per serving and worth every one.

Oven “Fried” Squash
Recipe Type: Side Dish, Vegetable
Author: MTEMC Company Gifts of Christmas Cookbook,
Crunchy, tasty “fried” squash from the oven.
Ingredients
  • 1/2 c. Cornmeal
  • 1/2 Tsp Salt
  • 1/4 Tsp Pepper
  • 2 Egg Whites
  • 1 Tbsp Water
  • 3 Medium-sized Yellow Squash, cut into 1/4 in. slices
  • Cooking Spray
Instructions
  1. Preheat oven to 450 degrees.
  2. Combine cornmeal, salt, and pepper. Set Aside.
  3. Combine egg whites and water; beat well.
  4. Dip squash into egg and then dredge into cornmeal mixture.
  5. Lightly coat a baking pan with cooking spray. Place squash in a single layer.
  6. Bake for 30- 40 minutes turning once.
Notes

Ok here are my notes on this one:

I would use LESS pepper than this calls for. It was a little spicy with 1/2 teaspoon if you ask me. You might even use a different spice like paprika in it’s place.

I considered my squash to be medium-sized, but I could fit only 2 of them on my pan. You may not really need 3.

I ended up needing more like 1 cup of cornmeal so have more on-hand in case. There was plenty of egg whites, however.

30 minutes was too long. I would say more like 10 minutes, then flip and then another 10 minutes. Or perhaps reduce the temperature.

Enjoy!


Like this post? SHARE it!

Related Posts Plugin for WordPress, Blogger...