DIY Fall Treats: Tasty Acorns

Tasty Acorns 1

 I just about had a fit when I started to put this post together because my SD card decided that it wanted to be corrupted and not let me have access to my pictures. But you know what? I showed it who is boss and it eventually gave me my pictures. So you can see the beauty of these adorable little fall treats!

Today is the very last day of summer did you know that? Can you believe that? I sure can! And I’m completely ready for fires and everything cozy. I love fall wardrobes. Everything gets covered up, tucked in, and just more comfortable. Less intense and less need to be in shape.

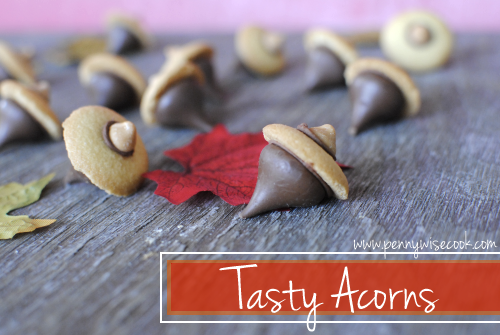
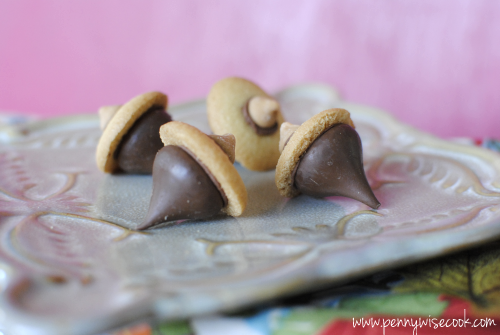
So you can eat chocolate, right?! Aren’t these acorns just the cutest little fall treats? They are so easy to make and adorable to just set around for a treat. Not to mention that they taste amazing. Anything with a Hershey Kiss on it is going to make your mouth happy.

Tasty Acorns 3

 I made a bunch of these one night and it took me no time at all. Such a fun craft for the kids to enjoy with you. And because it’s so easy you can just let them take over! Just don’t let them eat too many before bed or they may never sleep. Again…

Tasty Acorns 2

 I didn’t put together step by step pictures for you because this one is easy enough. If you have questions please don’t hesitate to ask!

Tasty Acorns
With a few simple ingredients you can make tasty and edible acorns for the fall!
Write a review
Print
Ingredients
  1. Hershey Kisses
  2. Mini Vanilla Wafers
  3. Butterscotch Morsels
  4. Chocolate Frosting
Instructions
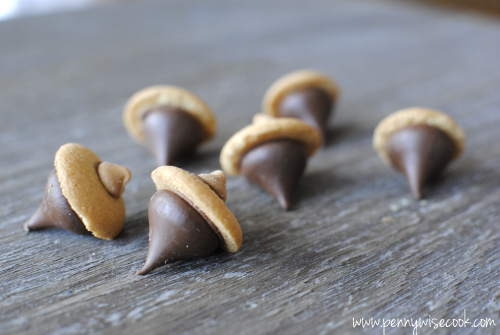
  1. Begin by placing a teensy bit of frosting in the middle on the bottom of the vanilla wafer. Press the flat side of the Hershey Kiss into the frosting and twist a little to attach it.
  2. On the top of the vanilla wafer, at a very teensy bit of frosting in the middle and press the flat side of a butterscotch morsel to the frosting, twisting a bit to attach.
  3. Set aside and allow the frosting to "crust" a bit which will help them to stay attached.
Notes
  1. I would serve these the same day or at least by the next day you plan to make them. The frosting can make the vanilla wafer begin to get a little soggy. I like when this happens but if you want them to be crisper you will want to serve them soon.
  2. Keep them in an air-tight container until ready to eat.
Pennywise Cook http://www.pennywisecook.com/

Like this post? SHARE it!

Related Posts Plugin for WordPress, Blogger...

Krispy Oreo Cookie Balls


I remember the very Christmas that I was introduced to what was called “Oreo Balls”. The most wonderful and decadent morsels made of crushed Oreo cookies and cream cheese all contained within a crust of white chocolate.

It does not get any better than that.

I must have made them 5 times that Christmas for different functions. And they have become a go-to treat ever since. While some desserts and treats can end up so stressful over the holidays, it’s always nice to have something like these Oreo Cookie Balls to fall back on since they are so easy! And not to mention that they taste amazing.

The best part is that you can practically make them festive for any holiday. Christmas is especially fun because they easily look like little snowman heads. Or simply add some red or green glitz and glam with sprinkles while they are still wet. Put them on a stick or serve them in a bowl!

You can find some super fun ideas for creating your own festive Oreo Cookie Balls HERE. There’s everything from penguins to Nutter Butter Cookie Ball ideas there. I also think that the pretzel idea for reindeer antlers is genius! You can also follow @Oreo on twitter for more cookie ball inspiration.

I made this last batch a little more on the simple side when it came to decoration. My coloring didn’t exactly work out for turning red, so I settled on pink which didn’t really matter because they were just going to get eaten anyways.

The biggest change that I made this time around was a complete experiment. I attempted to merge 2 of my favorite treats into one: Oreo Balls and Rice Krispy Treats. I decided to make them both as normal and then simply stir them together and finish off the cookie ball recipe as normal. Hence the name Krispy Oreo Cookie Balls. While the first day that I made them they were Krispy, I must confess that they lost that “krispiness” after the next day or so. That cereal tends to become soggy after a while so it didn’t surprise me. But I will say that I liked the way that the Rice Krispy Treat made the Oreo Balls lighter and not as rich. I also used Almond Bark instead of regular semi-sweet chocolate chips.

We enjoyed them!

Pure bliss in every bite. They are addicting and sure to be a hit at any holiday gathering! I’ll give you the original recipe and also the recipe that I made in case you want to try it out.

Original Oreo Cookie Balls
Ingredients
  • 1 pkg (8 oz) Cream cheese, softened
  • 36 Oreos, finely crushed (about 3 cups)
  • 4 pkgs (4 oz) semi-sweet baking chocolate, melted
Instructions
  1. Mix cream cheese and cookie crumbs until blended.
  2. Shape into 48 (1-inch) balls. Freeze 10 min. Dip balls into melted chocolate; place in a single layer on a pan covered in wax paper.
  3. Customize how you’d like!
  4. Refrigerate an hour or so until set.
  5. Enjoy!


Krispy Oreo Cookie Balls

1 pkg (8oz) cream cheese, softened
36 Oreos finely crushed (about 3 cups)
1 pkg Almond Bark, Melted

Mix cream cheese and cookie crumbs until blended.
Meanwhile heat 3 tbsp milk in a sauce pan over low heat. Add 10 oz bag mini marshmallows and stir until melted.
In a large bowl, add 6 cups Rice Krispies to melted marshmallows. Combine well.
Stir together Rice Krispies Mixture with Oreo Mixture until well-combined.
Shape into 48 (1-inch) balls. Freeze 10 min. Dip balls into melted almond bark; place in a single layer on a pan covered in wax paper.
Customize how you’d like!
Refrigerate an hour or so until set.
Enjoy!

This is a sponsored post written by me, made possible by Yummly, on behalf of Oreo. All opinions expressed are 100% my own. For more information, review my disclosure policy.


Like this post? SHARE it!

Related Posts Plugin for WordPress, Blogger...

Strawberry Rice Krispie Treats

It’s only the first week out of school and I’m finding my snack stash to be a little on the low side. Sure I’ve bought the same as usual like I’ve always done throughout the year, but then it dawned on me….she’s home now.

When Addie would have been learning to spell small words, she is now asking for a Pop-Tart. When she would have been learning to add simple addition problems, she is now asking for a peanut butter and jelly sandwich. And when Addie would have been out burning off energy on the playground, she is now asking for a piece of candy or popsicle. It’s a never-ending viscous cycle.

She comes to me and asks for something to eat.

I say no.

She comes back 3 minutes later.

I say no.

And the process continues. Am I the only one experiencing this? I feel bad sometimes, like I’m depriving her of her basic needs! But I have to remind myself that she just ate lunch 15 minutes ago and that her main reason for snacking is boredom. I, myself, have that same issue so I can relate. But do as I say, not as I do!

So as I’m telling you all of this, I’m realizing that it’s not exactly a great way to relate my life to these super tasty treats. But I digress and will now tell you about this awesome new discovery that I made!

So I told you earlier this week that I put together a super cool Mickey Mouse party for my now 2 year old. I had so much fun planning this party, it’s ridiculous. This idea came to me when I was figuring out the color scheme.

I wanted RED Rice Krispie Treats. I was thinking what can make things red? Food coloring? Yes, but it’s weird sometimes when things are an unexpected color, but don’t taste any different. (Anybody remember the green ketchup years ago?) Kool-Aid? Maybe. J-ELLO! That’s it!

The rest is history y’all. I whipped up a batch of the original Rice Krispie Treats, but added a box of sugar-free Strawberry J-ELLO to the melted marshmallows before adding them to the Rice Krispies! They turned out delish. They remind me of the Crunch Berries in Cap ‘N Crunch cereal!

You should have seen me when I realized the possibilities. You can make them any flavor that you’d like! Simply add the box of J-ELLO to your melted marshmallows before mixing them with the Rice Krispies. Done deal.

And for the record, I was a teensy bit saddened that they didn’t end up red. I should’ve known that red and white make pink, DUH. Either way, I was very happy with the way they turned out.

Strawberry Rice Krispie Treats
Recipe Type: Snack, Dessert
Author: Pennywise Cook
This simple trick can get you several different tasty flavors of marshmallow treats!
Ingredients
  • 3 Tbsp Butter
  • 4 Cups Mini Marshmallows
  • 6 Cups Krispy Rice Cereal
  • 1 Pkg Sugar-Free Strawberry J-ELLO Mix (or any flavor you like)
Instructions
  1. In a large saucepan, melt butter over low heat. Stir in marshmallows and until melted.
  2. Add package of J-ELLO and mix until disolved. Remove from heat.
  3. Add the Rice Krispies and stir until well coated.
  4. Place into a well-greased jellyroll pan or casserole dish and let set.
  5. Cut into squares and enjoy!


Like this post? SHARE it!

Related Posts Plugin for WordPress, Blogger...

Butterscotch Pretzel Treats

Thanksgiving is in TWO days! This year has just flown by. Have you finished all your big feast shopping? I sure hope so, because the stores are nuts about now. I was in a few stores the other day and just gave up. You know those trips to the store when you have only a couple of items. Then you get in line only to realize that for those 2 items you’ll have to wait in line for 20 minutes. That’s about the time that I start to justify whether or not it’s absolutely necessary that I get those items.

I usually just give up.

I wanted to share with you guys these awesomely yummy treats that I made the other day. When I’m feeling experimental, I pick up things I think might go well together and then kinda throw it together. As you know, sometimes it works well and other times, well, it completely bombs.

I’m human and a novice cook, so what can I say?

So this is why I was so very happy when these tasty Butterscotch Pretzel Treats turned out so yummy! So easy with just 4 simple ingredients and they take literally minutes to make.

They resemble that of rice krispie treats, but I used pretzels instead of the rice krispies. And oh did that make them yummy. I just love the hint of salty that  you get with these sweet treats.

The first thing you want to do is get all of the pretzels out of the bag. The reason that I want to unscore pretzels is because the bag tends to have a ton of salt at the bottom, so don’t just pour the entire bag of pretzels into your ziploc. Use your hand to get them out leaving all the salt at the bottom of the bag.

Use meat mallet or something heavy to break up the pretzels a bit.

It’s really not essential that you make them super small. Just get them fairly broken and be done. Put them in a bowl.

Then it’s time to melt up your marshmallows with a little bit of milk. This may be the longest step in the whole process.

Pour the melted marshmallows in with the pretzels and use your spoon to mix it all up really well. There tends to be pretzel crumbs at the bottom, so make sure to incorporate those too.

Pour it all into a greased 9×13 dish and flatten out. Set that aside while you get the butterscotch going.

Using your preferred method, melt the butterscotch chips until smooth. Some people feel comfortable using the microwave, but I’m not good at that so I always use a make-shift double boiler for this.

Pour the melted chips over the marshmallowey pretzels and place in the refrigerator to set.

Cut into bars and serve! It’s so easy to make these and they are SO good. A nice little change from your everyday rice krispie treats, don’t ya think?

Butterscotch Pretzel Treats
Recipe Type: Dessert, Snack
Author: Pennywise Cook
With only 4 ingredients, these Butterscotch Pretzel Bars and easy AND incredibly yummy!
Ingredients
  • 1 12 oz Package Butterscotch Chips
  • 1 12 oz Package Pretzel Sticks
  • 1 10 oz Package Mini Marshmallows
  • 2 Tbsp Milk
Instructions
  1. Remove the pretzels from their bag and transfer to a large ziploc bag. Make sure to use your hands to remove them and not pour the entire bag in. This will avoid getting all of the salt into your treats.
  2. Using something heavy, break the pretzels inside the ziploc until fairly small. Pour into a mixing bowl.
  3. Place the milk into a large saucepan. Pour in marshmallows and melt over medium heat until smooth.
  4. Pour the marshmallows into the pretzels and combine well. Making sure to get the pretzel crumbs incorporated well. Pour into a greased 9×13 dish and flatten with the back of a wooden spoon.
  5. Meanwhile, melt bag of butterscotch chips in microwave or over a double boiler until smooth. Pour over pretzel mixture and spread completely over top.
  6. Place in refrigerator to set. Cut into bars and serve!


Like this post? SHARE it!

Related Posts Plugin for WordPress, Blogger...

Peanut Butter Choco-Banana Ice Cream

I am an absolute ice cream fanatic. There, I said it. It’s in my top favorite sweets out there. I have issues practicing portion control when a tub is placed in front of me. So as you can imagine, I try not to get into that position very often.

A while back, I shared a recipe for 1-Ingredient Banana Ice Cream over at Saving with Amy. For ice cream lovers like myself, this is quite a discovery that makes eating ice cream a little less guilt-stricken. You see, all it takes to make a batch of creamy and smooth no-add sugar banana ice cream is to freeze a few sliced bananas and then pop them into a food processor!  I know, right?

I can just feel you saying SHUT UP!


But around here, where there’s banana you’ll almost always find peanut butter. They go together like milk and cookies or Lucy and Ethel……..

….or perhaps me and ice cream.

I have a history of pairing peanut butter and banana together.

Exhibit A:

If you’re a fan of the duo, those are some recipes you could try.

Not only did I add in some peanut butter, I also added in another fave of mine…chocolate! There is nothing better than the combination of those three in harmony taking a dip in my ice cream cone. So soft and creamy.

That’s the stuff! And I just love that this is available whenever I’m ready. The bananas can be frozen for weeks or sometimes even months in the freezer and then popped out to be made into ice cream when you have a craving. And of course, you probably have a little powdered cocoa in the pantry along with some peanut butter.

3- Ingredient Peanut Butter Choco-Banana Ice Cream
Recipe Type: Dessert, Ice Cream
Author: Pennywise Cook
The base of this natural ice cream is simply frozen bananas. Add in some yummy touches like peanut butter and cocoa for an extra treat!
Ingredients
  • 2 Cups Frozen Banana Slices
  • 1 Heaping Tbsp Peanut Butter (creamy)
  • 2 Tsp Cocoa Powder
Instructions
  1. Place the bananas in a food processor and pulse until the bananas start to break up. Add in the peanut butter and cocoa.
  2. Process until small beads are created then scoop into bowl and ice cream and serve!
Notes

I must admit that these are complete estimates for the peanut butter and cocoa. I did not measure exactly but I don’t see how you could really mess this one up. 🙂


Like this post? SHARE it!

Related Posts Plugin for WordPress, Blogger...

Chocolate Chip Cookie Dough Dip

How did your Valentine’s Day go? Oh really? Uh-huh. Interesting… Well if you had a less than satisfactory day (or even if you had a great one), you might just want to dig into this little sumthin’ sumthin’ here…

You are about to be amazed. How incredible does THAT look? Couldn’t you just dive right in? Well you really can, because it’s actually healthy. How many times have you been making cookies and stolen a bite or two of the dough? It’s almost humanly impossible for me not to. That’s probably why I don’t make cookies that often. I’d be as big as a house. I digress…

This cookie dough “dip” has a secret and it’s not going to tell anyone. I am- Chickpeas! Yes, that’s right. Those little garbanzos that no one knows what to do with half the time actually add something nutritional and special to this dip. It’s also been called “dessert hummus”, but I’m not too keen on that title. There are a ton of different versions of this dip everywhere right now. They are all very similar either being very smooth or very chunky. With or without sweeteners. With or without oats. It’s all a matter of taste. This recipe is the one that I enjoy the most, but you can feel free to adjust it to your liking.

Everyone always want to know what to dip these in. I’ve used vanilla wafers and graham crackers. And don’t tell anyone (I’m totally going to look like a pig now), but you can also pile some into an ice cream cone and eat it like ice cream. I don’t have ice cream in there with it, but that might be delicious too. I prefer the sugar cones over the others.

It’s fantastic and I can say that on my scouts honor. My husband and I devoured an entire bowl of this the other night. Not needing crackers or cookies to dip in it, it’s lovely right out of the bowl. You will want to make this tonight, I can almost guarantee it. Here’s the recipe, exactly as I made it.

You can find similar recipes for “dessert hummus” at Nourishing Flourising, Chocolate Covered Katie and Food Doodles. All fabulous! This one is kind of a mixture of those.

Chocolate Chip Cookie Dough Dip

Chocolate Chip Cookie Dough Dip

A dessert hummus recipe that no one will ever guess what's in it! Healthy but equally as delicious.

Ingredients

  • 1 Can Chickpeas, Drained and Rinsed
  • Pinch of Salt
  • 1 Tsp Vanilla Extract
  • 1/4 c. Peanut Butter (Natural if preferred although I’ve used Peter Pan Honey Roasted before and Reduced Fat even works!)
  • 1 Tbsp Milk (skim is healthiest!)
  • 2/3 c. Brown Sugar (Even Splenda Brown Sugar works!)
  • 2 Tbsp Oats (optional)
  • 1/3 c. Chocolate Chips

Method

  1. Place all ingredients, except chocolate chips, in food processor and mix until very smooth.
  2. Add in chocolate chips and stir. Serve with graham crackers or devour right out of the bowl.

Notes

I tried using less chocolate chips to be “good” and it’s just not the same. I usually end up adding more than the recipe calls for. 😉 If you don’t prefer the grit of the brown sugar, you can try using 1/4 + 2 Tbsp of maple syrup like Food Doodles does. This makes it very fluffy!

P.S.- you can also use White Northern Beans or Cannelini Beans in place of the Chickpeas if you’re seeking a smoother texture. I just prefer a thicker dip. 🙂 Also, I recommend refrigerating it a bit before eating. It thickens up a bit and tastes better chilled to me.

http://www.pennywisecook.com/to-die-for-cookie-dough-dip-its-healthy-too/


Like this post? SHARE it!

Related Posts Plugin for WordPress, Blogger...